
5th Gen Midmark M9-050 Installation Guide
 In a recent article on our website, we discussed the new 5th Gen Midmark M9-050 steam sterilizer. This latest release from Midmark brings a fresh perspective to a classic product, incorporating various features that propel the original M9 into the future of medical technology. As this autoclave prepares to enter the market, we have the information you need for integrating it into your practice. In this article, we will review the installation guide for the 5th Gen Midmark M9-050, providing the manufacturer’s instructions for proper installation of the 5th Gen Midmark M9-050.
If you have any questions about this or any other topic, feel free to contact us at 704-966-1650, Option 3, for our Free Tech Support Line.
5th Gen Midmark M9-050 Installation Guide
In this section, we’ll cover the manufacturer’s installation instructions.
Location Requirements
 Support Surface
- Surface should be water-resistant material (e.g. laminate, stainless steel, solid surface materials, stone)
- Surface must be level to ensure chamber fills with correct water level. Improper water level in the
chamber could cause a sterilizer malfunction. - Surface including clearances should meet these minimum dimensions:
Depth (front to back w/plug) M11® – 67.3 cm (26.5 in) M9® – 59.7 cm (23.5 in)
Width (side to side) M11 – 55.4 cm (21.8 in) M9 – 50.3 cm (19.8 in)
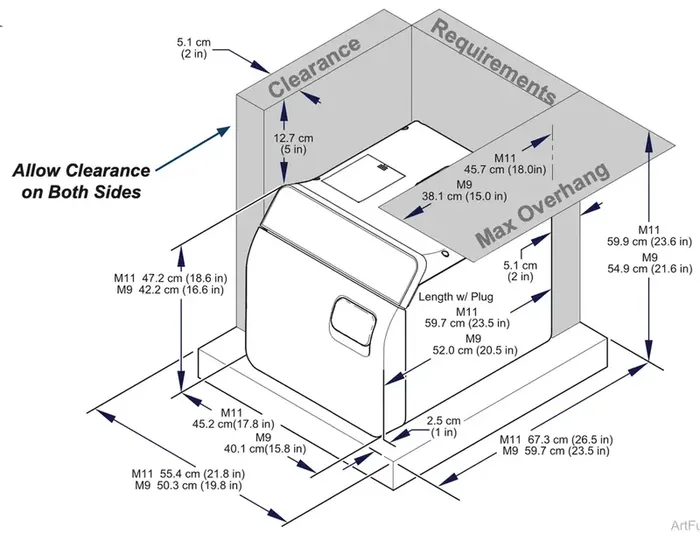
Clearance Requirements
To ensure proper air circulation and to allow access to the power cord, adhere to the minimum clearance requirements listed below. If the sterilizer will frequently be operated without pauses between cycles, position unit where steam will not damage materials or equipment in the surrounding area. If the sterilizer will be used in an enclosed area and will frequently be operated without pauses between cycles, a direct to drain solution is recommended.
- Back of Unit – Back Wall – 5.1 cm (2 in)
- Front Support Surface – Front Sterilizer – 2.5 cm (1 in)
- Sides of Unit – Side Wall – 5.1 cm (2 in)
- Distance above Unit – 12.7 cm (5 in)
- Maximum Upper Overhang – M11 – 45.7 cm (18 in) M9 – 38.1 cm (15 in) (from back of sterilizer)
- Under Cabinet or Shelf – M11 – 59.9 cm (23.6 in) M9 – 54.9 cm (21.6 in)
Relocation Requirements for Sterilizer
- Disconnect power cord from electrical outlet and allow sterilizer to cool.
- Drain water from reservoir to prevent water from spilling. Refer to Weekly Care for process
- Perform Qualification Testing. Refer to Qualification Testing for details.
- It is recommended to use two persons when moving or lifting sterilizer.
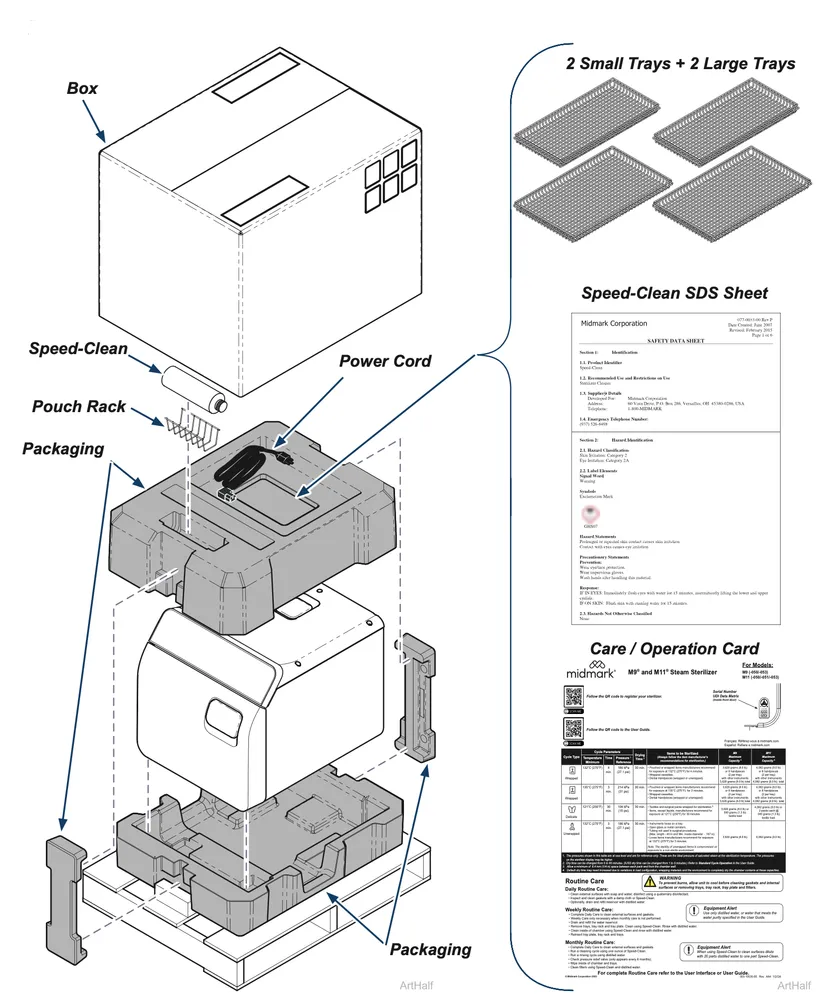
Unboxing the M9 Steam Sterilizer
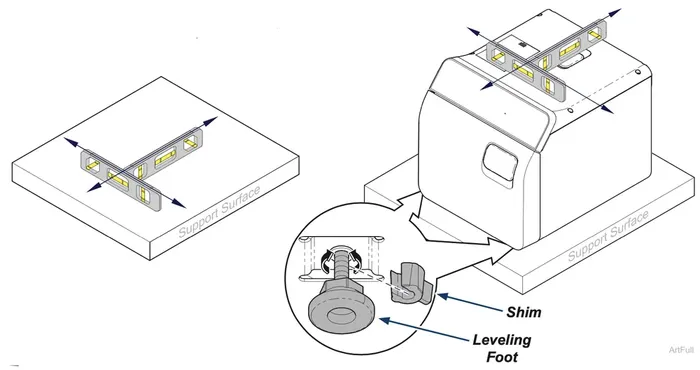
Leveling Procedure
Step 1: Leveling Your Sterilizer
A) Place a level on top of support surface to ensure it is level front to back and side to side. If the support surface is level, verify the leveling feet are tightened securely against the shim. There is no need to adjust the sterilizer in this case.
B) If support surface is not level: Use pliers to remove shims from between leveling feet and base of sterilizer to raise or lower leveling feet located under front corners of sterilizer.
C) Place a level on top of sterilizer, thread leveling feet in or out of bottom of sterilizer until the sterilizer is level front to back and side to side.
 Connecting the Power Cord
Equipment Alert – For optimal performance, allow sterilizer to reach room temperature before operating.
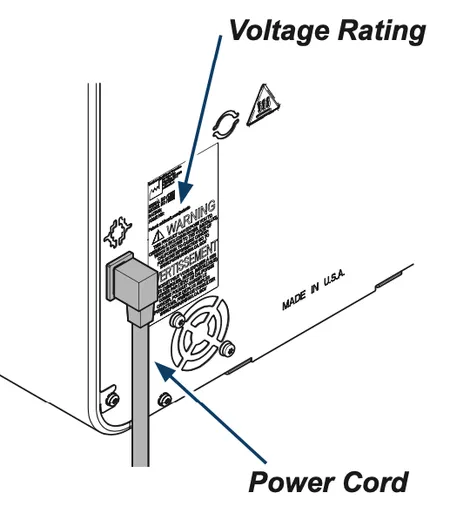 Step 1: Connect the power cord
A) Plug power cord into receptacle on back of sterilizer.
B) Plug power cord into a properly polarized and grounded receptacle. A dedicated circuit only used for the sterilizer is recommended.
C) M9® and M11® are not equipped with an on/off switch. The display operates off low power similar to a microwave oven display.
D) Allow approximately 30-45 seconds for initial start up.
User Interface Setup
The Midmark M9® and M11® Sterilizers are equipped with a touch screen display. Use the touch screen to perform the user interface setup by following the on-screen prompts and steps.
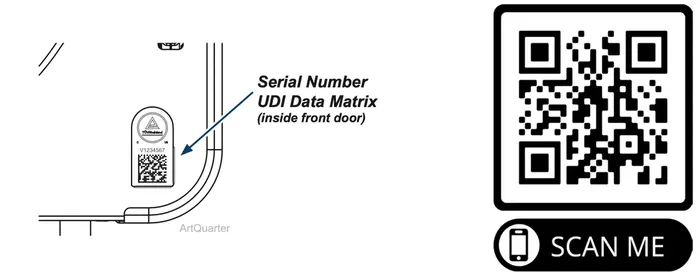
Scan the QR code below to register the sterilizer.
Enter the serial number off of the label located inside the door on the bottom right corner.
 Note
Note
These settings can be edited at any time by accessing the Settings menu by pressing the Menu icon on the left of the home screen. Refer to the Settings section in this guide for details.
Important Information
Intended Use
The Midmark M9® and M11® Steam Sterilizers can be used in medical and dental offices, hospitals, clinics, nursing homes, laboratories and other facilities to sterilize heat and moisture stable reusable items (including dental handpieces) that are compatible with steam sterilization. Refer to Standard Cycle Parameters in this guide for detailed information.
Sterilization Technology
The Midmark M9 and M11 Steam Sterilizers utilize a dynamic-air-removal method to effectively remove air in the chamber and load while generating steam. There are two commonly used dynamic-air-removal systems; one type is pre-vacuum which utilizes a vacuum pump, and the other type is steam-flush pressure-pulse (SFPP), which utilizes a series of steam flushes and pressure pulses without the need for additional vacuum components. Midmark sterilizers utilize the SFPP type of air removal.
FCC Compliance Statement
This equipment has been tested and found to comply with the limits for a Class A digital device, pursuant
to part 15 of the FCC Rules. These limits are designed to provide reasonable protection against harmful interference when the equipment is operated in a commercial environment. This equipment generates, uses, and can radiate radio frequency energy and, if not installed and used in accordance with the user guide, may cause harmful interference to radio communications. Operation of this equipment in a residential area is likely to cause harmful interference in which case the user will be required to correct the interference at his own expense.
Any modifications to this product may violate the rules of the Federal Communications Commission and make operation of the product unlawful.
FCC, IC ID’s and wireless transmitter information can be found in the Settings Menu.
Electromagnetic Interference
This sterilizer is designed and built to minimize electromagnetic interference with other devices. However, if interference is noticed between another device and this product:
- Remove interfering device from room
- Plug sterilizer into isolated circuit
- Increase separation between sterilizer and interfering device
- Contact Midmark if interference persists
Equipment Alert
Portable RF communications equipment (including peripherals such as antenna cables and
external antennas) should be used no closer than 30 cm (12 in) to any part of the device, including cables specified by the manufacturer. Otherwise, degradation of the performance of this equipment could result.
Warning
- Use of the sterilizer adjacent to or stacked with other equipment should be
avoided because it could result in improper operation. If such use is necessary, the sterilizer and the other equipment should be observed to verify that they are operating normally. - The sterilizer is not intended to be used in an environment that contains other equipment that are unique medical emitters such as electrocautery, MRI, electrosurgical units, and diathermy devices.
- Use of accessories, transducers, and cables other than those specified or provided by Midmark could result in increased electromagnetic emissions or decreased electromagnetic immunity of this equipment and result in improper operation.
Wi-Fi and Ethernet Connections
- A remote connection with the myMidmark app is available for 30 minutes after powering on the sterilizer.
- Disconnect and reconnect power to the sterilizer if a connection to the myMidmark app is needed to modify network settings or to re-register the device.
- This sterilizer includes an Ethernet connection and a Wi-Fi module that allows the device to connect to the local network.
- In rare instances, the sterilizer may be unable to connect to a wireless network at power-up due to operating location/environment frequency interference on certain wireless channels. Moving the sterilizer slightly may resolve this issue. Note: Interference conditions may change. Connecting the sterilizer via Ethernet is another option.
- Please consult your IT department/contact to verify the proper Wi-Fi coverage in the area where the device will be used.
- Only products certified to one of the following may be connected to the Ethernet ports.
– IEC 60950-1 and complying with SELV or TNV-1 limits
– IEC 62368-1 and complying with ES or ES 1 limits
- Connecting the sterilizer to an IT-network could result in previously unidentified risks to patients, operators or third parties and the system integrator should identify, analyze, evaluate and control these risks.
myMidmark.com Cloud Service Information
Loss of Connection – If the sterilizer is off-line for:
- Less than a period of 90 days, no action is required to backup or restore authenticated configurations. Midmark’s cloud-based services are backed up and will, in the event there is a loss of services, be restored when the device reconnects to the Midmark cloud services.
- A period of 90 to 180 days, the device may need to be re-registered using the myMidmark app to reconnect to Midmark cloud services.
- More than 180 days, the device must be re-registered using the myMidmark app to reconnect to Midmark cloud services.
On reconnection, authenticated configurations stored in the Midmark cloud services will be synchronized to the sterilizer.
Unregistering a Sterilizer
The sterilizer may be unregistered in the myMidmark.com cloud-based application.
- An unregistered device will be inactivated in the Midmark cloud services. Past activity and data will not be available to any new customer associated to that device. Future activity or data is not associated with a prior customer account.
- Device activity and data is retained in the cloud for a prior customer so that historical data may be retrieved by that customer.
- No data is retained on the device network hardware.
Cybersecurity
Connecting the sterilizer to a local network could result in previously unidentified cybersecurity risks that the organization responsible for the network should identify, analyze, evaluate, and control. The product captures relevant system and security logs to identify date, time, and source of user activity. A software bill of material (SBOM) is available upon request. If a cybersecurity vulnerability or incident is detected while using the sterilizer, or for any other cybersecurity needs, contact Midmark Technical Service for assistance.
Software Update
Within myMidmark.com, a sterilizer software update may be available, and the update may be scheduled to be applied to the sterilizer either immediately or for a specific time.
- If the sterilizer is being used at the scheduled time or up to 30 minutes past the scheduled time, the software update will be canceled and will need to be rescheduled.
- Follow prompts on the sterilizer display as the device may need to be disconnected and reconnected to power.
- If applicable, the device will indicate if qualification cycles should be run after the update.
As always if you have any questions about this process or anything else please feel free to contact us and take advantage of our “FREE TECH SUPPORT.”
We also offer FREE VIRTUAL TECH SUPPORT to “See and Talk” with a “Real Time Live Technician” for any problems you may be in need of help with.
You can also use our “FREE MAINTENANCE PROGRAM”. Take the guesswork and worrying about what unit is due for maintenance and which maintenance cycle it is time for. We will keep track of all your autoclaves and let you know when it’s time for anything.
If you want to see more on the 5th Gen Midmark M9-050 , you can find it on our website here.
If you want more news about all things autoclave or infection control, check out our news tab.