

5th Gen Midmark M9-050 Operation Guide
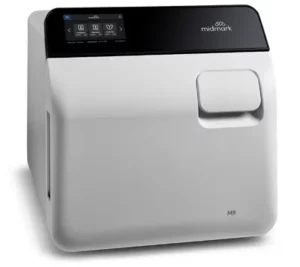 We recently published an article on our website discussing the latest 5th Gen Midmark M9-050 steam sterilizer. Additionally, we have uploaded an installation/setup guide for the 5th Gen M9-050 on our website. As this autoclave is set to be released soon, we have all the information you need to prepare for its introduction to your practice. Moving forward, we will be providing an operation guide for the 5th Gen Midmark M9-050 in this article. This guide outlines the proper use of the autoclave with instructions directly from the manufacturer.
For any inquiries regarding this or other topics, feel free to contact us at 704-966-1650 Option 3 for our Free Tech Support Line.
Operation Guide
Before Operating the Sterilizer
![]() WARNING
WARNING
- Do not use this sterilizer for sterilizing volatile substances or for any purpose
other than its intended design. Burns and toxic or explosive conditions could
result. - Do not force door handle at any time. Chamber pressure may cause door to
open with extreme force. If door handle does not move freely, allow unit to cool and depressurize for 40 minutes before opening door. Failure to adhere could result in serious personal injury. - Do not run the sterilizer without the tray plate in place. If the sterilizer malfunctions, unplug sterilizer and call for service; do not attempt to repair the sterilizer yourself. Doing so could result in serious injury.
WARNING
- Programmable cycles are provided for those applications requiring sterilization parameters different than the preset cycles. These cycles are not FDA cleared for medical use. All material processed in these cycles must be validated by the user to ensure sterility of the processed load.
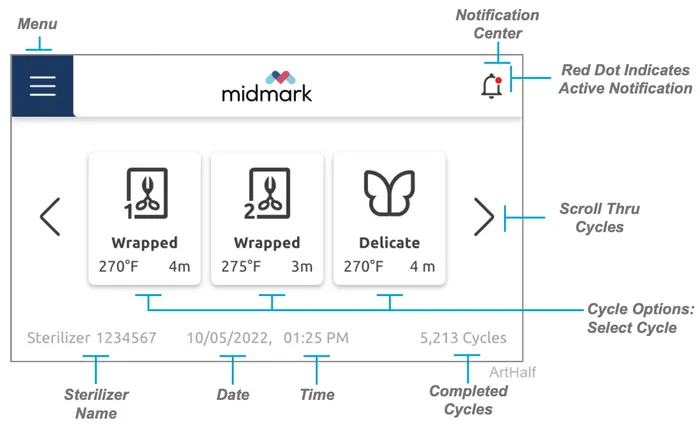
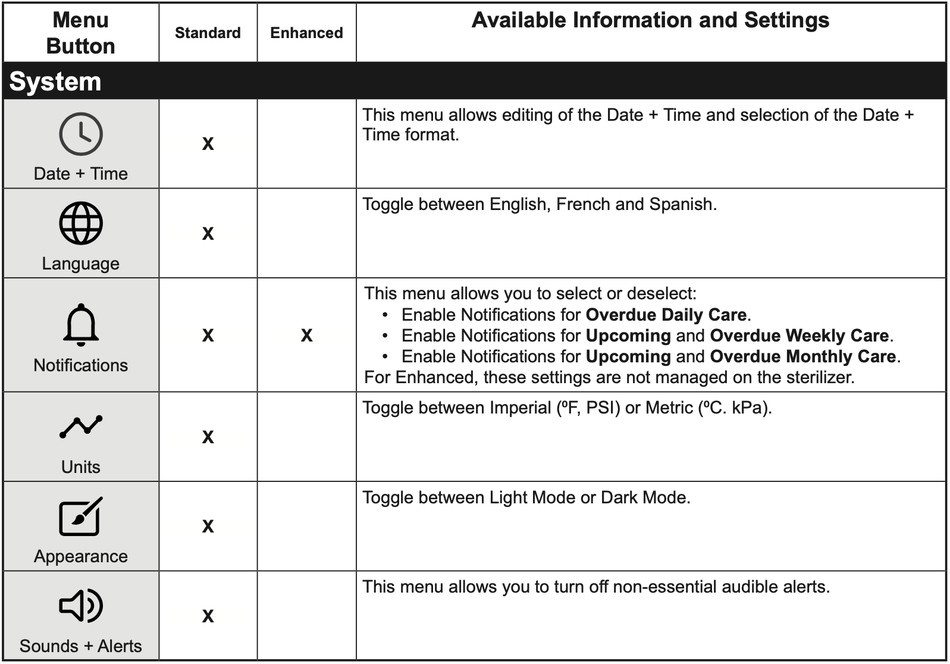
Controls and Interface
The sterilizer controls and indicators are shown in the illustrations on this and the following pages. The accompanying tables describe the function of each control / indicator.
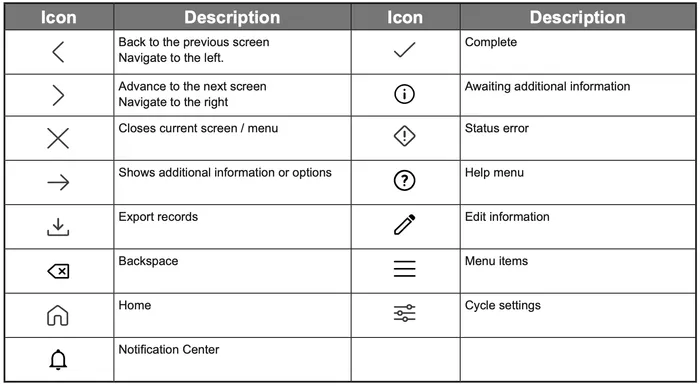
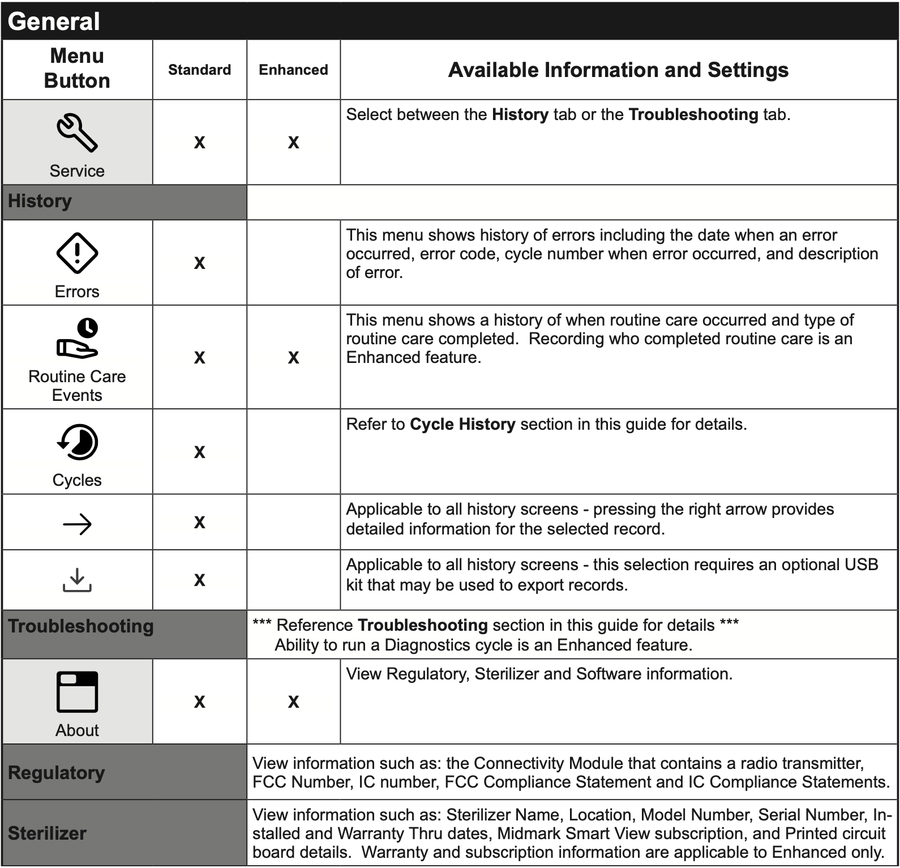
 User Interface Icon Key
 Additional Menus
Pressing the menu items icon on the left of the home screen will give you access to the following information, menus and settings. Additional menus are shown in more detail within this guide.
Note
All options and menus may not be available for your model sterilizer.
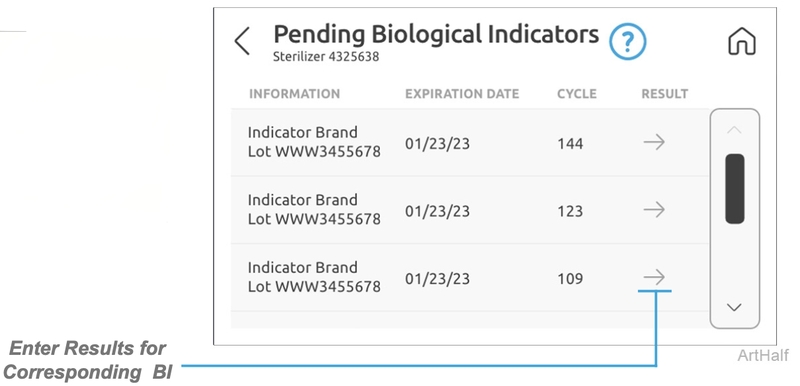
 Biological Indicators (BI)
This screen displays all of the pending BI information as entered by users along with the corresponding cycle information. When the BI results are received they can be entered in the interface by a user as a pass or fail along with any notes. Once the BI results are entered and confirmed for a cycle they are available to view in cycle history.
Note
Notes are for internal use only and not reviewed by Midmark. For additional support contact your Midmark Authorized dealer (see Calling for Service).
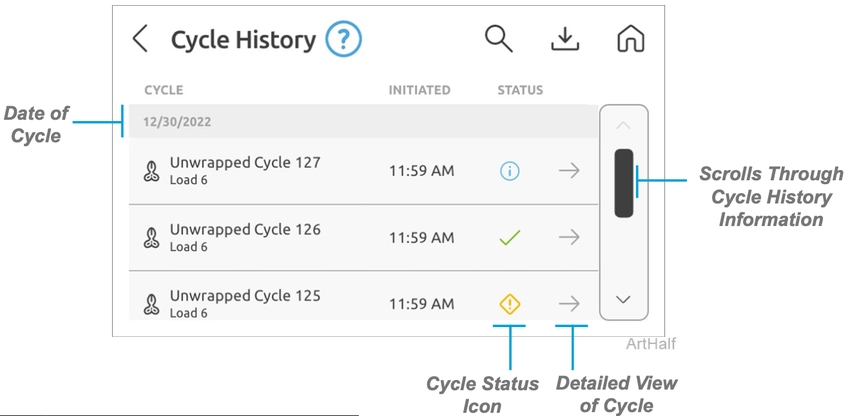
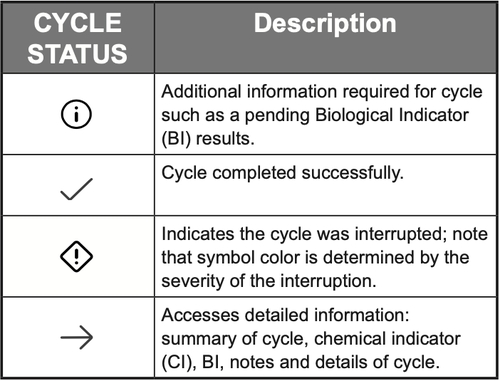
 Cycle History
This screen allows you to view the cycle history with the date, time, cycle type, status and cycle number.
Settings
Within the Settings menu there are three main tabs across the top GENERAL, CYCLES and SYSTEM. Navigating through these tabs will provide access to information and modifying device settings.
Note
All options and menus may not be available for your model sterilizer.
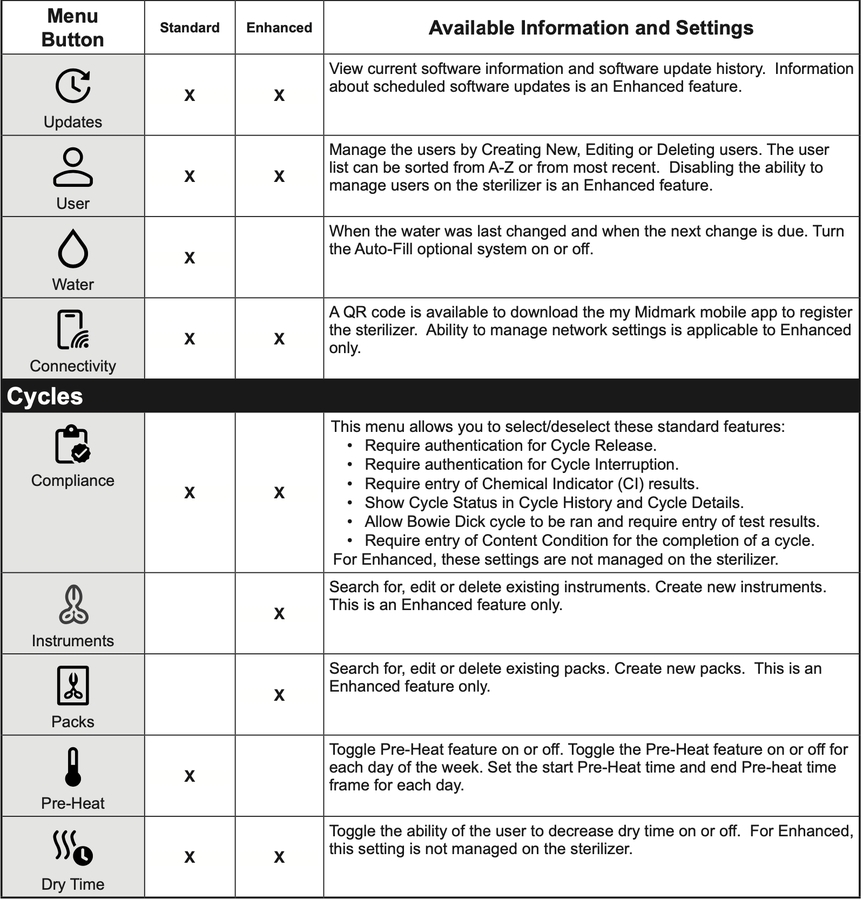
Filling the Reservoir
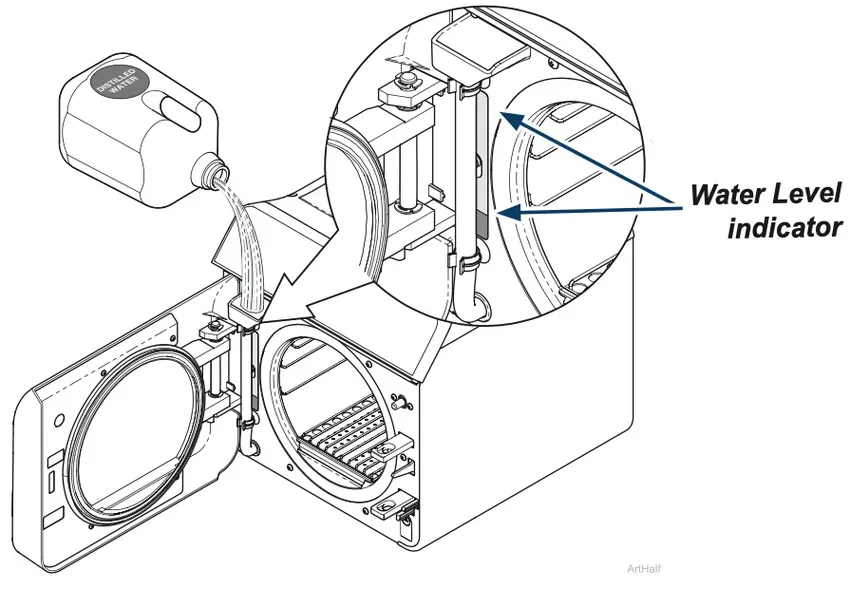 Step 1: Fill Reservoir
A) Open door to unit.
B) Pour distilled water into fill opening until water level reaches the top of the fill level label on the water level indicator tube.
Note: An Auto-Fill optional accessory is available.
Equipment Alert
Use distilled water or water that meets the referenced water purity specifications. Failure to comply may result in sterilizer malfunction and/or premature failure due to excessive corrosion.
Qualification Testing
Qualification testing should be performed prior to placing the sterilizer in service after installation, relocation, major repairs or software updates if indicated in service instructions. Qualification testing should be conducted for the cycle type(s) with the shortest cycle times commonly used in your facility. A test pack that is representative of a load typically processed in the sterilizer should be placed on the bottom tray near the chamber door. Use items that are routinely processed and considered to be the most difficult to sterilize. Also include at least one Biological Indicator (BI) and one Chemical Indicator (CI) in the test pack. Additional items should be placed in the chamber along with the test pack so that the chamber is fully loaded (don’t exceed the maximum capacities listed in the Guidelines for Loading tables in this guide). Three consecutive test runs, for each cycle type tested, with negative results from the BIs and appropriate readings from all CI’s demonstrating complete sterilization, provide verification that the sterilizer will function effectively in the facility in which it is installed. All items processed during qualification testing should be quarantined until the results of the biological testing for all three test runs are available.
Guidelines for Loading
Items to be sterilized should be arranged to permit free circulation of steam, refer to General Guidelines for examples of proper loading.
Equipment Alert
Do not place items directly on the tray rack or tray plate. Always use a tray or cassette rack – otherwise, serious instrument or equipment damage may occur.
Types of Items that can be processed
Before placing any instrument in the M9® and M11® Steam Sterilizer, check with the instrument manufacturer to be sure the materials are compatible with steam sterilization and to verify the acceptability of sterilization parameters. The M9 and M11 Steam Sterilizers are designed to sterilize the following:
- Metal instruments
- Rubber / plastic devices (ex. suction cannulas, impression trays, etc.)
- Steam sterilization packaging for medical devices. (ex. sterilization wrap, paper or plastic
pouches, etc.) - Cassettes (which fit in the sterilizer trays or the cassette rack accessory)
- High / low speed handpieces
- Surgical instruments (ex. Ophthalmology instruments)
Equipment Alert
Do not sterilize items composed of any of the following materials in the M9 or M11. • Corrosion sensitive metals (ex. carbon steel, iron, etc.)
- Fragile items susceptible to breaking under pressure / high temperature
- Biomedical waste
- Plastics that may break down or produce residue when exposed to steam / high temperatures.
Examples
Polyethylene, Styrene, Cellulosics, ABS, PVC, Acrylic (PlexiglassTM), PPO (NorylTM), Latex and Neoprene
Preparing Items for Sterilization
WARNING
Clean and dry instruments thoroughly before placing them in sterilizer. Improper cleaning or drying may result in non-sterile instruments or damage to the unit. Follow instrument manufacturer’s guidelines and industry recommendations for handling and cleaning instruments prior to sterilization.
Instruments must be thoroughly cleaned to remove all residual matter, such as debris, disinfectant residuals, blood, organic tissue, etc. General cleaning guidelines:
- Follow instrument manufacturer’s instructions for proper cleaning and preparation.
- Clean instruments immediately after use to avoid drying of residual matter.
- The use of automated cleaning equipment (e.g. ultrasonic cleaner, instrument washer or washer/ disinfector) is recommended over manual cleaning for clinician safety and cleaning effectiveness.
- After cleaning, thoroughly rinse instruments with distilled or equivalent water type. After rinsing,
instruments should be inspected for damage, debris, detergent residue and then dried before
packaging. If necessary repeat the cleaning process. - If the instrument manufacturer’s instructions require lubrication of the instruments after cleaning, wipe off excess lubricant before packing for sterilization or loading into the sterilizer.
Immediate Use Steam Sterilization
The M9® and M11® Steam Sterilizers are capable of Immediate Use Steam Sterilization (IUSS)
- Sterilizing instruments for immediate use should only be used in urgent clinical situations.
- Instruments should be thoroughly cleaned and prepared for sterilization.
- Sterilized instruments should be aseptically transferred to the sterile field
- Sterilized instruments should not be stored for later use.
- Sterilization records should indicate that IUSS was utilized.
Unwrapped
For an unwrapped cycle, place a surgical cotton towel, paper tray liner or CSR wrap folded to fit on the tray bottom before putting unwrapped items in the tray. Arrange unwrapped items on the towel so they do not touch one another See Photo Below (1).
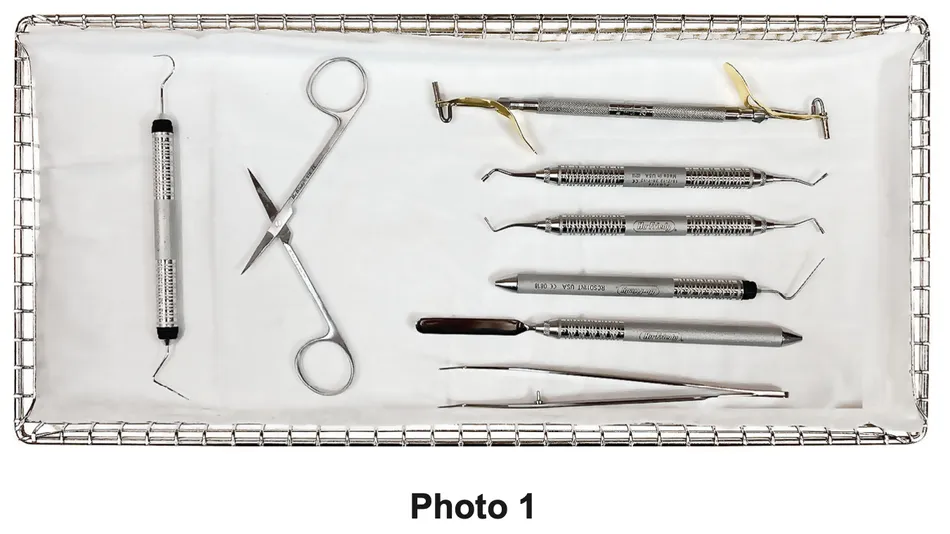
Please consider the following when choosing whether or not to sterilize your instruments unwrapped:
- The sterility of unwrapped instruments is compromised upon exposure to a non-sterile environment. Follow CDC guidelines for using unwrapped, sterilized instruments.
- Due to the sensitive nature of some types of surgery (including, but not limited to ophthalmology), instruments used in such procedures must be wrapped or pouched to maintain sterility and in order to be stored. The water reservoir should also be drained and refilled with fresh distilled water on each day when processing instruments for these procedures on a routine basis.
WARNING
Do not overload the chamber! Adequate space is required around items in trays for steam circulation and drying. Failure to allow adequate space will compromise
sterilization and drying. Items and packaging should be completely dry when removed from the sterilizer to minimize the potential for recontamination.
General Guidelines
- Use only M9® and M11® trays in their appropriate sterilizer. Using other trays could restrict air / steam flow to items resulting in inadequate sterilization and drying.
- All items must fit within the tray and not extend over the lip of the sterilizer tray. Instruments must not scrape the chamber walls when sliding the tray into the chamber.
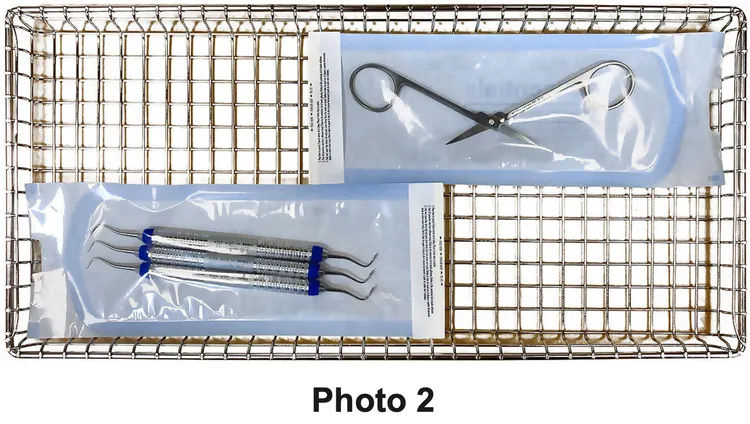
- Jointed items must be sterilized in an open position so all surfaces are exposed to the steam (See Photo Below (2).
 Note
Note
Pouches should be loaded paper side down when loaded flat on a tray. This prevents steam from pooling inside the pouch which can prevent proper drying.
- Reusable Instruments, devices and items must be arranged in a single layer on the trays (not piled or stacked), to permit proper steam flow and drying.
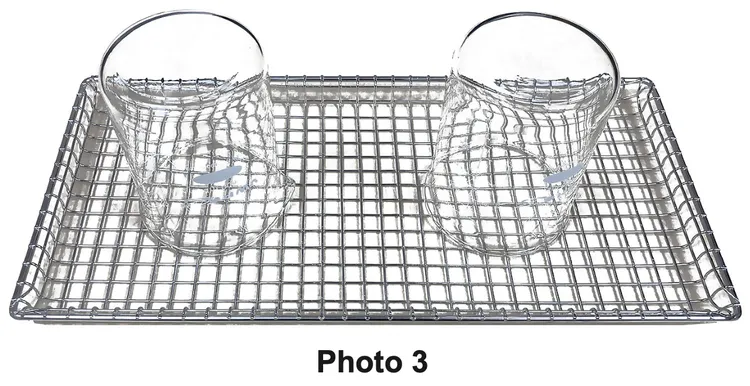
- Glassware or utensils capable of holding water (e.g., bottles, basins, beakers) should be positioned on the tray with the open side down so any water condensate drains from the container (See Photo 3). When sterilizing glassware check with the manufacturer to make sure it is compatible with steam sterilization.
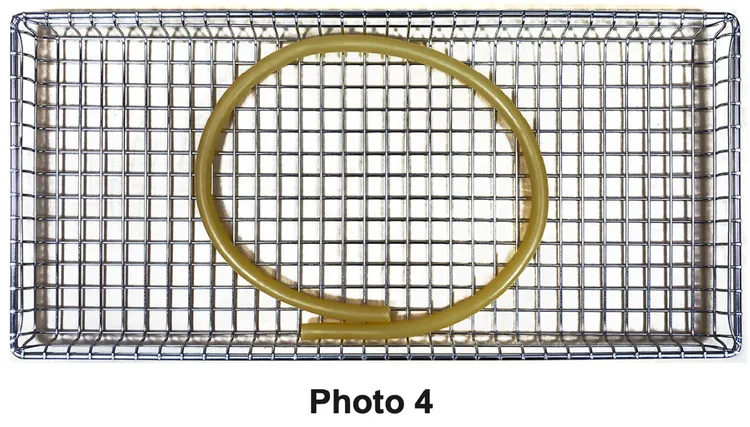
- Rinse tubing with distilled water or water that meets the referenced water purity specifications (see Water Purity Specifications) and do not dry prior to sterilizing. Arrange tubing on the tray so there are no sharp bends and the tubing ends are open and unobstructed (See Photo 4).
- Follow the device manufacturer’s instructions for disassembly of multi-part instruments prior to packaging and sterilization to assure all parts are adequately exposed to the steam.
- If items are being sterilized and stored for later use they must be packaged (e.g., pouched, wrapped) and completely dry when removed from the sterilizer chamber to avoid potential Recontamination.
- Variations in load configuration, size, wrapping materials and the environment may require
the operator to increase the default drying time to assure all packaging and instruments are completely dry. See Standard Cycle Operation in this guide for instructions on adjusting drying time. It is also recommended to run a Pre-Heat cycle prior to running sterilization cycles at the start of each day. - When sterilizing a load with one or more handpieces, utilize the Wrapped 1, Wrapped 2, Unwrapped or Custom cycle depending on the handpiece manufacturer instructions.
Pouching and Wrapping Items
The M9® and M11® Steam Sterilizers are capable of sterilizing pouched or wrapped items to preserve sterility after processing.
- When pouching or wrapping items, use only sterilization pouches and wraps that have been cleared by the FDA and labeled for use with the steam sterilization cycle being used. Follow the manufacturer’s instructions for use.
- Instruments made from different materials (e.g.,stainless steel, carbon steel, plastic) should not be mixed in the same pouch or wrapped pack to avoid potential instrument damage.
- Pouches, wraps and their included instruments should not touch the chamber wall. Clearance allows proper steam circulation and avoids potential instrument damage.
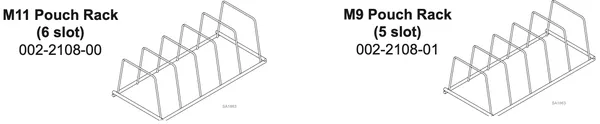
- For proper steam circulation and drying the preferred orientation of pouches is resting on their edge, best accomplished using the Midmark Pouch Rack supplied with the M9 and M11 Steam Sterilizers. If additional pouch racks are needed, order the appropriate kit part number. If more than two pouch racks are used in a single load, additional dry time may be required.
- The use of a Pouch Rack requires the removal of some of the sterilizer trays. When using a Pouch Rack, load a single pouch per rack slot. Orient pouches in the rack so the plastic side of one pouch faces the paper side of the adjacent pouch.
- Pouches loaded directly on the trays will dry best if loaded with paper side down.
- Do not layer or overlap pouches in the trays. Pouches should be loosely packed with the handpieces and instruments single height loaded (not piled or stacked), to permit proper steam flow and penetration to the items (See Photo 2).
- If pouches or wrapped packs are labeled using a marking pen the ink should be nontoxic. On paper-plastic pouches only mark on the plastic side of the pouch. On wrapped packs mark the labeling information on the indicator tape or apply a separate label.
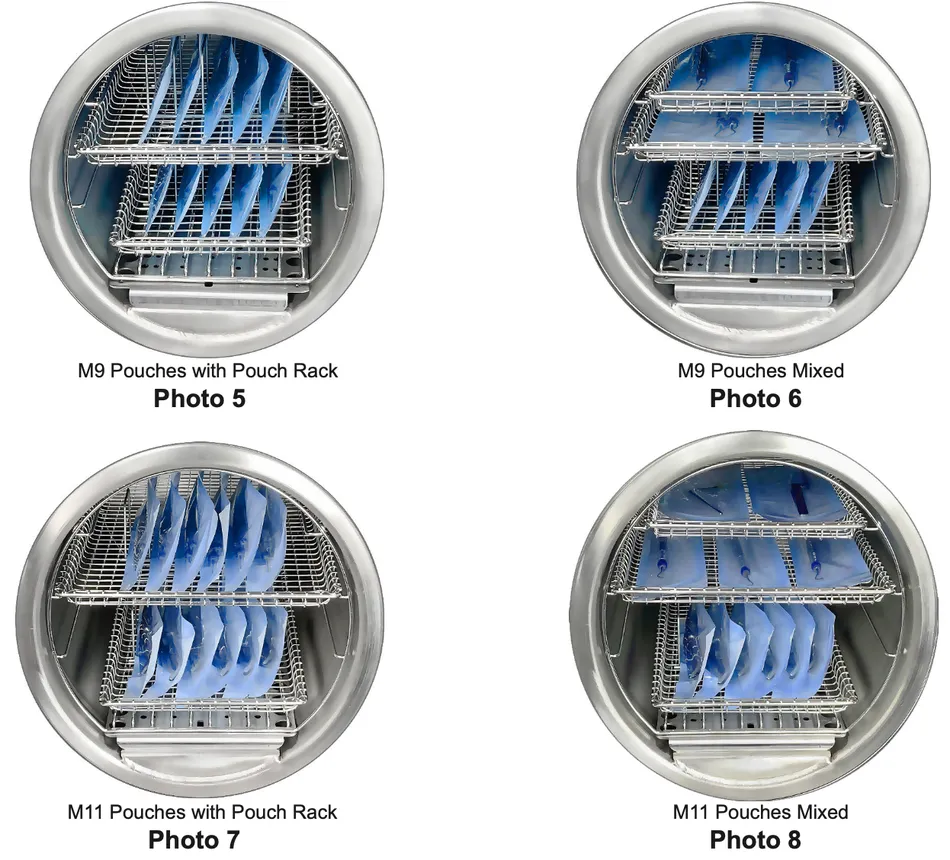
Shown here are some recommended pouch load configurations for the M9® (Photo 5 and 6) and M11® (Photo 7 and 8):
Equipment Alert
Do not place items directly on the tray rack or tray plate. Always use a tray or cassette rack – otherwise, serious instrument or equipment damage may occur.
Note
Heavier loads should be located at the bottom of the sterilizer chamber, unless it will obstruct the transient heat coming from the heater preventing loads above from drying properly.
- When using cassettes in the M9® and M11® Steam Sterilizers, follow the cassette manufacturer’s instructions for use.
- Do not wrap items too tightly. If an item is excessively wrapped, sterilization can be compromised and the wrap is more likely to tear if wrapped too tightly.
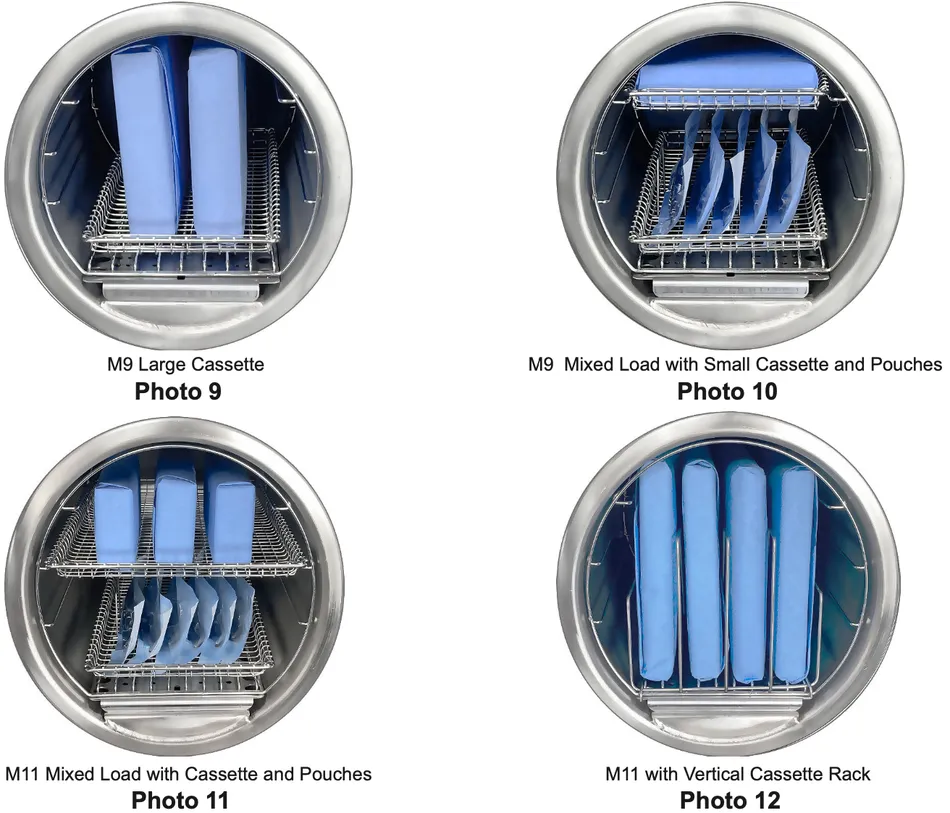
- Cassettes can be loaded on the trays, but they must fit within the boundaries of the tray and they should not touch each other, the tray above or the chamber wall to allow proper steam circulation. The total instrument load, including the cassettes, should not exceed the limits listed in the maximum capacity tables (see Load Size).
- When using the optional Vertical Cassette Rack in the M11, the maximum load including cassettes can be increased to 5.44 kg (12 lb). Additional dry time may be required.
Shown here are some recommended cassette load configurations for the M9 (Photos 9 and 10) and M11 (Photos 11 and 12):
Equipment Alert
Do not place items directly on the tray rack or tray plate. Always use a tray or cassette rack – otherwise, serious instrument or equipment damage may occur.
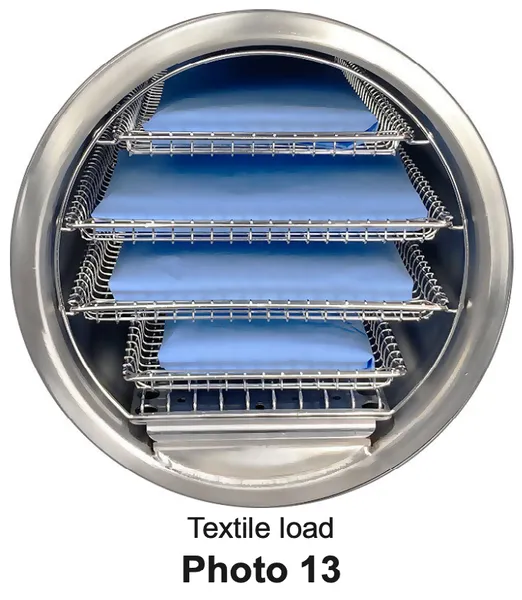
 Textile Loads
- Clean textiles recommended for steam sterilization can be processed in the Delicate Cycle. Verify the acceptability of the Delicate Cycle sterilization parameters with the textile manufacturer to assure the textiles are compatible.
- Textile packs must not exceed the capacity limits specified (see Standard Cycle Parameters).
- Textile packs must fit within the boundaries of the sterilizer trays and not touch the chamber wall.
- If multiple packs are placed on a single tray maintain a minimum of 6.4 mm (1/4 in) between packs for proper steam circulation and drying. (Photo 13)
Equipment Alert
Do not use towels or packaging containing chlorine bleach residue. Failure to comply may cause rusting or discoloration of the chamber / trays and significantly shorten the life of the sterilizer.
 Load Size
Successful sterilization depends on proper loading of the sterilizer. Do not overload the sterilizer chamber! Adequate space must be maintained around all items placed in the chamber to ensure proper steam circulation and adequate drying. Maintaining proper spacing between all items processed should be the deciding factor in determining the maximum load that can be processed.
Standard Cycle Parameters
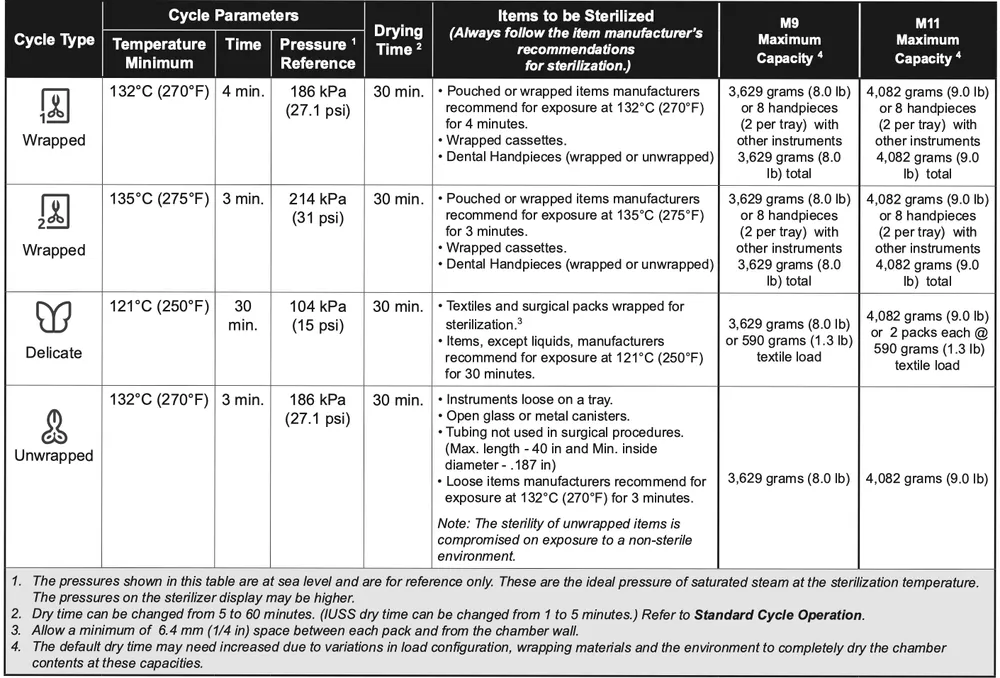
Note
Some features may be disabled in Settings, such as ability to reduce dry time or ability to run an IUSS cycle.
Custom Cycle Parameters
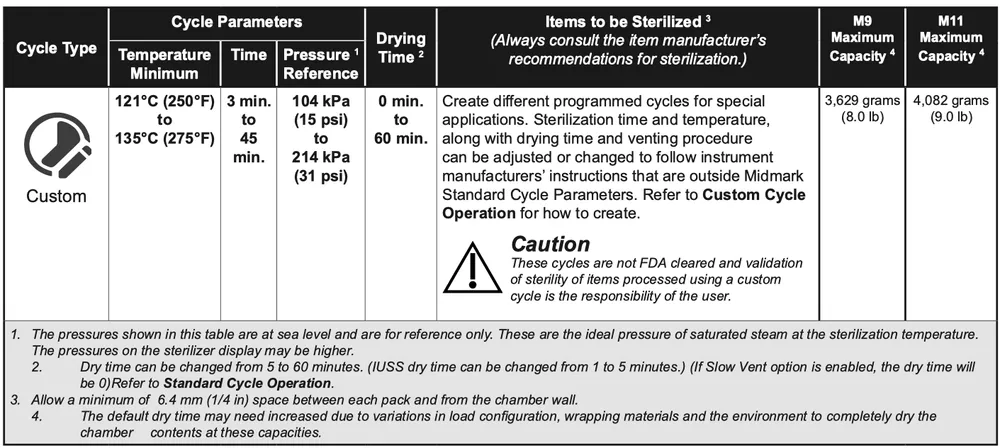 Note
Note
The ability to run a Custom Cycle may be disabled in Settings.
Note
Pre-Heat can be turned on in Settings and activated for certain days of the week and for a time range on those days. This feature keeps the chamber pre-heated, potentially shortening the total cycle time.
Equipment Alert
Using an incorrect sterilization cycle could result in non-sterile items and may damage instruments. Follow instrument manufacturer’s recommendations for sterilization.
Step 1: Select the Correct Cycle
Use right and left arrows to locate correct cycle.
Refer to Standard Cycle Parameters chart for time and temperature specifications.
Note
On units using the metric display,°F will display as°C and psi will display as kPa.
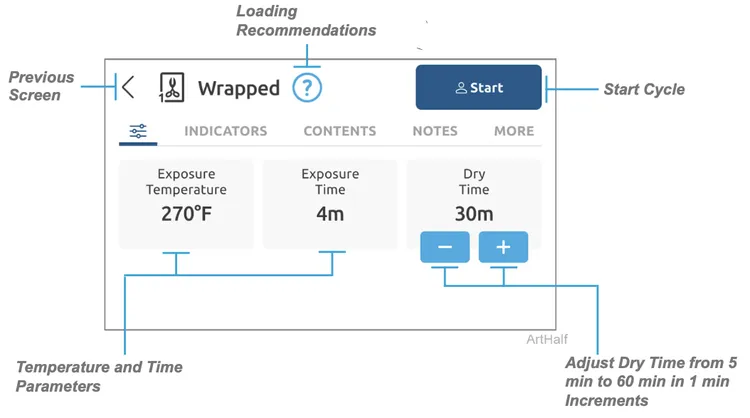 Step 2: Start Cycle
A) Press start.
B) Select user, enter PIN and press start.
WARNING
When closing the door avoid contacting the bottom of the door handle as it may be hot to touch.
The sterilizer will progress through the following listed stages. As the cycle progresses the status bar will move to the right. The current temperature and pressure in chamber will be displayed. A timed countdown will start in the sterilization stage and continue until the cycle and drying are complete.
- Filling – Chamber begins filling with water. When water reaches the proper level the sterilizer proceeds to the next stage.
- Heating – Heating element turns on heating up the chamber. Status bar progresses, temperature and pressure changes are shown. Air purge routines occur during this phase.
- Sterilizing – Sterilizing begins when correct temperature and pressure are reached. Time remaining in the cycle counts down while current temperature and pressure in the chamber are continuously updated. Heating element turns on and off, maintaining temperature and pressure. Status bar continues to progress.
- Venting – When the sterilizing mode completes, the vent valve opens. Steam and water are released back into the reservoir. Status bar progresses, temperature and pressure changes are shown.
- Door Opening – An audible signal is emitted to indicate that the door is about to open. When pressure in chamber reaches zero, the door actuates to the partially open (drying mode) position.
WARNING
Keep clear when sterilizer door is ready to open! Failure to do so could result in severe burns from steam being released.
- Drying – During the dry cycle the heating element is cycled on and off. Time of Dry Cycle is counted down.
WARNING
The processed loads may still be wet if the Dry Cycle is aborted prior to completion. To avoid re-contamination, always allow processed loads to dry in the sterilizer before handling.
- Cycle Complete – Will appear when the cycle is completed
- Cycle Summary – Will appear after the Cycle Complete notification
WARNING
STOP button may be pressed at any time to stop or interrupt a cycle. Items must not
be considered sterile if this occurs before the Dry Cycle is complete or instruments are wet. Sterilizer will return to SELECT CYCLE mode.
Step 3: Confirm Cycle
A) Press next.
B) Select PASS/FAIL for the Chemical Indicator (CI). C) Select DRY/WET for the Contents Condition.
D) Select confirm, select a user and enter the PIN.
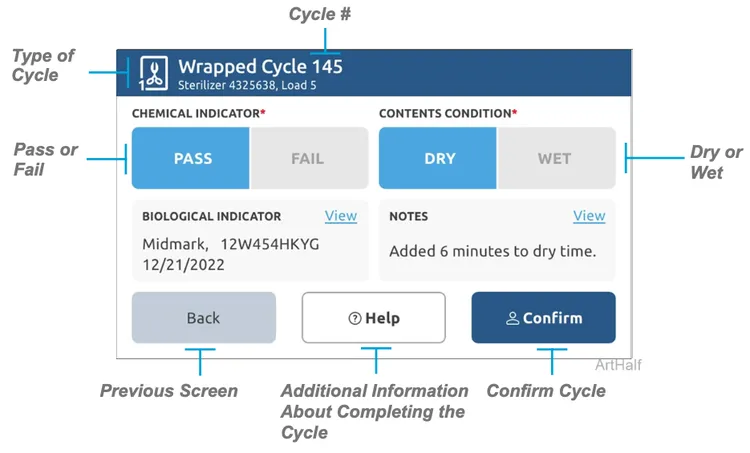
View (BI) – Allows user to see manufacturer, lot number and expiration date of the BI used.
View Notes – Allows user to view and add notes pertaining to the cycle that just finished.
Note
Notes are for internal use only and not reviewed by Midmark. For additional support contact your Midmark Authorized dealer (see Calling for Service).
Warning
The processed load and inner surfaces will be hot. Avoid contact with hot surfaces. Failure to do so could result in serious burns.
Do not apply downward pressure to the open sterilizer door. Doing so could cause the sterilizer to tip resulting in serious burns, or injury from trays or instruments sliding out of the chamber.
If the door does not open due to the chamber not automatically venting, the chamber may be manually vented by pulling up on the pressure relief lever.
Post-Sterilization Handling
After sterilization is complete, all items must be handled in accordance with accepted and documented standards, such as the Centers for Disease Control and Prevention (CDC) documents, “Guidelines
for Infection Control in Dental Healthcare Settings” – 2003, MMWR; 52 (no. RR-17) and “Guidelines for Disinfection and Sterilization in Healthcare Facilities” – 2008, as well as any local requirements that may apply.
Qualified personnel responsible for infection prevention should prepare a protocol for handling sterilized items. This protocol should be followed by all personnel responsible for handling sterilized items.
Custom Cycle Operation
The Custom Cycle can be used for custom applications that are not covered by standard cycles. These cycles have not been FDA-cleared for medical use. The Custom Cycle allows the cycle to be adjusted
or changed to follow instrument manufactures instructions that are outside Midmark Standard
Cycle Parameters. Once a Custom Cycle has been saved it will appear in the main cycles menu and can be used by scrolling to it and selecting it. Settings within these Custom Cycles may be changed with options to Save as New Preset or Update This Preset.
WARNING
These cycles are not FDA cleared. Validation of sterility of items processed using them is the responsibility of the user.
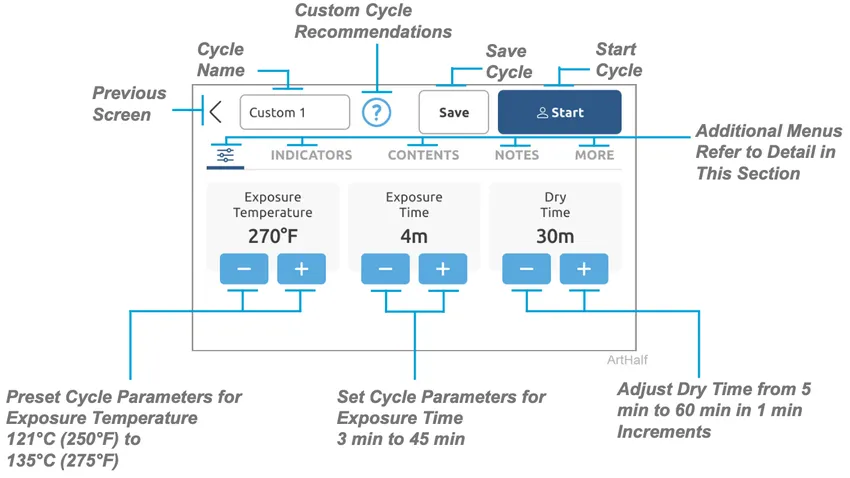
Note
When creating a Custom Cycle a custom name can be given to it.
Note
IUSS dry time can be changed from 1 to 5 minutes. If Slow Vent option is enabled the dry time will be 0.
Note:
Custom Cycles can be programmed for monthly cleaning cycles with no dry time to expedite monthly maintenance.
Once a Custom Cycle is started, the sterilizer will progress through the same basic stages of sterilization as a standard cycle. As the cycle progresses, the status bar will continue to move right. The current temperature and pressure in the chamber will be displayed. A timed countdown will start in the sterilization stage and continue until the cycle and drying are complete.
Note
All options and menus may not be available for your model sterilizer.
 Main custom cycle parameters adjustments: Exposure Temperature, Exposure Time and Dry Time.
- Indicators – Select CI and/or BI indicators to be included in the custom cycle.
- Contents – Select add past content or add/create a new pack or instrument to be included in the custom cycle.
Notes – Add a note to the cycle.
Note
Notes are for internal use only and not reviewed by Midmark. For additional support contact your Midmark Authorized dealer (see Calling for Service).
More – Selection of:
- Immediate Use Steam Sterilization (IUSS) settings.
- Designate this cycle as Qualification Cycle.
- Slow Vent can be activated.
Note
IUSS dry time can be changed from 1 to 5 minutes.
Bowie-Dick Cycle
For the M9® and M11® Steam Sterilizers the Bowie-Dick test is optional and not required. A Bowie-Dick test is a sensitive and rapid means of detecting air leaks and inadequate steam penetration in dynamic- air-removal sterilizers. The test pack should be placed horizontally in the front of the bottom tray with an otherwise empty chamber. Follow the Bowie-Dick test instructions for proper storage, use, interpretation and disposal.
Caution
This cycle is not intended to be used to sterilize instruments.
Step 1: Start Preconditioning Cycle
A.) Empty the chamber of any items or test materials.
B.) Press start.
Note: The preconditioning cycle is performed to raise the sterilizer to operating temperature.
Preconditioning Cycle
- The Preconditioning Cycle will run a complete cycle (filling, heating, sterilizing, venting, door opening and cycle complete).
- There is no drying operation used for the Preconditioning Cycle.
WARNING
The sterilizer is at operating temperature – use a tray removal tool or insulated pad to handle the metal trays.
Note
A test pack must be selected before the Bowie-Dick cycle will run.
Step 2: Start Bowie-Dick Cycle
A) Carefully place test pack near front of lower tray. B) Select a Test Pack and press start.
Step 3: After Cycle is Complete Confirm Cycle
A) Press next.
B) Select PASS or FAIL for the Test Pack.
C) Add notes if needed.
D) Select confirm, select a user and enter the PIN. E) Press Home.
As always if you have any questions about this process or anything else please feel free to contact us and take advantage of our “FREE TECH SUPPORT.”
We also offer FREE VIRTUAL TECH SUPPORT to “See and Talk” with a “Real Time Live Technician” for any problems you may be in need of help with.
You can also use our “FREE MAINTENANCE PROGRAM”. Take the guesswork and worrying about what unit is due for maintenance and which maintenance cycle it is time for. We will keep track of all your autoclaves and let you know when it’s time for anything.
If you want more news about all things autoclave or infection control, check out our news tab.