

W&H Lexa Mini Sterilization Cycles Instruction Guide
Proper operation of an autoclave is essential in ensuring the effective sterilization of medical and dental instruments. By understanding and following the correct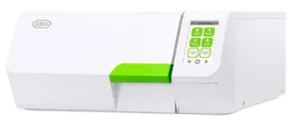 procedures for using an autoclave, healthcare professionals can maintain a safe and hygienic environment for patients and staff. Which is why we do our best to provide the proper information when it comes to operating your autoclave. So in this article, we’ll be going into the sterilization cycles guide for the W&H Lexa Mini autoclave.
These instructions go over all of the options and procedures for the sterilization cycles on your Lexa Mini. The instructions come straight from the manufacturer to ensure the latest information. If you have any questions about the Lexa Mini, maintenance or anything else, please give us a call at 704-966-1650 Option 3 for our Free Tech Support line.
Sterilization Cycles Guide
Sterilization Cycles
WARNINGS
WARNING! Any residual of chemicals (like cleaning and disinfection products), could affect the purity of the steam and consequently the whole sterilization process. If necessary, the load shall be cleaned and lubricated in accordance with the instrument manufacturer’s instructions.
Notice: any residual of chemicals could seriously damage the sterilizer. The manufacturer’s warranty is void in case of damage caused by chemicals.
DENTAL HANDPIECE EXTERNAL DISINFECTION
This procedure reduces the risk of infection during cleaning and maintenance of the dental handpieces.
- Wear protective gloves during disinfection. Avoid using abrasive disinfectants (pH-value2.5–9; no chlorine based disinfectants).
- Use disinfectant wipes rather than spray disinfection.
- Do not immerse handpieces in disinfectants. Residual disinfectants on handpieces can cause extensive damage to your instrumentation during sterilization (oxidation, alteration of technical characteristics of seals, rubbers, fiber optics, etc.).
DENTAL HANDPIECE EXTERNAL CLEANING
This procedure involves the removal of residues (blood, dentine, etc.) that adhere to critical areas such as spray outlets, light ports, knurling etc.
- Wear protective gloves during cleaning.
- Refer to the instructions of the instrument manufacturer.
- Use a soft, damp brush and take care not to scratch the surface of the light ports.
DENTAL HANDPIECE LUBRICATION
Once the dental handpieces has been disinfected, cleaned and dried (free from residues), it must be lubricated prior to sterilization. Follow manufacturer’s instructions for proper lubrication.
PACKAGING
In order to preserve sterility, rotating instruments should be wrapped/bagged prior to sterilization. Follow the manufacturer’s packing instructions when using sterilization packaging.
CLEANING THE INSTRUMENTS
Clean all instruments thoroughly prior to sterilization. If possible, clean instruments immediately after use; always follow the instrument manufacturer ‘s instructions. Remove all traces of disinfectants and detergents. Rinse and dry carefully all instruments.
The instruments and tubes must be carefully rinsed and dried prior to sterilization.
CORRECT LOAD PLACEMENT
WARNING! Do not overload trays and the chamber. Adhere to the maximum load weight limits (see “Sterilization programs” on page 86).
Risk of burns. Before touching, ensure the sterilization chamber is cold.
Wrap items with porous wrapping materials to facilitate steam penetration and drying (e.g. sterilization bags for autoclaves).
Follow these requirements:
Load type Placement
Hinged instruments (e.g., forceps, extraction pliers, etc.) In open position.
Tubes Place tubes on a tray allowing the ends to remain open. Do not bend tubes.
Cassettes Cassettes can only be placed horizontally on the trays. When placing cassettes, slide them into the chamber putting them on trays.
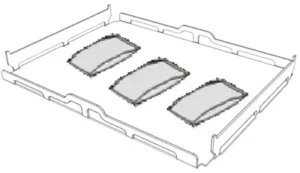
Pouched Items On trays allowing adequate space in-between bags. Ensure that packs do not touch the walls of the chamber. Place sterilization pouched items with the paper side facing up.
(view image below table)
Items made from different materials (stainless steel, carbon steel, aluminium, etc.) On separate trays or wrapped/pouched.
Instruments manufactured from carbon steel Place paper among them and the trays to avoid rusty spots.
Chemical/biological indicator and Helix strip/s For more information see the dedicated documentation.
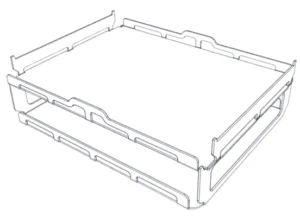
 PARTIAL LOAD
If the chamber is just partially loaded, place the load in such a way that the space in-between the trays is maximized. Spread items evenly on two trays. Below is an example with two 5 liter trays.
 Prepare the Sterilizer
WARNINGS
Notice: use only distilled or demineralized water (see “Water quality” on page 99 for technical requirements). Do not add any chemical / additive to the water.
FILLING THE CLEAN WATER TANK
If no water system is connected you have to fill the tank:
- Switch the sterilizer ON and open the chamber door.
- Fill the clean water tank with distilled or demineralized water until the sterilizer makes a sound.
INSERTING THE TRAYS INTO THE STERILIZER
CAUTION! Risk of burns. Before touching the chamber trays or contents, ensure the sterilization chamber is not hot.
- Open the chamber door and insert the trays horizontally (one above the other).
- Close the door.
- Turn the sterilizer ON: after the initialization the homepage appears.
GENERAL RECOMMENDATIONS
Follow these recommendations to obtain the most from the drying: n Ensure the paper side of the sterilization bags faces up, and that the space in-between bags is enough.
Sterilization Cycle Management
RUN A STERILIZATION CYCLE
Note: if the user management and the label printer functions are enabled, you might be requested to enter your PIN code during the following procedure.
- On the homepage, tap the desired cycle. Tap the right page arrow to display further cycles on the next page, if any.
- Check the cycle requirements.
- If the door gasket is new, hold the door gently closed until the beginning of the cycle.
- Tap the start button and enter your credentials if required: the door locks. If you have not set a different start time, the sterilization starts immediately.
- The sterilization is completed. Tap the page icon to view the cycle summary.
- The sterilization is completed. Tap the page icon to view the cycle summary or tap (legend) to view the cycle information.
- Tap OPEN: the door unlocks and the homepage appears.
- If required, enter your credentials and confirm the load release.
Note: the load release is possible only if the cycle is completed successfully.
Note: the user visually checks that pouches are intact and dry. It is even possible to identify the user who releases the load, accepts the cycle plateau time, cycle minimum temperature and cycle minimum pressure.
Note: during the load release it is also possible to accept or reject the Helix strip, biological indicator and chemical indicator results (for more information see the dedicated documentation).
STERILIZATION CYCLE MONITORING
Even if the sterilization process is automatically monitored by the software and the values of temperature, pressure and duration are controlled, there is the possibility to check the values manually. See the table below for the correct values of the temperature, pressure, and duration in order to confirm manually the proper execution of the cycle.
U.S. – Canada Version
| 270 °F (132 °C) cycles | 250 °F (121 °C) cycles | |
| Duration (minutes) | 4 | 30 |
| Min. temperature | 270 °F (132 °C) | 250 °F (121 °C) |
| Max. temperature | 275 °F (135 °C) | 255 °F (124 °C) |
| Min. pressure | 26.68 psi at 270 °F (1.84 bar) at (132 °C) | 14.9 psi at 250 °F (1.028 bar) at (121 °C) |
| Max. pressure | 30.45 psi at 275 °F (2.1 bar) at (135 °C) | 17.83 psi at 255.2 °F (1.23 bar) at (124 °C) |
Standard Version
| 269.6 °F (132 °C) cycles | 249.8 °F (121 °C) cycles | |
| Duration (minutes) | 4 | 30 |
| Min. temperature | 269.6 °F (132 °C) | 249.8 °F (121 °C) |
| Max. temperature | 275 °F (135 °C) | 255.2 °F (124 °C) |
| Min. pressure | 26.68 psi at 269.6 °F (1.84 bar) at (132 °C) | 14.9 psi at 249.8 °F (1.028 bar) at (121 °C) |
| Max. pressure | 30.45 psi at 275 °F (2.1 bar) at (135 °C) | 17.83 psi at 255.2 °F (1.23 bar) at (124 °C) |
SET THE STERILIZATION CYCLE START
You may schedule the start of the sterilization cycles at a certain date and time (e.g., if you want to load the sterilizer in the evening and run standard sterilization cycle early the next morning before office hours). You can set the cycle start date and time and enable or disable it for each cycle.
- On the homepage, tap the cycle and settings.
- To change the start time, tap Start cycle at.
- Tap the time or the date: a settings page opens.
- Tap the number you want to change and tap up or down to increase it or decrease it.
- Tap the back page arrow to confirm and go back to the previous page. This date and time become the scheduled default start time for all next sterilization cycles.
- Tap the start button to lock the door; a new page appears.
Note: if nothing else is pressed, the cycle will start at the programmed time. The page allows also to start the cycle immediately (“Start now”) or to delete the operation and the programmed cycle (“Stop”).
VIEW THE CYCLE PARAMETERS
You can check the real time cycle parameters or the cycle parameters at the end of the cycle. Following is an example:
- While the sterilization cycle is running or when cycle ends tap the information icon: the cycle information page opens.
- Tap left or right to scroll the pages.
STERILIZATION CYCLE PAGE
Following are the information displayed while a cycle is running:
 END OF A STERILIZATION CYCLE
When a cycle is successfully finished, the “Cycle completed” message appears on the screen. To end the cycle:
1.) Tap the page icon to view the cycle summary or tap to view the cycle parameters. See “View the cycle parameters” above
2.) Tap OPEN to open the door: the door unlocks and the home page appears.
CAUTION! Hot surfaces. Burnings. Do not touch the chamber, the internal side of the door and the internal fittings. Use the tray holder or cassette holder or gloves for high temperatures or adequate protection to remove the load!
3.) Open the chamber door.
4.) Remove the load and stock it.
STOP A STERILIZATION CYCLE
WARNING! You can stop the cycle at any time. Instruments must not be considered sterile if this occurs before the DRY phase.
A cycle can be manually aborted at any time. To stop a cycle:
1.) Tap STOP: a confirmation request appears.
2.) Tap the X icon to abort the stop command. The cycle continues programmed.
3.) Tap the check mark icon to abort the cycle: the sterilizer starts a reset phase.
Notice: do not switch off the sterilizer during the reset phase: it takes some time to reset the system and reach safe conditions in the sterilizer chamber.
4.) Check the message. See “Messages of a stopped sterilization cycle” below.
5.) Tap to view the cycle parameters. See “View the cycle parameters” above
6.) Open the chamber door.
7.) Reprocess the load if necessary.
CAUTION! Hot steam. Wait the steam to dissipate before opening the door.
Note: water could be present in the chamber when opening the door. To prevent spilling place a towel below the chamber door.
MESSAGES OF A STOPPED STERILIZATION CYCLE
Following are the messages:
- Load not sterile: Do not use items on patients!
- Drying interrupted: The load might be wet. Wet items are for immediate use only!
Unloading
WARNINGS
CAUTION! Risk of burns. Before touching, ensure the sterilization chamber is cold. Always use the tray holder.
Sterilization cycle report
WHERE CYCLE DATA ARE STORED
The sterilizer stores in memory the summarized reports of the last 400 cycles and the analytical reports of the last 5 cycles. All reports can also be saved on the USB pen drive or in a specific remote folder in the network if the sterilizer is connected to a LAN .
STORED REPORT FORMAT
The summarized reports are stored in HTML format and the analytical reports in SCL format. All parameters are recorded every second.
WHAT HAPPENS WITH UNSAVED CYCLES
If for any reason (e.g. USB memory full, USB pen drive disconnected, etc.) some cycles cannot be saved, no alert is shown. If still stored in memory, the unsaved cycles will be copied in a working USB pen drive connected to the sterilizer as soon as a new cycle starts.
VIEW CYCLE HISTORY
To view the sterilization cycle history:
- On the homepage, tap Menu > Cycle History: all the sterilization cycles are listed with number, date, time and sterilization program. The interrupted sterilization cycles appear in red.
- Scroll the list and tap the desired sterilization cycle: the report opens.
PRINT OR SAVE A CYCLE REPORT ON THE USB PEN DRIVE
On the homepage, tap Menu > Cycle History.
- Scroll the list and tap the desired sterilization cycle: the report
opens. - Tap the “…” icon.
- Tap the Print icon to print the report, or tap the “Save to USB Pen Drive” icon to save the report on the USB pen drive.
PRINT LABELS FOR A SPECIFIC CYCLE
Note: function available only with the Label printer activation code.
On the homepage, tap Menu > Cycle History.
Scroll the list and tap the desired sterilization cycle: the report opens.
Tap the “…” icon.
Tap the barcode icon to print traceability labels for the selected cycle.
Tap Up or Down to increase or decrease the number of label to be printed.
Tap the check box to save the set number for the next time.
Tap the check mark icon to print the labels required.
SAVE ALL THE CYCLE REPORTS ON THE USB PEN DRIVE
The number of reports that can be saved on the USB pen drive depends upon the USB capacity. To save all the cycle reports:
On the homepage, tap Menu > Cycle History.
Tap the “Save to USB Pen Drive” icon: after the confirmation all sterilization cycle reports are stored in the USB.
SET THE REMOTE FOLDER FOR SAVING THE REPORTS
To activate the remote storage and set the necessary parameters do the following:
1.) On the homepage, tap Menu > Settings > Right Page Arrow > Remote Storage Data > Settings.
2.) Tap the switch icon to enable the remote data storage: the first four fields in the page and the check box turn dark grey.
3.) In Path enter the name of the shared folder followed by the sub- folder name, if any, where to save reports. Do not enter the full path.
Note: The folder name must include letters and numbers only. Do not use other characters like space-bar, slash, accent, etc.
4.) Enter the host name or the IP address: if the data are complete, the fields highlight.
5.) Not mandatory. Enter the domain name.
6.) Tap the check box to require the authentication credentials to access the remote storage folder and enter the user name and password.
7.) Tap the check mark to save to save.
8.) Tap the page back arrow to go back to the previous page.
9.) To check if the parameters entered are valid, see “Test the data storage ” below.
TEST THE DATA STORAGE
Note: the test function is available only if the remote data storage is enabled. See “Set the remote folder for saving the reports” on the previous page.
- On the homepage, tap Menu > Settings > Right Page Arrow > Remote Storage Data.
- Tap “Test”: a sequence of tests is automatically performed.
- In case a test fails, check the relevant settings and tap Refresh to repeat the test sequence, if the error persists call your IT manager.
- Tap the page back arrow to go back to the previous page.
SAVE ALL THE CYCLE REPORTS IN A REMOTE FOLDER
Note: the save all function is available only if the remote data storage is enabled. See “Set the remote folder for saving the reports” on the previous page.
Only the last 400 cycles in HTML and 5 cycles in SCL in the sterilizer memory can be saved in the remote folder.
- On the homepage, tap Menu > Settings > Right Page Arrow > Remote Storage Data > Save All.
- Tap the check mark icon to start the remote saving.
As always if you have any questions about this process or anything else please feel free to contact us and take advantage of our “FREE TECH SUPPORT.”
We also offer FREE VIRTUAL TECH SUPPORT to “See and Talk” with a “Real Time Live Technician” for any problems you may be in need of help with.
You can also use our “FREE MAINTENANCE PROGRAM”. Take the guesswork and worrying about what unit is due for maintenance and which maintenance cycle it is time for. We will keep track of all your autoclaves and let you know when it’s time for anything.
The W&H Lexa Mini Installation Guide is available here on our website.
The W&H Lexa Mini Operation Guide is available here on our website.
The W&H Lexa Mini Printer Management Guide is available here on our website.
The W&H Lexa Mini Maintenance Guide is available here on our website.
The W&H Lexa Mini Error Codes are available here on our website.