

Tuttnauer 2340M Operation Guide
The Tuttnauer 2340M is a classic, reliable autoclave, favored for its straightforward design and consistent performance. This manual steam sterilizer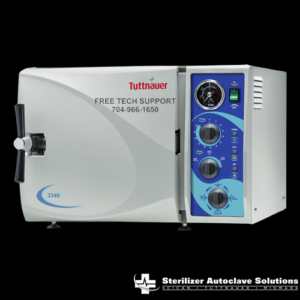 has become a staple in many medical and dental practices. Its simplicity and robust build make it a trusted workhorse for daily sterilization needs. Proper operation is key to maximizing its lifespan and ensuring effective sterilization. Today, we’ll delve into the operation guide for the Tuttnauer 2340M. These instructions come directly from the manufacturer, Tuttnauer, to ensure the best possible operation instructions.
For more information on the Tuttnauer 2340M autoclave, we have an overview blog on our website here. We have an installation guide of the Tuttnauer 2340M that you can find on our site here. And if you’d like to see a digital version of the 2340M manual, we have a link to it on our website from our resources tab here.
Operation
 To avoid possible damage, do not leave the autoclave unattended while in operation.
Make sure the power cord is plugged into the back of the unit and also plugged into a power source.
Loading and Unloading the Device
Safety
Protective equipment, clothes and other safety instructions should be implemented in accordance with local and national regulations and/or rules!
For proper sterilization – Do not overload the chamber. Only autoclavable products shall be used; please refer to the material or instrument manufacturer’s instructions for sterilization of unknown materials or instruments.
Loading
Correct loading of the autoclave is essential to successful sterilizing for several reasons. Efficient air removal from the chamber and the load will permit steam penetration and saturation, and allow proper drainage of condensate. Additionally, correct loading will reduce damage to packs and their contents and maximize efficient use of the sterilizer.
For detailed loading instructions, see sec. 6 (Preparation before sterilization).
Unloading
On completion of the cycle, the load shall be immediately removed from the sterilizer and a visual inspection made to ascertain that the load is dry, and that sterilizing indicators have made the required color change.
Fill the Water Reservoir
Ensure that the drain valve is in a CLOSED position.
Remove the water reservoir cover.
Pour distilled water into the reservoir through the opening
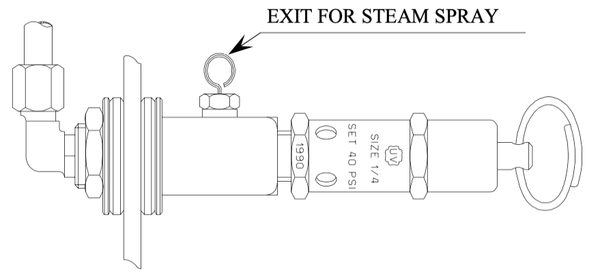
on top of the autoclave, until it reaches the base of the safety valve holder. Under no circumstances fill any higher than the base of the safety valve holder.
For proper operation make sure the water level is above the coils of the cooling coil.
Caution: Under no circumstance should water be filled above the safety valve holder.
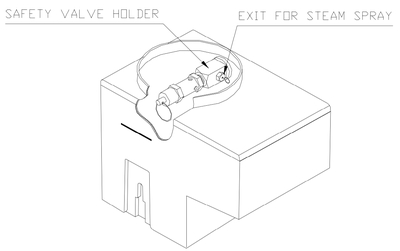 USE DISTILLED WATER ONLY. Use water-having characteristics as per table in sec 5. The impurities in tap water will create the need for more frequent cleaning and maintenance, in addition, they will accumulate and block the hole of the Air Jet. This will prevent the temperature in the chamber from rising properly. This will cause spore tests to fail and indicator strips will not change color. It is essential from time to time, during heating and sterilization phases, that a spray of steam should escape, from the Air Jet, causing a hissing sound. If no escaping steam is evident or no hissing sound heard, follow the instructions in sec 8.3 for cleaning the Air Jet.
 Caution: Daily before operation, check the water level in the reservoir and add water when required. Once a week or after 20 cycles (the shorter period) replace the water in the reservoir.
- Move the ON / OFF rocker switch, located on the front panel, to the ON position. The green Power Light will turn on, indicating that power is ready to be supplied to the Heating Elements.
- Turn the red tracking needle on the pressure gauge counterclockwise to 0 psi. The tracking needle will indicate the highest pressure reached during the cycle.
- Open the front door of the autoclave and set the Multi-purpose valve knob to the FILL WATER position.
- The water will now flow into the chamber.
- The water should cover the bottom of the chamber up to the groove in the front. This amount of water should be in accordance with the table in sec 4.2.
- When the water reaches the mark at the front of the autoclave, set the multi-purpose valve knob to the STERILIZE position.
Note: When used for the first time, the multi-purpose valve requires slight effort, but with use it will turn smoothly and easily.
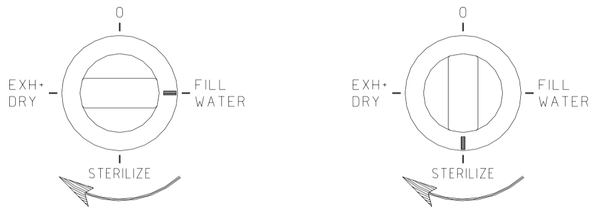 Warning! The Multi-purpose valve knob should be turned in a clockwise direction only!
- Load the autoclave. See section “Preparation for Sterilization” for information on proper loading.
- Shut the door, move the Door Closing Devise into position and tighten, making sure that the Door Switch is activated.
NOTE:
Due to the inherent elasticity of the door gasket, it is important to tighten the door bolt until “hand tight”. Do not over-tighten the bolt as this may result in damage to the gasket.
Should the autoclave fail to reach the sterilizing temperature/pressure, always check first that the door is fully sealed. If not, tighten the door bolt further, as described above, until completely sealed.
- Turn the thermostat knob to the desired sterilization temperature.
Note: This autoclave is designed according to all international standards, which allows the temperature to raise 4oF (2oC) over the working temperature.
Sterilization Time Table
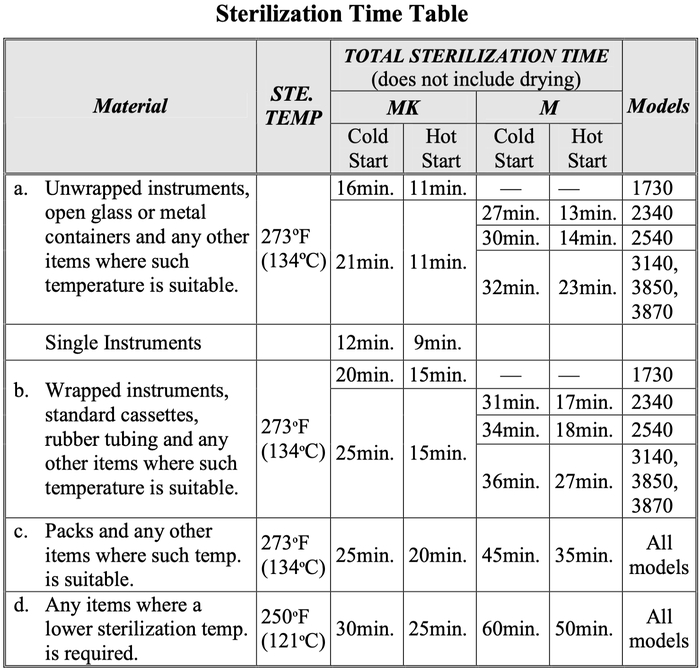
Note: The table shows different times for M (Standard Manual) & MK (Kwiklave Manual) units as well as for hot and cold starts. Make sure you are using the correct times for your model machine. A hot start is any cycle that is begun within 1 hour of a previous cycle ending (including drying time).
Note: These sterilization times are based on the unit being supplied the correct voltage, as indicated on the Technical Label attached to the outer cabinet. If the voltage supplied is substantially less than the indicated voltage, additional time must be added to each cycle.
Set the Timer to the desired sterilization cycle time according to the Sterilization Time Table.
- The Heat Light will come on, indicating that power is being supplied to the Heating Elements and remain on until the correct sterilization pressure is achieved.
- Once the correct pressure is reached the Heat Light will cycle on and off, indicating that the Heating Elements are turning on and off to maintain the correct sterilization pressure.
- When the Timer reaches 0 min, the Heating Elements are turned off and a buzzer will sound indicating that the sterilization cycle is complete.
If unwrapped instruments were sterilized and no drying is required, follow these steps.
- Once the Timer has reached 0 min, turn the Multi-purpose valve knob promptly to the Exhaust / Dry position. This will allow the steam and leftover water to return to the reservoir.
- When the white needle on the pressure gauge has reached 0 psi, the door can be opened.
- Unscrew the Door Closing Device, move it to the side and open the door to remove the instruments.
- Now turn the Multi-purpose valve knob to the “0” or off position.
Note: The sterility of instruments processed in unwrapped cycles cannot be maintained if exposed to a non-sterile environment.
If wrapped instruments were sterilized and drying is required, follow these steps.
- Once the Timer has reached 0 min, turn the Multi-purpose valve knob promptly to the Exhaust / Dry position. This will allow the steam and leftover water to return to the reservoir. Do not allow the pressure to drop below 10 psi before beginning this procedure. This will cause water to remain in the bottom of the chamber even after the Multi-purpose valve has been turned to Exh / Dry. Resetting the Timer for drying will only be heating up this water and not drying the instruments.
If the pressure has dropped below 10 psi, leave the unit in the STERILIZE position, leave the door closed and locked. Now reset the Timer for 10 minutes.
When the Timer reaches 0 min, the pressure should be above 10 psi (if not, add 5 more minutes to the Timer). Now turn the Muli-purpose valve to the Exh / Dry position. This will insure that all the water has been returned to the reservoir.
Note: The sooner the Multi-purpose valve is turned to Exh / Dry at the end of the sterilization cycle, the more effective and efficient will be the drying.
When the white needle on the pressure gauge has reached 0 psi the door can be opened.
Unscrew the Door Closing Devise as far as it will go, but do not move it to the side, this will allow the door to open about 3⁄4 of an inch.
Leave the Multi-purpose valve knob in the Exhaust / Dry position.
Reset the Timer for drying, 20 – 30 minutes, the Dry Light will come on indicating that Drying is active and the Heating Elements are back on.
When the Timer reaches 0 min., the drying is complete and the Dry Light and Heating Elements will turn off.
Unscrew the Door Closing Device, move it to the side and open the door to remove the instruments.
Now turn the Multi-purpose valve knob to the “0” or off position.
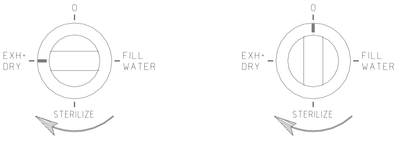
Warning! Multi-purpose valve knob should be turned in a clockwise direction only.
At the end of the day, turn the ON / OFF rocker switch to the OFF position.
As always if you have any questions about this process or anything else please feel free to contact us and take advantage of our “FREE TECH SUPPORT.”
We also offer FREE VIRTUAL TECH SUPPORT to “See and Talk” with a “Real Time Live Technician” for any problems you may be in need of help with.
You can also use our “FREE MAINTENANCE PROGRAM”. Take the guesswork and worrying about what unit is due for maintenance and which maintenance cycle it is time for. We will keep track of all your autoclaves and let you know when it’s time for anything.