

The Sterilization Cycle
What Really Happens During the Sterilization Cycle?!?
In the medical industry, keeping things clean is super important, but sometimes the info about how isn’t easy to find. If you’ve ever wondered what really happens to tools to make them safe, you’re not alone! It can be confusing.
Have you ever thought about every single step it takes to get a medical tool completely sterile? Lots of people have questions about cleaning and sterilizing, but the answers aren’t always clear.
Maybe not right now, but by the end of this simple guide, you will! Here at Sterilizer Autoclave Solutions, we want to make this easy to understand so you have the info you need.
Let’s break down every step in the medical tool sterilization process, from the moment a tool is used until it’s ready to go again.
Point of Use – What are the first steps after use?
The cleaning journey starts right after a medical tool is used. Before it goes anywhere else, a few simple things happen:
- Quick Rinse: Big stuff like bits of tissue or fluids gets rinsed off with lukewarm water. This stops it from drying and getting stuck.
- Soaking: If the tool can’t be cleaned right away, it goes into a special soaking liquid. This liquid helps break down any gunk – think of a gentle cleaner.
- Taking Apart: If a tool has different pieces, they get taken apart. This helps make sure every little bit gets super clean later.
Once these quick steps are done, the tools are ready to be moved to the cleaning area.
Transportation – How should you move instruments from one place to another?
Getting the tools to the cleaning area safely is the next step. We need to make sure no one gets hurt or anything gets dirty again. Here’s how it should work:
- Safe Boxes: The tools go into hard, closed containers that won’t leak. Think of a sturdy lunchbox with a good lid.
- Sharps Separate: Sharp things like needles and blades go into their own hard, closed “sharps” container. This keeps everyone safe from accidental pokes.
- Direct Path: Someone takes the box of tools straight to the cleaning area. This helps avoid germs from other places.
Once the tools arrive at the cleaning spot, the real cleaning can begin.
Cleaning – How do I ensure my instrument is ready for sterilization?
Now it’s time to get the tools really clean! This step uses different ways to get rid of tiny bits of stuff and lower the number of germs so the sterilizer can do its job right.
When you’re cleaning, make sure your work area is clean too, so you don’t get the tools dirty again.
Here are the main ways to clean medical tools:
- Hand Washing: Just like washing dishes, you can scrub tools with a brush and soapy water. If you do this, make sure the water is running, you wear gloves and eye protection, and you don’t splash germs around.
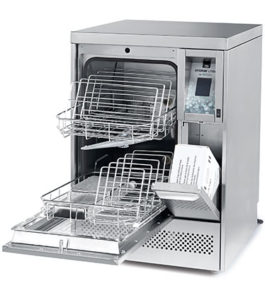
- Machine Washing (Washer Disinfector, above): Washer disinfectors are like super dishwashers for medical tools. They wash, rinse, and use hot water to kill even more germs. They’re fast and do a good job every time.
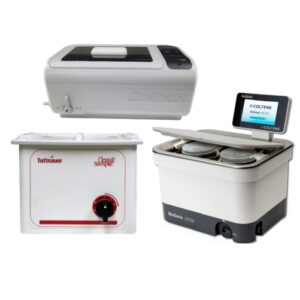
- Sound Cleaning (Ultrasonic Cleaner, above): These ultrasonic cleaners use sound waves in water to shake off dirt with a process called cavitation. Cavitation is where tiny bubbles form and pop on the tools, gently scrubbing them clean.
No matter how you clean, the tools need a good rinse afterwards to get rid of any soap. Then, they need to be completely dry before the next step.
Packaging – What are the best practices for protecting instruments?
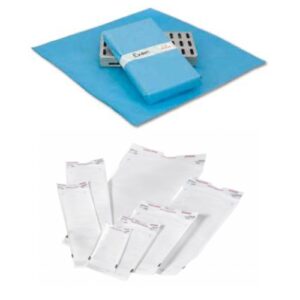
Now the clean tools need to be wrapped or put in pouches. This keeps them clean after they come out of the sterilizer.
There are two main ways to package tools:
- Sterilization Wraps: These are special papers that let the sterilizing steam or gas in but keep germs out later. They help the tools stay clean until they’re used.
- Sterilization Pouches: These look like sealed bags. Like the wraps, they keep germs away and keep the inside clean.
When you’re wrapping or bagging tools, always check for rips or holes. Even a tiny tear means the tools inside might not be clean anymore, and you’d have to wash and repackage them.
Once the tools are in their packaging, they’re ready for the sterilizer.
Sterilization – Can you guess why this is our favorite step?!?!
This is the main step where all the germs are killed! How you package the tools matters for the type of sterilizer you have. How you put the packages in the sterilizer also matters so everything gets properly cleaned. Make sure to load the sterilizer the right way – the manufacturer has proper instructions written in the included operation/user manual.
The water you use in the sterilizer is also a big deal.
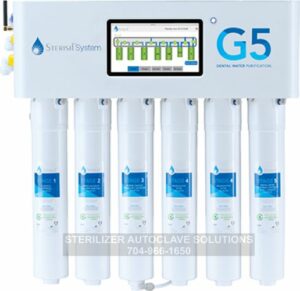
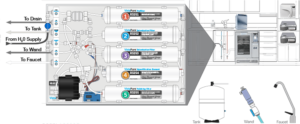
Medical sterilizers need pure, distilled water. Special water cleaning systems can make sure you have the right kind of water. And there are water purification systems that can attach to your water line and do this for you. Like the Sterisil System G5 or the SciCan VistaPure water purification systems shown above.
Then, you start the cycle on the sterilizer. You need to pick the right temperature, pressure, and time for the tools you’re cleaning. Let the whole cycle run without stopping.
While it’s running, keep an eye on the sterilizer. Gauges and lights will show you it’s working right. You also need to test your sterilizer regularly with special strips or tests to make sure it’s killing all the germs.
When the cycle is done, let the packages cool down inside or in a clean area. Then, check the packages again for any tears, holes, or wet spots.
If the packages look good, the tools inside are sterile and ready for clean storage.
Sterile Storage – How do you keep your sterilized instruments ready for the next use?
After the tools are sterilized, they need a clean place to wait until they’re used again.
When you put the packages away, make sure your hands are clean. Don’t pile heavy things on top of the packages.
The storage area should be clean, dry, and have good air flow. Keep it away from really hot or damp places.
It’s also a good idea to keep track of when things were sterilized so you use the oldest packages first.
Now the medical tools have gone through the whole cleaning and sterilization process and are safe to use again!
Final Thoughts – Where can I go for more information?
Now you know the entire sterilization cycle from start to finish. From point of use, through the cleaning and sterilization processing, right back into your hands for your next patient. That’s the journey medical tools take to become completely sterile and safe for patients. By following each of these simple steps, healthcare professionals can feel confident that they are doing everything possible to prevent infections and provide the best care. Remember, if you ever have questions about keeping your medical tools clean and sterile, resources like our free tech support line are always here to help.
If you have any questions about sterilization, infection control, or anything else, give us a call at 704-966-1650 Option 3 for our free Tech Support Line. We also have various consumer programs for anyone to access at any time for free using the links below.
As always if you have any questions about this process or anything else please feel free to contact us and take advantage of our “FREE TECH SUPPORT.”
We also offer FREE VIRTUAL TECH SUPPORT to “See and Talk” with a “Real Time Live Technician” for any problems you may be in need of help with.
You can also use our “FREE MAINTENANCE PROGRAM”. Take the guesswork and worrying about what unit is due for maintenance and which maintenance cycle it is time for. We will keep track of all your autoclaves and let you know when it’s time for anything.