
Tuttnauer T-Edge 11S TVET Edition Installation Guide
The Tuttnauer T-Edge 11S TVET Edition offers a much needed modification for the veterinary industry. With the same speed and efficiency as the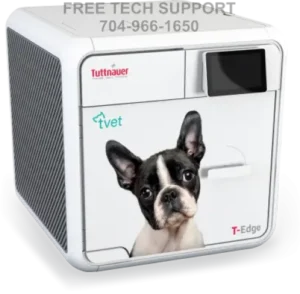 base T-Edge model, outfitted with the necessary technology able to handle the more delicate instruments used in vet clinics. The TVET Edition offers the necessary sterilization efficacy and convenience needed for even the busiest days in veterinary clinics.
And here at Sterilizer Autoclave Solutions, we make it our job to provide you with the proper knowledge to make sure everything goes smoothly. So in this article, we’d like to go over the installation instructions for the Tuttnauer T-Edge 11S TVET Edition, with instructions provided by the manufacturer, Tuttnauer.
If you have any questions about the Tuttnauer T-Edge 11S TVET Edition or anything else, please give us a call at 704-966-1650 Option 3 for our Free Tech Support line.
Installation Instructions
Lifting and Carrying
Cautions!
Before moving the autoclave, make sure that the electric cord is disconnected from the power, and there is no pressure in the chamber.
Drain the water from the reservoir.
Do not drop the device!
To avoid injuries, lifting and carrying should be done with at least two people or by using a fork-lift or any other mechanical aid.
Device Placement and Operating Conditions
The autoclave is intended for indoor use only.
Check and verify that the counter carrying the autoclave is a rigid and leveled surface and can carry a load of 192 lbs.
Caution! The device is not designed for use on any standard slide out shelf. If it is necessary to use a slide out shelf, it must be tested and/or rated for 192 lbs or more.
Check and verify that the dimensions of the surface of the counter are at least 21″(55cm) x 23″ (60cm).
Keep the back and the sides of the autoclave approximately 10cm away from the wall to allow ventilation and facilitate the device disconnection.
If placed in a cabinet, verify that the rear of the cabinet is open to allow ventilation.
Caution! Insufficient space for ventilation may result in malfunction or damage due to overheating.
It is recommended that enough space be left around the autoclave to give a technician access for servicing the machine.
Check and verify that the ambient temperature range is 41o°F (5o°C) -104o°F (40o°C).
Check and verify that the ambient relative humidity does not exceed 80%
The operational altitude shall not be over 13123 ft (4000 meters).
Ambient pressure shall not be lower than 8.8 psi(60.5KPa).
Operate the autoclave only in the manner specified in the manual. If the equipment is used in a manner not specified by the manufacturer, the protection provided by the equipment may be impaired.
Connections to Utility Supplies
Check and verify that the power supply is a 1 phase, 120 VAC ± 10%, 50/60 Hz.
Check and verify that the electrical net is protected by a current leakage safety relay.
The autoclave defines Class A – devices are those that are marketed for use in a commercial, industrial, or business environment.
Storage
After the removal of the autoclave from the package, we recommend the following:
- Keep the device dry.
- Keep the device away from sunlight and protect it from heat.
Initial Operation of the Device
Note: Remove all packaging material before turning ON the device.
1.) Plug the power cord into the power socket.
2.) Warning! Mind the power socket. Keep it and its vicinity dry. Danger of electrocution.
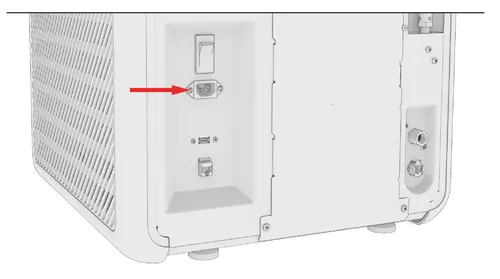
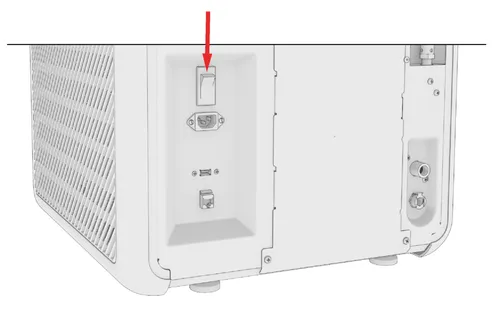
3.) Turn ON the semi-automatic ON/OFF button switch located on the bottom left side of the back panel of the autoclave.
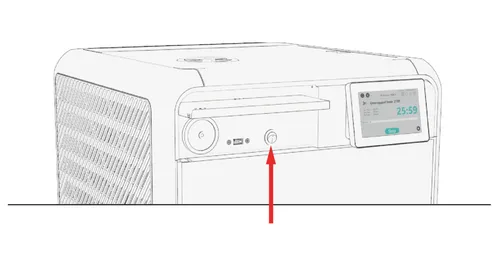
4.) Turn on the ON/ OFF Switch mounted on the bottom left side of the front panel.
When you turn on the autoclave, it will automatically warm up.
Warning! Be careful the surfaces may be hot!
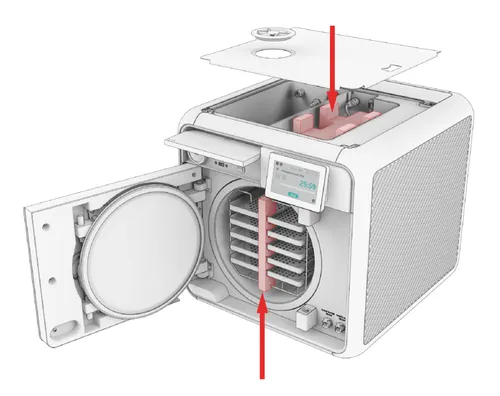
5.) Fill the Mineral Free Water Reservoir with water meeting the quality specs (see Water Quality and Filling the Mineral-Free Water Reservoir).
6.) Set date and time
Before Starting the Autoclave
Note: The device automatically resets the Atmospheric Pressure when turned on.
Open the Autoclave door for 2 minutes and verify that the ambient temperature is below 113°F.
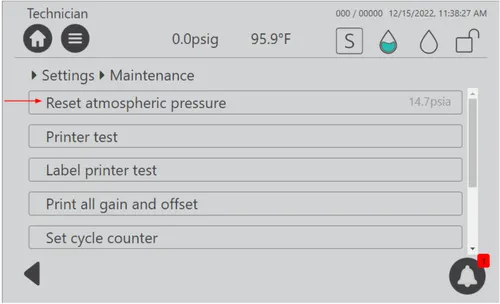
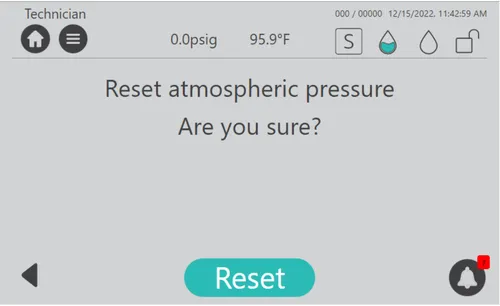
To reset the Atmospheric Pressure manually:
1.) In the Quick Option screen, press the Settings icon then browse to Maintenance/Reset atmospheric pressure.
2.) In the confirmation screen, press Reset
Wi-Fi Configuration
Prior to operating the autoclave for the first time, please connect the Wi-Fi and ensure it remains connected at all times.
The Wi-Fi connection is used for uploading all data information from devices in the field, to the online company’s server.
This data is used for:
- Monitoring
- Viewing and downloading device history
- Software updates while validating the integrity of the update (applicable for users with Tuttnauer code)
The data is backed-up on the device main board.
Note: In case of connection failure, the data may be exported manually.
To connect the Wi-Fi:
1.) In the Quick Option screen, press the Wifi Configuration option.
2.) To enable the connection, press “On”.
3.) The Wifi Configuration screen is displayed with the available networks.
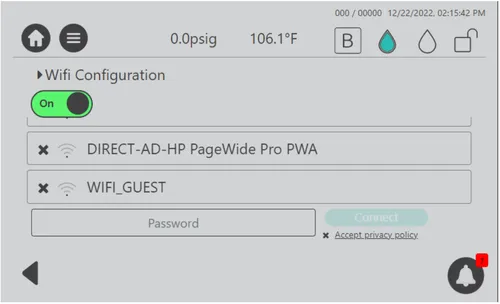
4.) Select your network, enter your Password and press the Accept privacy policy.
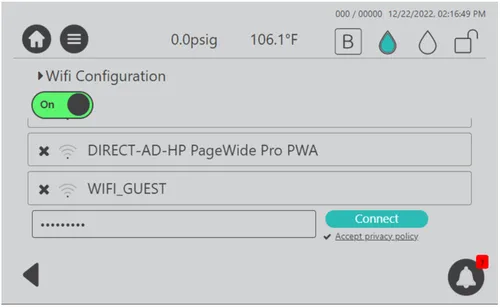
5.) Press Connect.
6.) The Wi-Fi is connected successfully. Press OK
Checking the device Version information.
1.) In the Quick Option screen, press the Info option .
2.) Select the Version information.
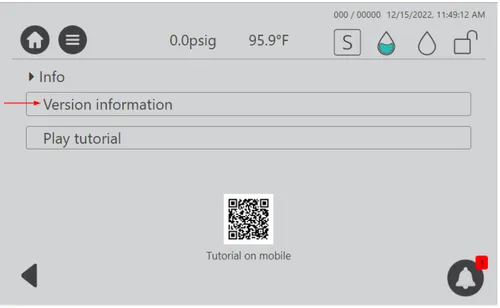
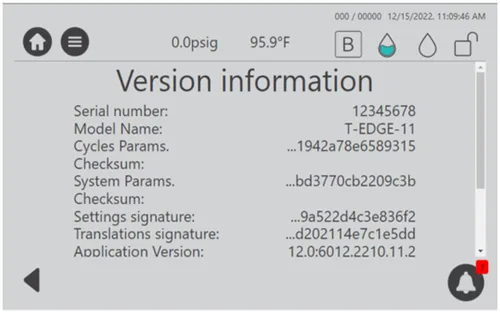
3.) The Version information is displayed. For an example, see below:
4.) Press on back arrow the to return to the Info screen.
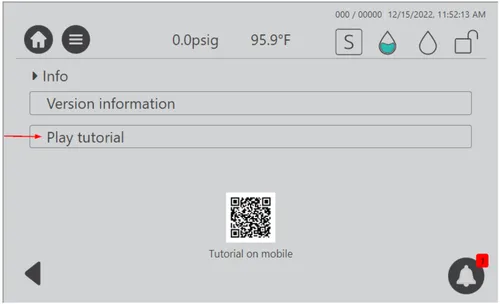
5.) Select the Play tutorial option to watch the T-Edge Instructional Video
As always if you have any questions about this process or anything else please feel free to contact us and take advantage of our “FREE TECH SUPPORT.”
We also offer FREE VIRTUAL TECH SUPPORT to “See and Talk” with a “Real Time Live Technician” for any problems you may be in need of help with.
You can also use our “FREE MAINTENANCE PROGRAM”. Take the guesswork and worrying about what unit is due for maintenance and which maintenance cycle it is time for. We will keep track of all your autoclaves and let you know when it’s time for anything.