

Operating a Midmark M11 Self-Contained Steam Sterilizer 2
Operating a Midmark M11 Self-Contained Steam Sterilizer General Instructions*
In this article we want to share Midmark’s proper procedures for operating their M11 Self-Contained Steam Sterilizer. We will cover Filling the Reservoir, Qualification Testing, Guidelines for Loading, Standard Cycle Parameters, Cycle Operation, Post-Sterilization Processing, and Programmable Cycle Buttons. And if you just want to talk to someone, call our Free Tech Support at 704-966-1650 Option 3.
Before Operating the Sterilizer


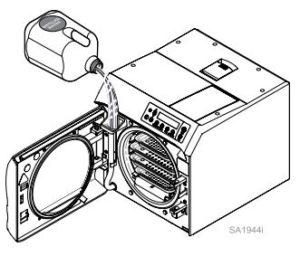
Let’s start with Filling the Reservoir


About Qualification Testing
Your sterilizer should be tested after sterilizer installation, malfunctions, relocation, major repairs, and after sterilization process failure.
Qualification testing should be performed prior to placing the sterilizer in service. If multiple cycle types are used, e.g. “Pouches” and “Packs” each cycle type should be qualified.
Qualification testing should include at least one Biological Indicator (BI) (sometimes referred to as Spore Tests) and one Chemical Indicator (CI).
The test pack should be placed on the bottom tray near the chamber door and performed with items routinely processed and considered to be the most difficult to sterilize.
Additional items should be placed in the chamber along with the Biological Indicator and Chemical Indicator so that the chamber is fully loaded (don’t exceed the maximum capacities listed in the tables under “Guidelines for Loading” in the users manual).
Three consecutive test runs, for each cycle type tested, with negative results from the BIs, and the appropriate readings from all physical monitors and chemical indicators demonstrating complete sterilization, provide verification that the sterilizer has been properly installed (or reinstalled after relocation) or repaired to the manufacturer’s specifications and that it will function effectively in the facility in which it is installed.
All items processed during qualification testing should be quarantined until the results of the biological testing for all three test runs are available.
Next is Guidelines for Loading
All items must be processed in accordance with the Centers for Disease Control and Prevention (CDC),
“Guidelines for Infection Control in Dental Healthcare Settings” – 2003, MMWR; 52 (no.RR-17), and
“Guidelines for Disinfection and Sterilization in Healthcare Facilities” – 2008, which states: “Items to be sterilized should be arranged to permit free circulation of the sterilizing agent (e.g., steam, chemical vapor, or dry heat); manufacturer’s instructions for loading the sterilizer should
be followed.”

Types of Items that can be processed in the M11
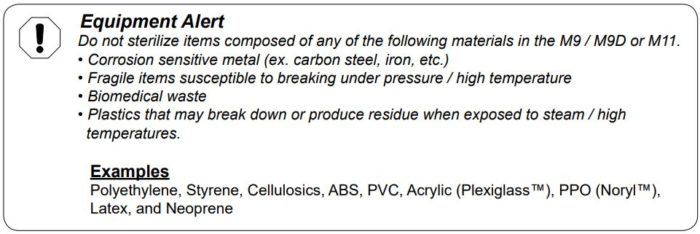
Before placing any instrument in the M11, check with the instrument manufacturer to be sure the materials are compatible with steam sterilization, and to verify the acceptability of sterilization parameters.
The M11 is designed to sterilize the following:
- Metal instruments
- Rubber/plastic devices (ex. suction cannulas, impression trays, etc.)
- Wrapping/bundling materials (ex. CSR wrap, instrument pouches, etc.)
- Cassettes (which fit in the sterilizer trays or the cassette rack accessories)
- High/low-speed handpieces
- Surgical instruments (ex. ophthalmologic instruments)
Preparing Items for Sterilization

Instruments must be thoroughly cleaned to remove all residual matter, such as debris, disinfectant residuals, blood, organic tissue, etc. General cleaning guidelines are listed below but the device manufacturer’s instructions for proper cleaning and preparation of the device for sterilization should always be followed:
- Clean instruments immediately after use to avoid drying of residual matter.
- The use of automated cleaning equipment (e.g. ultrasonic cleaner or washer-disinfector) is recommended over manual cleaning for clinician safety and cleaning effectiveness.
- After cleaning, thoroughly rinse instruments with tap water to remove any loosened debris or residual cleaning fluid. The purity of tap water varies significantly thus, it’s recommended the final rinse be done with water of adequate quality to avoid instrument staining. After rinsing instruments should be inspected for damage, debris, detergent residue and then dried before packaging.
- If the instrument manufacturer’s instructions require lubrication of the instruments after cleaning, wipe off excess lubricant before packing for sterilization or loading into the sterilizer.
Immediate Use Sterilization
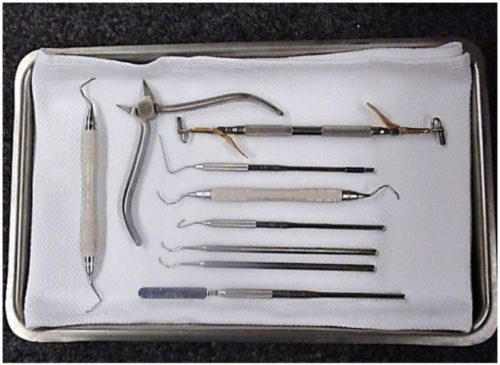
The M11 is capable of Immediate Use sterilization – sterilizing unwrapped instruments for immediate use. Place a surgical cotton towel, paper tray liner or CSR wrap folded to fit on the tray bottom before putting unwrapped items in the tray. Arrange unwrapped items on the towel so they do not touch one another (as shown below).
Please consider the following when choosing whether or not to sterilize your instruments unwrapped:
- The sterility of unwrapped instruments is compromised upon exposure to a non-sterile environment. Follow CDC guidelines for using unwrapped, sterilized instruments.
- Due to the sensitive nature of some types of surgery (including, but not limited to ophthalmological), instruments used in such procedures must be wrapped or pouched in order
to reduce their exposure to sterilization process residues. The water reservoir should also be drained and refilled with fresh distilled water on a daily basis when processing instruments for
these procedures on a routine basis.

General Guidelines
- Use only M9 / M9D and M11 trays in their appropriate sterilizer. Using other trays could restrict air/steam flow to items resulting in inadequate sterilization and drying.
- All items must fit within the tray and not extend over the lip of the sterilizer tray. Instruments must not scrape the chamber walls when sliding the tray into the chamber.
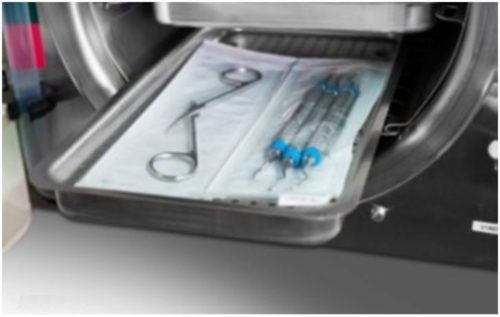
- Jointed items must be sterilized in an open position so all surfaces are exposed to the steam (as shown below).
- Handpieces and instruments must be arranged in a single layer on the trays (not piled or stacked), to permit proper steam flow and drying.
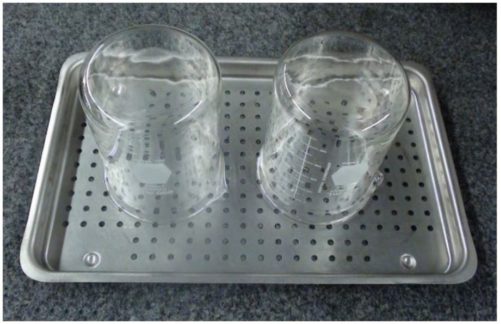
- Glassware or utensils capable of holding water, e.g. bottles, basins, beakers, etc., should be positioned on the tray with the open side down so any water condensate drains from the container (as shown below). When sterilizing glassware check with the manufacturer to make sure it is compatible with steam sterilization.
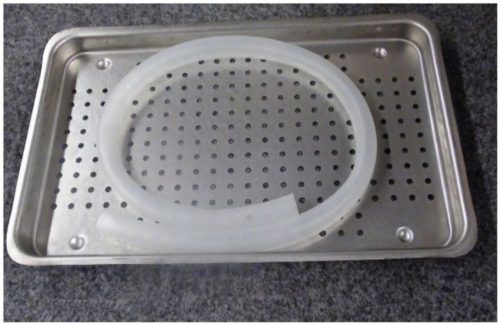
- Rinse tubing with distilled water or water that meets the referenced water purity specifications and do not dry prior to sterilizing. Arrange tubing on the tray so there are no sharp bends and the tubing ends are open and unobstructed (as shown below).
- Follow the device manufacturer’s instructions for disassembly of multi-part instruments prior to packaging/sterilization to assure all parts are adequately exposed to the steam.
- If items are being sterilized and stored for later use they must be packaged, e.g. pouched, wrapped, etc., and completely dry when removed from the sterilizer chamber to avoid potential recontamination.
- Variations in load configuration, size, wrapping materials, and the environment may require the operator to increase the default drying time to assure all packaging and instruments are completely dry.
- When sterilizing a load that contains one or more handpieces, utilize the handpiece cycle, not the Pouches or Unwrapped Cycle.
Pouching and Wrapping Items
- The M11 is capable of sterilizing pouched or wrapped items to preserve sterility after processing.
- When pouching or wrapping items, use only sterilization pouches and wraps that have been cleared by the FDA and labeled for use with the steam sterilization cycle being used. Follow the manufacturer’s instructions for use.
- Instruments made from different materials (stainless steel, carbon steel, plastic, etc.) should not be mixed in the same pouch or wrapped pack to avoid potential instrument damage.
- Pouches, wraps, and the included instruments should not touch the chamber wall to allow proper steam circulation and avoid potential instrument damage.
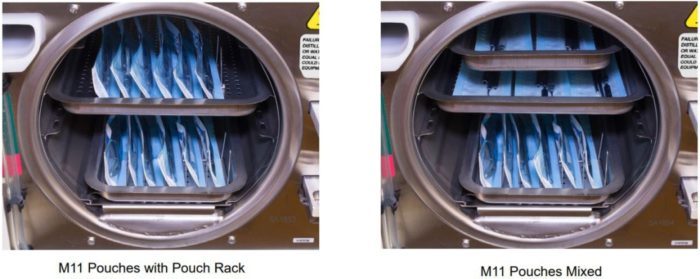
- For proper steam circulation and drying the preferred orientation of pouches is resting on their edge, best accomplished using the Midmark Pouch Rack supplied with the M11 sterilizer. If additional pouch racks are needed order kit P.N. 002-2108-00 (M11- 6 slot) HERE. If more than two (2) pouch racks are used in a single load additional dry time may be required.
- If pouches or wrapped packs are labeled using a marking pen the ink should be nontoxic. On paper-plastic pouches only mark on the plastic side of the pouch. On wrapped packs mark the labeling information on the indicator tape or apply a separate label.
Shown below are some recommended pouch load configurations for the M11
- When using cassettes in the M9 / M9D / M11, follow the cassette manufacturer’s instructions for use.
- Do not wrap items too tightly. Sterilization can be compromised if an item is excessively wrapped and the wrap is more likely to tear if wrapped too tightly.
- Cassettes can be loaded on the trays but they must fit within the boundaries of the tray and they should not touch each other, the tray above, or the chamber wall to allow proper steam circulation. The total instrument load, including the cassettes, should not exceed the limits listed in maximum capacities tables.
- When using the optional Horizontal and Vertical cassette racks (9A215001 and 9A215002) in the M11 the maximum load including the cassettes can be increased to 12 lbs. (5.44 kg). Additional dry time may be required.
Shown below are some recommended cassette load configurations for the M11


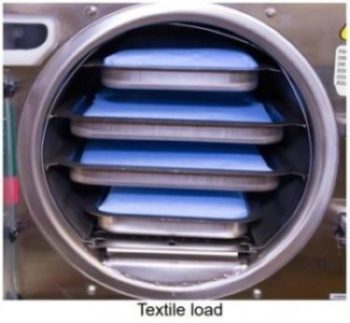
Textile Loads
- Clean textiles recommended for steam sterilization can be processed in the Packs cycle. Verify the acceptability of the Packs cycle sterilization parameters with the textile manufacturer to assure the textiles are compatible.
- All textile packs must not exceed the thickness limits specified in the maximum capacity tables below and must fit within the boundaries of the sterilizer trays.
- If multiple packs are placed on a single tray maintain a minimum of 1/4” (6.4 mm) between packs for proper steam circulation and drying. (as shown below).
Load Size
Successful sterilization is dependent on the correct loading of the sterilizer. Do not overload the sterilizer chamber! Adequate space must be maintained around all items placed in the chamber to assure proper steam circulation and adequate drying. The charts below are provided as a reference regarding the maximum loads that can be processed in the sterilizers but maintaining proper spacing between all items processed to assure good steam circulation and drying should be the guiding factor in determining the maximum load that can be processed.
M11 Maximum Capacities**
| Load Type | Large Tray | Small Tray | Total |
|---|---|---|---|
| Solid Instruments | 2.7 lbs., (1225 grams) or | 1.8 lbs., (816 grams) or | 9.0 lbs., (4082 grams) or |
| Handpieces | 2 handpieces with other instruments 2.7 lbs. (1225 grams) or | 2 handpieces with other instruments 1.8 lbs. (816 grams) or | 8 handpieces with other instruments 9.0 lbs. (4082 grams) or |
| Packs* | 145 in3 ≤ 1.5 in. thick (2376 cm3 ≤ 3.8 cm thick) | 108 in3 ≤ 1.5 in. thick (1770 cm3 ≤ 3.8 cm thick) | 505 in3 (8275 cm3) |
Standard Cycle Parameters
| Cycle Type | Cycle Parameters | Drying Time (2) | Items to be Sterilized (Always consult the item manufacturer’s recommendations for sterilization.) |
||
| Temp. (Min.) | Time | Press. (1)(Ref.) | |||
| 270°F (132°C) | 3 min. | 27.1 psi (186 kPa) | 30 min. | Instruments loose on a tray. • Open glass or metal canisters. • Tubing not used in surgical procedures. (Max. length - 40” and Min. inside diameter - .187”) • Loose items manufacturers recommend for exposure at 270°F (132°C) for 3 minutes. Note: The sterility of unwrapped items is compromised on exposure to a non-sterile environment |
|
| 270°F (132°C) | 4 min. | 27.1 psi (186 kPa) | 30 min. | • Pouched or loosely wrapped instruments. • Multiple layers of instruments separated by fabric. • Wrapped trays of loose instruments. • Wrapped cassettes. • Wrapped items manufactures recommend for exposure at 270°F (132°C) for 4 minutes. |
|
| 250°F (121°C) | 30 min. | 15 psi (104 kPa) | 30 min. | • Textiles and surgical packs wrapped for sterilization. • Items, except liquids, manufacturers recommend for exposure at 250°F (121°C) for 30 minutes. |
|
| 270°F (132°C) | 4 min. | 27.1 psi (186 kPa) | 30 min. | • Dental handpieces (wrapped or unwrapped). Note: Verify acceptability of sterilization parameters with handpiece manufacturer. |
|
| 1. The pressure shown in this table is for reference only. It’s the ideal pressure of saturated steam at the sterilization temperature. The pressure shown on the sterilizer display may be higher. 2. Dry time can be changed from 0 to 60 minutes. Refer to Cycle Operation. |
|||||
Cycle Operation
Refer to the following steps for a detailed description of cycle operation:

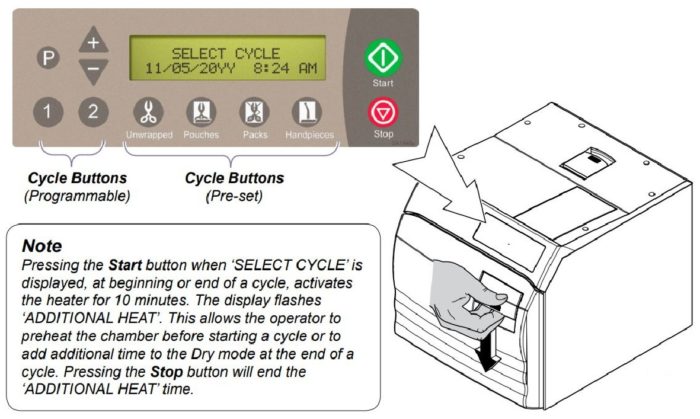
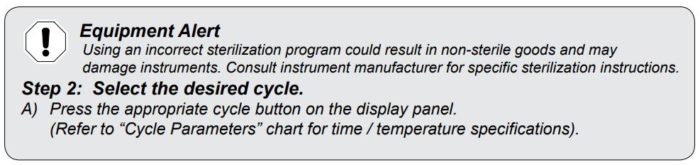
After the cycle button is pressed, the parameters for that cycle will appear on the display.
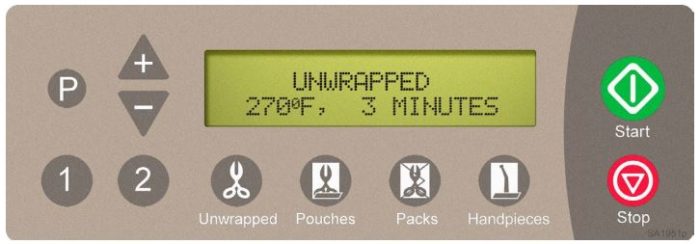

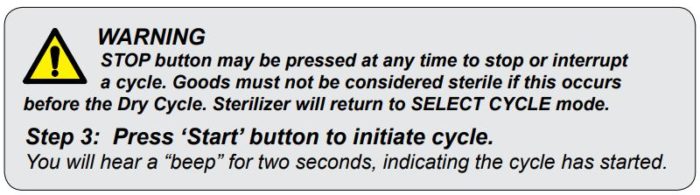
After the ‘Start’ button is pressed, the stage/status of the current cycle will appear on the display.
The chart below illustrates the display messages that will appear during each stage of the cycle.

| Stage of Cycle | Description | Display |
|---|---|---|
| Filling | Chamber begins filling with water. |  |
| Filling | When water reaches the proper level... |  |
| Heating | Display changes as temperature and pressure in chamber changes. (Metric units may be displayed if desired). |  |
| Sterilizing | Sterilizing begins when correct temperature / pressure is reached. Time remaining in cycle counts down while current temperature / pressure in chamber is continuously updated. |  |
| Ready to Vent | ‘READY TO VENT’ is displayed when 10 seconds remain in sterilization cycle. |  |
| Fast Vent | When time runs out in sterilizing mode, the vent valve opens. Steam / water are released back into the reservoir. The display changes as temperature and pressure in chamber changes. |  |
| Caution Keep clear when M9 / M11 door is ready to open! Failure to do so could result in severe burns from steam being released. |
||
| Door To Open | An audible signal is emitted to indicate that the door is about to open. When pressure in chamber reaches zero, the door actuates to partially open (drying mode) position. |  |
| Caution The processed loads may still be wet if the Dry Cycle is aborted prior to completion. Always allow processed loads to dry in the sterilizer before they are handled to avoid re-contamination. |
||
| Drying | Time of Dry Cycle is counted down. If desired, the Dry Cycle can be aborted by pressing the STOP button. |  |
| Drying | When Drying time reaches 0:00... |  |
| Cycle Complete | An audible signal is emitted for 10 seconds. |  |
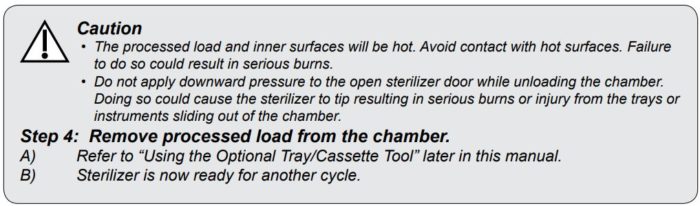
Post-Sterilization Processing
After sterilization is complete, all items must be handled in accordance with accepted and documented standards, such as the Centers for Disease Control and Prevention (CDC) documents, “Guidelines for Infection Control in Dental Healthcare Settings” – 2003, MMWR; 52 (no. RR-17), and “Guidelines for Disinfection and Sterilization in Healthcare Facilities” – 2008, as well as any local requirements that may apply.
Qualified personnel responsible for infection control should prepare a protocol for handling sterilized items. This protocol should be followed by all personnel responsible for handling sterilized items.
And Finally Programmable Cycle Buttons


Note: Pressing the STOP button during this procedure will abort the changes, and revert to the original settings.
| Action | Description | Display |
|---|---|---|
 | To store the temperature. This brings up the sterilization time programing display showing the current value. | |
 | Caution Sterilization time can be adjusted from a minimum of 3 minutes to a maximum of 45 minutes. Because it is important to properly coordinate the cycle time with the sterilization temperature the minimum selectable time will be determined by the temperature setting. |
|
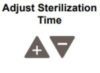 | The “+” and “-” buttons adjust the time by 1 minute increments. | |
| When the desired time appears on the display... | ||
| To store the sterilization time. This brings up the vent speed programing display and the current value. | |
 | In FAST vent, the valve fully opens and vents the chamber. In SLOW vent, the valve opens for a fraction of a second (once per minute) to slowly vent the chamber. Pressing “+” sets it to: FAST Pressing “-” sets it to: SLOW | |
| When the desired setting appears on the display... | ||
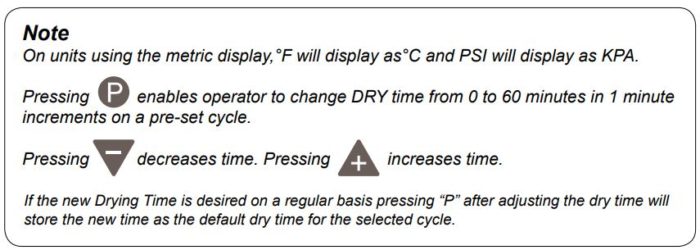
| To store the setting and bring up the dry time programing display and the current value. | |
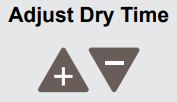 | Dry time can be adjusted from 0 to 60 minutes. The “+” and “-” buttons adjust the time by 1 minute increments. | |
| When the desired time appears on the display... | ||
| To store the setting and complete the programming process. The display will show the new cycle parameters. | |
| Note The programmed settings are retained under Program # button <1> or <2>. Even if power is interrupted, or the unit is unplugged the setting will be retained. |
||
| Caution All materials processed using these cycles must be validated by the user. Failure to do so could result in incomplete sterilization. |
|
*All information taken from Midmark M9/M9D/M11 Self-Contained Steam Sterilizer User Guide TP202 20-42-FO-00014 Rev A1 C2189
As always if you have any questions about this process or anything else please feel free to contact us and take advantage of our “FREE TECH SUPPORT.”
We also offer FREE VIRTUAL TECH SUPPORT to “See and Talk” with a “Real Time Live Technician” for any problems you may be in need of help with.
You can also use our “FREE MAINTENANCE PROGRAM”. Take the guesswork and worrying about what unit is due for maintenance and which maintenance cycle it is time for. We will keep track of all your autoclaves and let you know when it’s time for anything.
Hello, steam escaping the autoclave during the drying cycle. Is that normal to happen? Why does it happen and what can be done to prevent it from happening ?