

Tuttnauer EZ10 Operation Instructions Leave a comment
In this article, we’re going to show you how to operate your Tuttnauer EZ10 tabletop autoclave. The operation of your Tuttnauer EZ10 autoclave is simple, and will show you the basic layouts of how to properly load the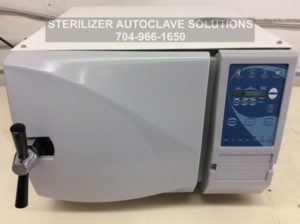 autoclave. and start a proper cycle, ensuring a safew and effective sterilization.
And if you just want to talk to someone for any questions you may have, call our Free Tech Support at 704-966-1650 Option 3.
Preparation Before Sterilization
The purpose of packaging and wrapping items for sterilization is to provide an effective barrier against contamination during storage, once the items have been sterilized.
Instruments to be sterilized must be free from all residual matter, such as blood or organic tissue. Instruments must also be dry and free from mineral deposits. Such substances may cause damage to the instruments themselves or the Sterilizer.
1.) Clean instruments immediately after use to remove any residue. It is recommended that all instruments be ultrasonically cleaned using Tuttnauer’s CLEAN AND SIMPLE enzymatic cleaning tablets or other suitable solution.
2.) After cleaning, rinse instruments under tap water for 30 seconds and pat or air dry to remove residual minerals. If your tap water has a high mineral content, rinse a second time in a bath of distilled water to remove minerals.
3.) Launder textile wraps prior to reuse, but do not use bleach.
4.) Follow the instrument manufacturer’s instructions on the use of products for cleaning and lubricating instruments that have been ultrasonically cleaned.
5.) Be sure that instruments of dissimilar metals (stainless steel, carbon steel, etc.) are separated. Carbon steel instruments should be bagged or placed on autoclavable towels and not directly on stainless steel trays (mixing will result in the oxidation of these metals).
6.) Do not place materials to be sterilized against the chamber’s wall. Place the material only on the tray or rack.
7.) When using a paper / plastic bag, the plastic side should always be down.
8.) Check the instructions of the item manufacturer as to the proper procedure for sterilizing each item.
9.) Items must be sterilized in an open position. Surfaces that are hidden because the item is in a closed position will not be exposed to the steam and will not be sterilized.
 10.) Place a sterilization indicator in each tray or inside each wrapped pack.
11.) At least once a week use a biological spore test (Bacillus Stearothermophilus) in any load to insure proper sterilization. (Be aware, testing standards may vary), always follow the spore test manufacturer’s instructions.
12.) Make sure that all instruments remain apart during the sterilization cycle. Surfaces that are hidden because items are covering other items will not be exposed to the steam and will not be sterilized.
13.) Verify that packaging methods are in accordance with the good practice approach and the packaging materials used are in agreement with applicable standards.
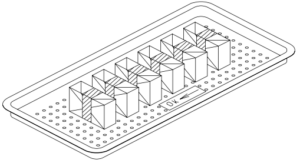
14.) Empty canisters should be placed upside down in order to prevent the accumulation of water.
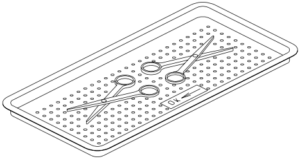
15.) Do not overload the Sterilizer trays. Overloading will cause inadequate sterilization & drying.
16.) Allow a distance of approximately 1″ between trays to permit steam circulation.
17.) Wrapped instruments should be placed in material which will allow steam penetration and promote drying, such as autoclave bag, autoclave paper, or muslin towels.
18.) Do not stack pouches. It is recommended that a pouch rack such as the Tuttnauer POUCH RACK be used to insure proper steam penetration and adequate drying. Surfaces that are hidden, because the items are being stacked, will not be exposed to the steam and will not be sterilized.
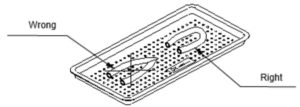
19.) Tubing should be rinsed after cleaning. When placed in the tray make sure that both ends of the tubing are open and there are no sharp bends or twists.
 20.) Packs should be placed upright on the tray. They should not be touching each other or the Chamber walls. There should be about 1” between packs for proper steam circulation.
 21.) If spotting is detected on the instruments, the first step would be to use an ordinary eraser to remove the spot. If there is no pitting under the spot then the spot was only dirt. Dirt spots on an instrument may be an indication that the autoclave needs to be cleaned or that the instruments were not adequately cleaned or dried. If removal of the spot reveals pitting, the spot was most likely rust. Rust spots on an instrument are not uncommon on inexpensive instruments. It may also be an indication that the instruments were rinsed in tap water with a high content of minerals. These minerals when exposed to high temperature and steam will accelerate the oxidation of the metal. One suggestion would be to final rinse the instruments in a distilled water bath.
22.) If the instruments exhibit a discoloration, this can be due to the mixing of carbon steel and stainless steel. When these two metals come into contact with each other an electrolysis occurs that breaks down the metal. The best solution is to separately wrap the carbon steel to insulate it from other instruments or the trays.
23.) Items should not be allowed to touch the walls of the Chamber as the hot metal can damage the item.
Operating Instructions
1.) Remove water reservoir cover. Pour distilled water into the reservoir, through the opening on top of the autoclave, until it reaches the base of the safety valve holder, approximately 0.7 gallons (3 liters).
2.) Plug the power cord into the back of the autoclave and into the wall outlet.
3.) Turn on the rocker switch mounted on the bottom of the front panel.
4.) If a printer is installed, set the clock with the proper date and time.
5.) Press the required key to select the required program. The light indicator of the selected program is illuminated; indicating the program has been selected. The preset data of the program, sterilization temperature, time and dry time are displayed.
6.) Load the material to be sterilized into the chamber according to instructions and close the door making sure the ‘Close Door’ indicator is illuminated.
NOTE: Due to the inherent elasticity of the door gasket, the CLOSE DOOR indicator light may be illuminated green before a complete seal is made between the door and the chamber.
Therefore, in order to ensure that the door is fully sealed, when the green light has been illuminated continue to tighten the door bolt until “hand tight”. Do not overtighten the bolt as this may result in damage to the gasket.
Should the autoclave fail to reach the sterilizing temperature/pressure, always check first that the door is fully sealed. If not, tighten the door bolt further, as described above, until completely sealed.
7.) Press the START key to put the autoclave in operation. WATER INLET is displayed until the correct volume of water is automatically introduced. The autoclave starts performing the sequence of operations. The actual measured values of pressure and temperature are displayed continuously (and printed with optional printer). The indicator lights HEAT, STE, EXH and DRY are turned on and off as each stage is started and completed.
NOTE: It is possible to change parameters, only when the autoclave is not in operation. In order to change the fixed preset parameters, proceed as follows:
To increase or decrease the sterilization temperature, sterilization time or dry time, press the TEMP key and change temp with the UP/DN key.
Pressing the UP/DN key, advances the setting upward or downward by one unit. The displays are updated with every change in the preset data.
8.) During any program that has a drying stage scheduled, the dry stage begins after the steam exhaust stage. The autoclave is equipped with an air compressor that, during the drying stage, draws air through a HEPA filter (0.2μm), pushes that air through the heated chamber and out the air outlet valve to remove moisture and facilitate the drying operation. Drying is performed with the door closed.
9.) At the end of the cycle a buzzer rings for approximately 5 seconds, the START light switches OFF. The air outlet valve is opened to prevent formation of a vacuum. In the event of a program failure, the exhaust valve is opened to release pressure from the chamber and a continuous buzz will sound for 5 seconds followed by an interrupted buzz of 7 seconds.
10.) Open the door and unload the sterilized material from chamber.
11.) The sterility of instruments processed in unwrapped cycles cannot be maintained if exposed to non-sterile environment.
Note: A minimum time interval of 10 minutes needs to be observed between the end of a cycle and the start of a new cycle, to prevent overheating of the autoclave.
 Do not touch the strainer’s cover, mounted on the exhaust line, during and shortly after operation, it will get very hot.
Touching the hot strainer’s cover may cause severe injuries.
As always if you have any questions about this process or anything else please feel free to contact us and take advantage of our “FREE TECH SUPPORT.”
We also offer FREE VIRTUAL TECH SUPPORT to “See and Talk” with a “Real Time Live Technician” for any problems you may be in need of help with.
You can also use our “FREE MAINTENANCE PROGRAM”. Take the guesswork and worrying about what unit is due for maintenance and which maintenance cycle it is time for. We will keep track of all your autoclaves and let you know when it’s time for anything.