
How to Properly Remove and Replace a Midmark M9/M11 Right Side Panel 2
In this article we’d like to cover how to remove the right side panel off of your Midmark M9/M11 autoclave. With our guide, there’s no need to worry about potentially damaging your autoclave.
However, if you’re more of a visual learner, we have a tie-in video available here. Feel free to follow along as we go. And if you just want to talk to someone for any questions you may have, call our Free Tech Support at 704-966-1650 Option 3.
Removing the Cover
To start this process off you’ll first need to do two things:
- Grab a Phillips head screwdriver
- And unplug the power cord from behind the unit itself first, and then the wall.
You can move the power cord out of the way because you won’t need it for the duration of this process.
Note: To reiterate, the right side panel we refer to is the panel on YOUR right hand side as you face the FRONT of the unit. The removal of this panel allows access to the inner electronics of your autoclave such as the PC board and its subsequent processes.
Start by spinning the unit around until you reach the back side of the unit where the air vents are visible. With the screws we need to loosen being on the BACK LEFT side of the autoclave, closest to the power outlet. You’ll notice there are 3 screws from top to bottom. Loosen the very bottom one in the bottom left corner of the door. The other two aren’t required unless you need to remove the entire cover, so leave those alone.
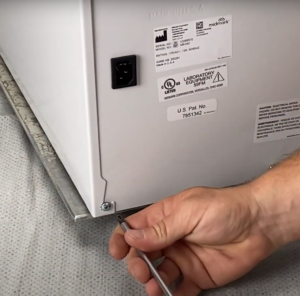
Remember: DO NOT Discard the screws you loosen, put them within view or somewhere you’ll remember them for when you need to reverse this process.
Move your attention to the screws on the top of the unit itself now. There should be 2 screws along the same side as the one you just loosened from the backside. Unscrew them starting from the one closest to you. Once you get that one, hold the panel wall with your other hand before you take the farther screw out.
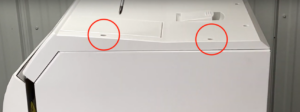
As you start to take the other screw out, the panel will start to hang and if you’re not holding it, can fall and cause damage. So as you hold it, take the last right side screw off and carefully remove the panel and set it to the side out of your way.
Access Granted
Now you’ve successfully removed the right side panel on your autoclave. Your unit is now ready for thorough inspections and any further diagnostics you may need. Now you’ve got access to the inner workings and can get a better view and scale of the issue should something go wrong during your autoclave’s cycles. Whether it’s just standard diagnostics or a deep dive into a prevailing error, now you’ve got the means to figure it out.
But before we leave you be, we’d like to quickly give you a recap on how to reverse this process. Still got those screws from before?
Replacing the Panel
Now that you’ve found what you needed inside the unit, it’s time to get it ready for work once more. Thankfully putting the panel back on is just as easy as taking it out.
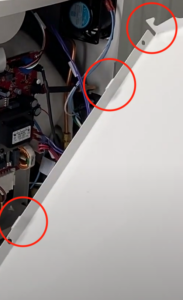
If you look on the bottom lining of the panel and toward the bottom back you’ll notice hook-like patterns. These hooks interlock to secure the door properly as you put it back on. Align the door with these hooks until it sits flush in the unit.
Take one of your screws and tighten the screw into the bottom left hole on the back of the unit, connecting the right side panel in the process. Once the screw and door are secure, just finish it off by screwing in the last two screws back into the top cover of the autoclave.
After that you’re all set!
As always if you have any questions about this process or anything else please feel free to contact us and take advantage of our “FREE TECH SUPPORT.”
We also offer FREE VIRTUAL TECH SUPPORT to “See and Talk” with a “Real Time Live Technician” for any problems you may be in need of help with.
You can also use our “FREE MAINTENANCE PROGRAM”. Take the guesswork and worrying about what unit is due for maintenance and which maintenance cycle it is time for. We will keep track of all your autoclaves and let you know when it’s time for anything.
LOVE the self help videos and tutorials. Do you have one for the top and door panel? Im trying to clean mine up and make it look newer on a shelf.
Hello Brian… we are truly glad the videos and tutorials are helpful to you. We are sorry but at this time we do not have a video on that subject yet. We can however relay the suggestion from the techs. We use Optim1 to wipe the units down. Optim1 is available here. Simple Green and Magic Erasers work very well for any stubborn spots. Really hope this helps you with your maintenance, and we will let you know when we get a video on the cleaning posted.