
W&H Lexa Installation Guide
We’ve recently talked about the W&H Lexa sterilizer, and now we’re going to add onto this press with the installation guide. These installation instructions come from the manufacturers themselves. And if you have any questions about this or anything else, you can call us at 704-966-1650, option 3 for our free tech support.
Installing the Sterilizer
LOCATION REQUIREMENTS
Notice:
Do not place the sterilizer so that it is difficult to operate the controls behind the service door. Do not place the sterilizer so that it is difficult to disconnect the power cord.
Leave the condenser grid (rear side of the sterilizer) free from anything that might obstruct the air passage.
Surface materials should be water resistant. If sterilization cycles will be continuous, pay attention to the surrounding materials: steam can damage them.
The sterilizer must operate in absence of explosive atmospheres. The sterilizer must operate in a well ventilated room (indoor), far from sources of heat and from flammable materials.
Place the sterilizer on a flat and level surface.
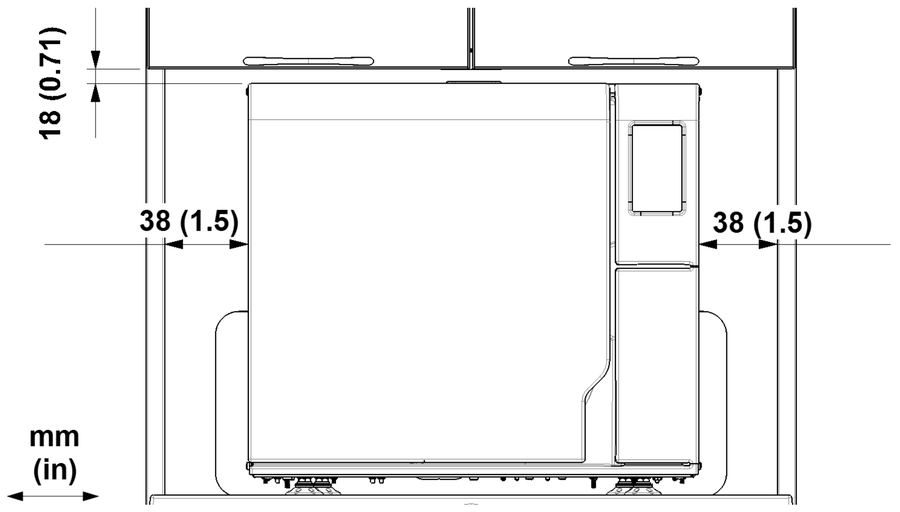
Clearance requirements to ensure proper air circulation:
ELECTRICAL CONNECTIONS
All the cables and tubes connected on the rear side of the sterilizer must be placed far from the condenser grid (e.g. using the available guides).
Notice:
Connect the sterilizer to a dedicated line. Do not use cable extensions nor multiple sockets/adapters.
Ensure that external and internal surfaces are free from moisture or condensation before connecting to power.
The installation of the sterilizer shall be performed by two authorized technicians using PPE (Personal Protective Equipment) according to applicable standards.
The electrical power supply of the sterilizer must fulfill all applicable standards in the country of use, and must comply with the data label on the back of the sterilizer.
WATER CONNECTIONS
The sterilizer clean water tank can be filled manually by the user or automatically with a water supply system . The water supply system must deliver demineralized or distilled water meeting the specifications listed in these instructions. Do not add any chemical/additive to the water.
The manufacturer’s warranty is void if the sterilizer was used with water containing either chemical additives, or contaminant levels exceeding those listed in these instructions. See “Feed water specifications (EN 13060)” on page 100 and “Feed water specifications (ANSI/AAMI and AAMI TIR34)” on page 101.
Notice: The maintenance of the external water filling system must be done in exact accordance with the Instructions for Use given with the relevant system.
WATER TANKS
At every cycle the sterilizer uses new fresh water and, at the end of the cycle, discharges it. Thus, the sterilizer is fitted with two water tanks : the clean water tank and the used water tank.
For this reason is necessary to periodically fill the clean water tank and draining the used water tank.
Filling the Clean Water Tank
Notice:
Before carrying out the following steps, make sure that the sterilizer has completed the cycle in progress.
Always wear appropriate PPE during use of the sterilizer (e.g. gloves for cleaning, maintenance, etc…).
1.) If switched-off, switch the sterilizer ON. If the clean water tank is almost empty, an alert appears on the display.
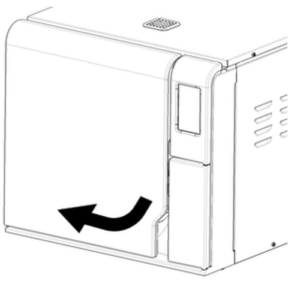
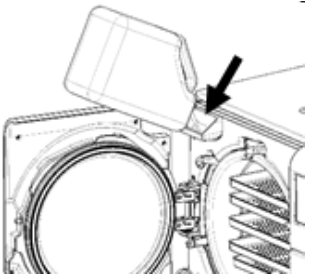
2.) Open the chamber door.
3.) Fill the clean water tank with a water container (app. 1.7 gal (6.4 l)).
Notice: The water must be demineralized or distilled meeting the specifications listed in these instructions (see “Feed water specifications (EN 13060)” on page 100 and “Feed water specifications (ANSI/AAMI and AAMI TIR34)” on page 101.). Do not add any chemical / additive to the water.
Notice: Take care not to pour the clean water out of the tank.
4.) Once the clean water tank is almost full, an audible tone sounds; stop filling.
DRAINING THE USED AND CLEAN WATER TANKS
Notice:
Before carrying out the following steps, make sure that the sterilizer has completed the cycle in progress.
Always wear appropriate PPE during use of the sterilizer (e.g. gloves for cleaning, maintenance, etc…).
1.) If the used water tank is almost full, an alert appears on the display.
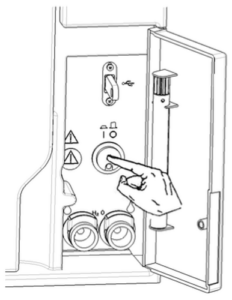
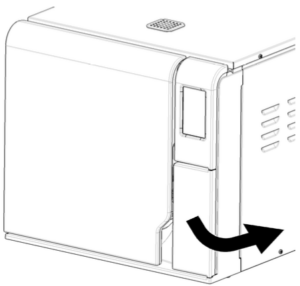
2.) Open the service door at the front of the sterilizer.
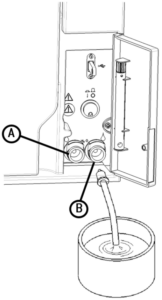
3.) Put a container (1.84 gal (7 l) min) below the sterilizer and insert into it the free end of the drain tube.
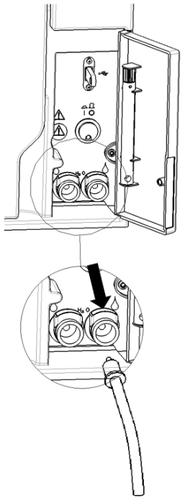
4.) Plug the other end of the drain tube into the drain connector until it clicks. Make sure that the connector is firmly engaged. Use left connector (blue, A) for the clean water and the right connector (grey, B) for the used water.
5.) Let the water flow from the tank completely.
6.) Press the push-button on top of the quick connector to dislodge the drain tube.
LAN Connection (Optional)
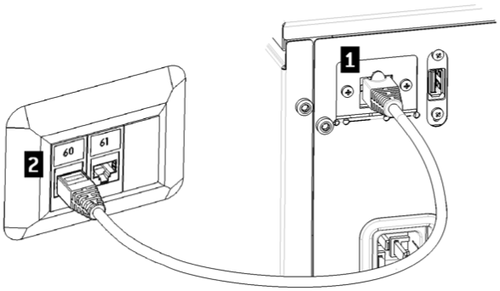
1.) Insert a standard Ethernet cable to in the LAN port of the sterilizer.
2.) Insert the other end of the cable in the LAN port of your computer or computer network: when the sterilizer will be switched on it will connect automatically to the LAN.
Wi-Fi Connection
For the Wi-Fi connection proceed as follows:
- Insert the Wi-Fi key in the USB port.
- Read the Instructions for Use provided with the Wi-Fi key.
Installing the Sterilizer
WARNING! In case of sterilizer malfunctions immediately unplug the sterilizer and call for service. Do not attempt to repair the sterilizer by yourself.
Notice: Please ensure that all installation requirements are met before plugging the sterilizer. See”Connection diagrams”on page 99.
No other devices should be connected to the sterilizer power panel circuit.
- Place the sterilizer on a sturdy, flat and level surface.
- Open the chamber door, remove all items from the sterilizer chamber except the chamber rack. Remove all plastic covers from trays.
- Connect the auto-fill and auto-drain tubes in the rear of the sterilizer (optional).
- Connect the Ethernet cable or the Wi-Fi key in the rear of the sterilizer (optional).
- Attach the power cord to the socket in the rear of the sterilizer and route the cord through the cable guides.
- Connect the power cord to a wall outlet. For power supply requirements, see below.*
*110V Power Supply requirement: 100-125 V AC (±10%); 50/60 Hz; 12 A Single Phase
*220V Power Supply requirement: 200-240 V AC (±10%); 50/60 Hz; 10 A Single Phase
As always if you have any questions about this process or anything else please feel free to contact us and take advantage of our “FREE TECH SUPPORT.”
We also offer FREE VIRTUAL TECH SUPPORT to “See and Talk” with a “Real Time Live Technician” for any problems you may be in need of help with.
You can also use our “FREE MAINTENANCE PROGRAM”. Take the guesswork and worrying about what unit is due for maintenance and which maintenance cycle it is time for. We will keep track of all your autoclaves and let you know when it’s time for anything.