

Tuttnauer 2540MKA Operation Guide
Not too long ago, we released an article going over Tuttnauer’s latest development, their 2540MKA sterilizer. As we do with our content, we gave an overview of the unit…Going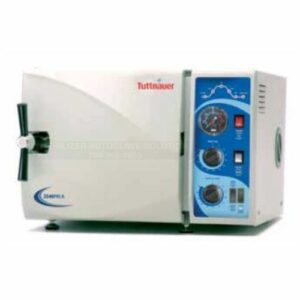 over different qualities, benefits and specifications about the unit itself. And since we’re moving on to our guided content, we come to you this time with the 2540MKA Operation Guide. These instructions come directly from the manufacturer. This is to ensure proper preparation and operation of the unit. And if you have any questions about this or anything else, you can call us at 704-966-1650, option 3 for our free tech support.
Water Quality
The mineral – free water supplied to the autoclave should have the physical characteristics and maximum acceptable level of contaminants indicated in the table below:
Physical Characteristics and Maximum acceptable contaminants levels in steam for sterilizers
(According to EN 13060:2004).
Element Condensate – allowable content
Silicium oxide. (SIO2) ≤0.1 mg/kg
Iron ≤0.1 mg/kg
Cadmium ≤0.005 mg/kg
Lead ≤ 0.05 mg/kg
Rest of metals except iron, cadmium, lead ≤0.1 mg/kg
Chloride (Cl) ≤0.1 mg/kg
Phosphate (P2O5) ≤0.1 mg/kg
Conductivity (at 20°C) ≤3 μs/cm
pH value (degree of acidity) 5 to 7
Appearance Colourless clean without sediment
Hardness (Σ Ions of alkaline earth) ≤0.02 mmol/l
Compliance with the above data should be tested in accordance with acknowledged analytical methods, by an authorized laboratory.
Attention: We recommend testing the water quality once a month. The use of water for autoclaves that does not comply with the table above may have severe impact on the working life of the sterilizer and can invalidate the manufacturer’s guarantee.
Preparation Before Sterilization
The purpose of packaging and wrapping items for sterilization is to provide an effective barrier against contamination during storage, once the items have been sterilized.
VERY IMPORTANT!
When sterilizing cotton wool or pads, it is essential to wrap them in paper or cotton bags in order to prevent the multi-purpose valve and the autoclave openings from becoming clogged with remnants of the material.
Packaging and wrapping materials should be approved for use in a steam sterilizer and permit the removal of air and penetration of the steam during the sterilization process.
The basic principle of determining the size, mass and contents of instrument and hollowware packs is that the contents are sterile and dry immediately upon completion of the drying cycle
Instruments to be sterilized must be clean and free from any residual matter, such as debris, blood, pads or any other material. Such substances may cause damage to the instruments themselves or the sterilizer.
1. Clean instruments immediately after use to remove any residual matter.
2. After ultrasonic cleaning rinse under tap water for 30 seconds and pat dry to remove residual minerals. If your tap water has a high mineral content then rinse a second time in a bath of mineral-free water and pat dry.
3. Launder textile wraps prior to reuse, but do not use bleach.
4. Follow the instrument manufacturer’s instructions for cleaning and lubricating instruments.
5. Be sure that instruments of dissimilar metal (stainless steel, carbon steel, etc.) are separated. Carbon steel instruments should be bagged or placed on autoclavable towels and not directly on stainless steel trays. (Mixing will result in the oxidation of these metals).
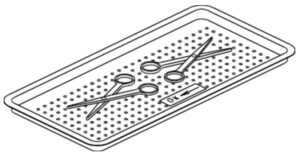
6. Load items within the boundaries of the tray so that they do not touch the chamber walls, or fall off when the tray is inserted into the autoclave. The chamber walls are very hot, items that come into contact with the wall can be damaged.
7. Check the manufacture’s instructions as to the proper procedure for sterilizing each item. The instrument manufacture can give specific information on proper sterilization temperature and sterilization time for any item.
8. Place a sterilization indicator in each tray or inside each wrapped pack
9. When using a paper / plastic bag the plastic side should always be down. Use single-use wraps once only and discard after use.
10. Verify that the packaging method is in accordance with good practice approach and the packaging materials are in accordance with the applicable standards (e.g. EN868 series).
11. At least once per week use a biological spore test (Bacillus Stearothermophilus) in any load to insure proper sterilization. (Be aware testing standard may vary).
12. All instruments must be sterilized in an open position. Place instruments with ratchets opened and unlocked or clipped on the first ratchet position. Surfaces that are hidden because the item is in a closed position will not be exposed to the steam and will not be sterilized
 13. Disassemble or sufficiently loosen multiple-part instruments prior to packaging to permit the sterilizing agent to come into contact with all parts of the instrument.
14. Make sure that all instruments remain apart during the sterilization process. Surfaces that are hidden because items are covering other items will not be exposed to the steam and will not be sterilized
15. Items prone to trapping air or moisture, e.g. hollow ware, should be tilted on edge. This will allow a minimal resistance to the removal of air or condensate during sterilization and drying.
16. The operator may use racks to allow for adequate separation of packaged instruments.
17. Do not overload the sterilizer trays. Overloading will cause inadequate sterilization and poor drying. Load trays loosely to capacity. Instruments should be loaded one level deep only. See table in section 2 for recommended loading capacities.
18. Tubing should be rinsed after cleaning. When placed in the tray make sure that both ends of the tubing are open and there are no sharp bends or twists
19. Empty canisters should be placed upside-down, in order to prevent accumulation of water.
20. Allow a distance of approximately 1” (2.5 cm) between trays or cassettes to permit steam circulation.
21. A gap of approx. 3 cm (1.2″) must be left between the chamber’s surface and the load on the upper tray.
22. Do not stack pouches.
23. Wrapped instruments.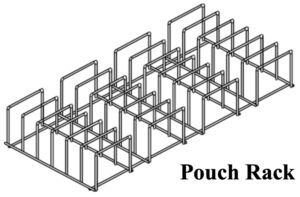
Wrapped instruments should be packed in material which will allow steam penetration and promote drying, such as autoclave bag,
autoclave paper, or muslin towels.
It is recommended that a Tuttnauer Pouch Rack be used. This will allow the operator to place pouches on their side, which will increase capacity and will allow for better exposure to steam for sterilization and better circulation of air for drying.
24. If spotting is detected on the instruments the first step would be to use an ordinary eraser to remove the spot. If there is no pitting under the spot then the spot was only dirt. Dirt spots on an instrument may be an indication that the autoclave needs to be cleaned or that the instruments were not adequately cleaned or dried. If removal of the spot reveals pitting then the spot was most likely rust. Rust spots on an instrument are not uncommon on inexpensive instruments. It may also be an indication that the instruments were rinsed in tap water with a high content of minerals. These minerals when exposed to high temperature and steam will accelerate the oxidation of the metal. One suggestion would be to final rinse the instruments in mineral-free water.
25. If the instruments exhibit a discoloration this can be due to the mixing of carbon steel and stainless steel. When these two metals come into contact with each other electrolysis occurs that breaks down the metal. The best solution is to separately wrap the carbon steel to insulate it from other instruments or the trays.
26. Packs
VERY IMPORTANT! When sterilizing cotton wool or pads, it is essential to wrap them in paper or cotton bags in order to prevent the multi-purpose valve and the autoclave openings from becoming clogged with remnants of the material.
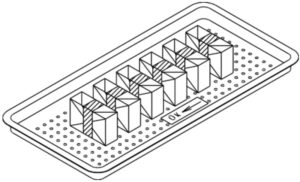
- Place packs upright on trays, side by side.
- Packs should not touch the chamber walls.
- Pack instrument sets in a manner that prevents damage to delicate items.
- Pack hollowware sets so that all openings face the same direction and so that the contents cannot move inside the pack.
- Load packs of folded operating room drapes with layers vertical, allowing air to be removed from the packs rapidly.
- Do not place packs of hollowware and trays of instruments above textile packs or soft goods in order to avoid wetting caused by condensation from items above.
- Load items packed in flexible packaging materials on edge with paper to laminate, or flat with the plastic surface downwards.
Note: The manufacturer’s recommendations shall be observed, concerning the sterilization data for each type of material.
27. Tubing
- When placing in a tray, make sure that both ends are open, without sharp bends or twists.
 Operation
Make sure the power cord is plugged into the back of the unit and also plugged into a power source.
Loading and unloading the Device
Safety
Protective equipment and clothes and other safety instructions should be implemented in accordance with local and national regulations and/or rules!
For proper sterilization – Do not overload the chamber. Only autoclavable products shall be used; please refer to the materials or instruments manufacturers instructions for sterilization of unknown materials or instruments.
Loading
Correct loading of the autoclave is essential to successful sterilizing for several reasons. Efficient air removal from the chamber and the load will permit steam penetration and saturation, and allow proper drainage of condensate. Additionally, correct loading will reduce damage to packs and their contents and maximize efficient use of the sterilizer.
For detailed loading instructions, see sec. 6 (Preparation before sterilization)
 Unloading
On completion of the cycle, the load shall be immediately removed from the sterilizer and a visual inspection made to ascertain that the load is dry, and that sterilizing indicators have made the required color change.
Fill the Water Reservoir
Ensure that the drain valve is in a CLOSED position.
Remove the water reservoir cover.
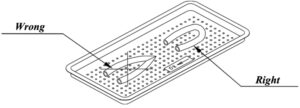
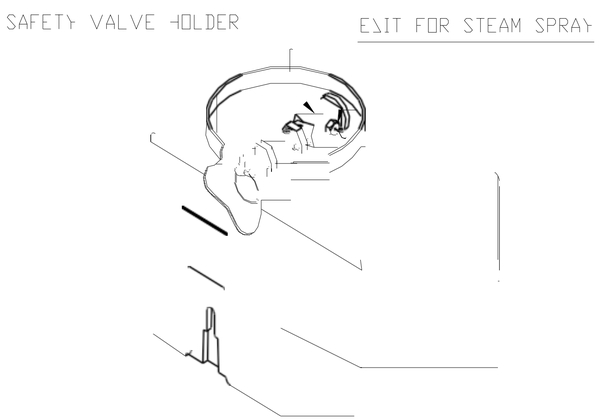
Pour mineral-free water into the reservoir through the opening on top of the autoclave, until it reaches the base of the safety valve holder.
For proper operation make sure the water level is above the coils of the cooling coil
Caution: Under no circumstance should water be filled above the safety valve holder.
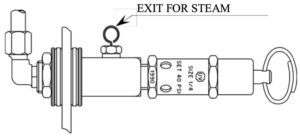
USE MINERAL-FREE WATER ONLY. Use water-having characteristics as per table in sec 5. The impurities in tap water will create the need for more frequent cleaning and maintenance, in addition they will accumulate and block the hole of the Air Jet. This will prevent the temperature in the chamber from rising properly. This will cause the unit to abort its cycle, spore tests to fail and indicator strips not to change color. It is essential from time to time during heating and sterilization phases that a spray of steam should escape, from the Air Jet, causing a hissing sound. If no escaping steam is evident or no hissing sound heard then follow the instructions in sec 8.3 for cleaning the Air Jet.
Caution: Daily before operation, check the water level in the reservoir and add water when required. Once a week or after 20 cycles (the shorter period) replace the water in the reservoir.
 Operation
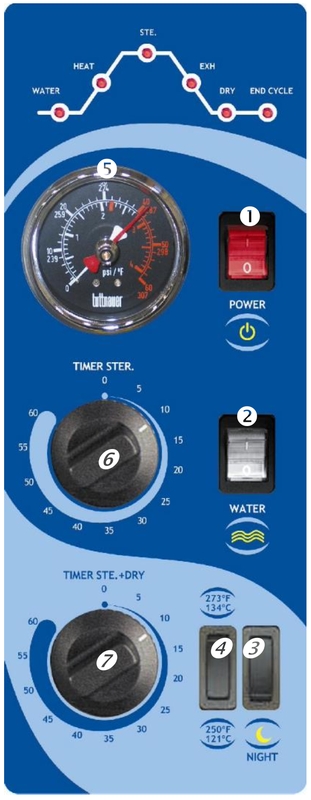
- (1.) POWER
- (2.) WATER
- (3.) NIGHT
- (4.) TEMPERATURE
- (5.) MANOMETER
- (6.) TIMER STER.
- (7.) TIMER STE. + DRY
The following steps have bold numbers that correlate to the corresponding numbers on the above diagram.
1. Make sure the instrument is connected to the power mains.
2. Make sure that mineral-free water reservoir is full – if not, fill water up to the height of the safety valve. The safety valve itself must never be immersed in water.
3. Power up the device by pressing the (1) POWER switch. Make sure that the END CYCLE LED is lit. Make sure that the NIGHT switch is set to ON. Wait about 10 minutes for the device to warm up.
4. At the beginning of each process, turn the red manometer (5) dial to 0.
5. Open the door and press the WATER (2) switch continuously, until the water reaches the line adjacent to the sterilization chamber opening.
6. Place the instruments within the autoclave chamber. Attention! Do not fill the upper tray with too many instruments. Leave room between the instruments and the chamber, to avoid a situation where the material touches the side of the chamber.
7. Select a sterilization temperature (4).
8. Close the door firmly.
9. Turn the two timers (6 and 7) to the desired process time.
| Sterilization Temp | Cold Start | Hot Start | |
|---|---|---|---|
| a. Unwrapped instruments, open glass or metal containers and any other items where such temperature is suitable. | 273°F (134°C) | 16 min. 21 min. | 11 min. 11 min. |
| Single Instruments | 12 min. | 9 min. | |
| b. Wrapped instruments, standard cassettes, rubber tubing and any other items where such temperature is suitable. | 273°F (134°C) | 20 min. 25 min. | 15 min. 15 min. |
| c. Packs and any other items where such temp. is suitable. | 273°F (134°C) | 25 min. | 20 min. |
| d. Any items where a lower sterilization temp. is required. | 250°F (121°C) | 30 min. | 25 min. |
Remarks,
- All items listed are heat up and sterilization times only are given and do not include dry times
a. When a 121°C cycle is selected after a 134°C, turn off the night switch and let the system cool down for approx. 5min. before starting a new cycle. When repeating a 134°C cycles, the night switch should always be on ON position).
b. Timer STR+DRY my be adjusted depending on the load.
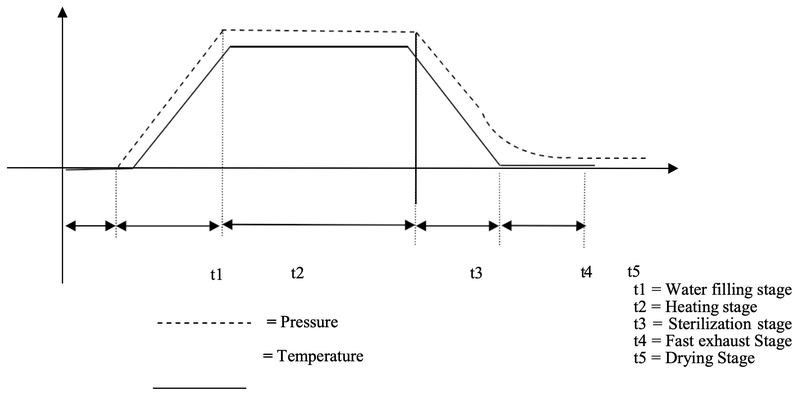
10. Cycle description
Operation Sequence
- Water enters the chamber until the required amount of water for the cycle is reached.
- Steam is generated by electric heating elements heating the water until the sterilization temperature is reached.
- Sterilization temperature is maintained constant for the preset sterilization time.
- Fast exhaust; steam is exhausted out of the chamber at a fast rate until pressure drops to atmospheric pressure.
- Drying; heating of chamber for the preset drying time at a reduced power and venting the chamber with a pump.
![]() Attention: The sterility of instruments processed in unwrapped cycles cannot be maintained if exposed to non-sterile environment.
Attention: The sterility of instruments processed in unwrapped cycles cannot be maintained if exposed to non-sterile environment.
11. At the end of each process, before removing the material, make sure that the manometer’s (5.) red dial has reached the selected sterilization pressure.
- For a 134°C cycle the sterilization pressure is 2.1 – 2.2 Bar.
- For a 121°C cycle the sterilization pressure is 1.1 – 1.2 Bar.
12. Attention! Before opening the door, make sure that the manometer (5.) pressure has gone down to 0 (white dial).
For a regular process without drying, the timer TIMER STE. + DRY (7.) should be set to 5 minutes later than the TIMER STER. (6.) timer.
For activating a process with drying and leaving the premises, the NIGHT (3.) switch must be turned on (which should be turned off upon returning). By Turning on the NIGHT switch the autoclave will not enter “stand-by” mode after the cycle ends, i.e. the heating elements will be turned off completely.
13. Sterilization of solutions
Attention! For sterilizing solutions at 121°C, the NIGHT (3.) switch must be set to 0 and the TIMER STER. (6.) timer set to 30 minutes, while the TIMER STE. + DRY (7.) is set to 0 (the slow exhaust will be carried out through the air vent). To work again with the drying feature, the NIGHT switch must be reset to 1. Attention! Before opening the door, make sure that the manometer pressure has gone down to 0.
This autoclave conforms to all international standards to allow the actual working temperature to exceed the set working temperature by 2°C, (4°F).
Caution: In the event that it is not possible to turn the door handle counter- clockwise in order to open the door, this may be because the pin is firmly lodged within its groove. In order to release the pin, turn the handle slightly in the direction of closure (clockwise). The pin will be released and the operator will be able to open the door. If the door cannot be opened, call service.
As always if you have any questions about this process or anything else please feel free to contact us and take advantage of our “FREE TECH SUPPORT.”
We also offer FREE VIRTUAL TECH SUPPORT to “See and Talk” with a “Real Time Live Technician” for any problems you may be in need of help with.
You can also use our “FREE MAINTENANCE PROGRAM”. Take the guesswork and worrying about what unit is due for maintenance and which maintenance cycle it is time for. We will keep track of all your autoclaves and let you know when it’s time for anything.
The Tuttnauer 2540MKA Sterilizer is available to purchase here.