

Installing a SciCan Statclave G4 Chamber Autoclave Leave a comment
Installing a Scican StatClave G4 General Instructions*
In this article we want to share Scican Ltd.’s proper procedures for installing their StatClave G4 Chamber Autoclave. We will cover Unit Size, Environment Size, Connecting Power, Connecting all necessary tubing, Connecting the Waste Bottle, and Connecting to a network and the internet for normal operation. And if you just want to talk to someone, call our Free Tech Support at 704-966-1650 Option 3.
How much room does a Statclave G4 need?
The Statclave needs to be on a flat level surface that is able to support 175 lbs (79.5 kg)
There needs to be at least 7” (180 mm) of space ABOVE the unit to enable access to the reservoirs. If there is not 7” (180 mm) above the unit, take a screwdriver and remove the front hinge of the clean water reservoir. This allows the reservoir panel to slide in and out of position from the front of the Statclave.
There needs to be at least 2” (50 mm) of clearance space on the right side for ventilation.
Also be certain that the door overhangs the the front of the level surface because the Statclave vents warm air from under the door.
Statclave G4 Dimensions and Operating Environment
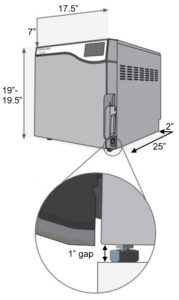
Height with front legs retracted: 19” / 483 mm
Height with front legs fully extended: 19.5” / 495 mm
Width: 17.75” / 450 mm
Depth: 25” / 635 mm
Weight: (empty) 136 lbs/ 61.7 kg
Weight (with full reservoirs and full load): 175 lbs/ 79.5 kg
IMPORTANT! To improve drainage, ensure the unit is tilted toward the back. Use the leveling feet to ensure the front of the unit is 1” (25 mm) from the level surface.
Temperature and Humidity
Do Not install your Statclave in direct sunlight or close to a heat source like vents or radiators. The recommended operating temperatures are between 5˚C-40˚C / 41˚F-104˚F with a maximum humidity of 80%.
Electromagnetic Environment
Your Statclave has been tested and meets applicable standards for electromagnetic emissions. Even though the Statclave does not emit any radiation, it may itself be affected by other equipment that does. We recommend keeping your Statclave away from any potential sources of interference.
Connecting and Powering Your STATCLAVE G4
1 Ensure the power switch at the front right of the unit is in the OFF position and connect the power cord supplied to the power port at the back of the unit.
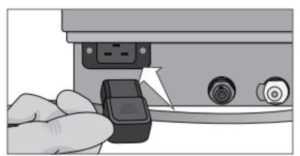
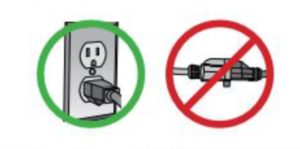
2 Connect directly to a power source. Don’t use an extension cord.
3 Turn ON the power switch located at the front right of the unit.
Electrical Connections
To power your unit, use properly grounded and fused power sources with the same voltage rating as indicated on the serial number label at the back of your Statclave.
- DO use an outlet that is protected by a 15A breaker.
- DO use a dedicated circuit, single phase 120 V~ 60Hz, 12A or 208-240 V~60Hz, 12A, depending on the voltage rating indicated on the serial number label at the back of your unit.
Unit Electrical Characteristics:
- Protection class 1 device.
- Maximum power consumption of the autoclave is 1,440 Watts for 120V and 2,250-3,000 Watts for 208-240V
Connecting Your STATCLAVE G4 Water Draining System
IMPORTANT! For the unit to function, BOTH reservoirs must be full and BOTH drain tubes must be connected.
The Statclave uses water from the Venturi reservoir to generate vacuum draws at the beginning and end of each cycle. For the unit to operate, BOTH the clean water reservoir and the Venturi reservoir must contain the minimum required water levels.
When the chamber releases steam it travels through the condenser and drains from the condenser exhaust tube. Excess water in both the Venturi reservoir and the clean water reservoir drains from the reservoir overflow tube. BOTH elbow fittings at the back of the unit must be connected to a water draining system.
Connecting your Statclave G4 Directly to a Drain
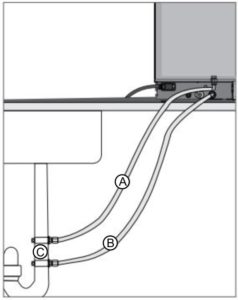
A technician should install any new central drain point. The drain points (C) must be located on the upper portion of the vertical drain pipe ABOVE the P-trap.
For direct-to-drain connections, you will need to use the direct-to-drain hardware (provided with the unit).
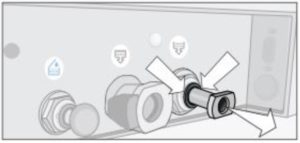
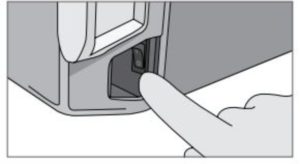
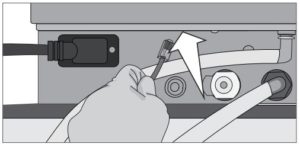
1 The unit is shipped with plugs in its ports. To remove a plug, apply even pressure to the Inner Ring holding it down on either side of the plug and pull out the plug.
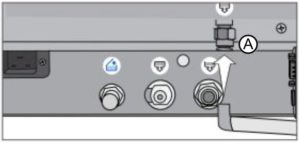
2 Insert one elbow connector with silicone tube to the metal exhaust port (A).
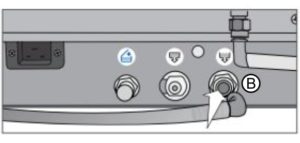
3 Insert the other elbow connector with silicone tube to the plastic reservoir overflow drain port (B).
4 Connect the exhaust tube with elbow fittings (A) to the port installed on the drain pipe (C).
5 Connect the reservoir overflow tube (B) to the remaining port on the drain pipe (C).
Connecting the Statclave G4 Waste Bottle
The Statclave G4 is shipped with a waste bottle in case a direct-to-drain installation is not possible. To use the waste bottle, follow these steps:
1 Set the waste bottle (D) on the ground or in the cabinetry below the unit.
2 Connect the exhaust tube (A) to a port on the waste bottle cap (C).
3 Connect the reservoir overflow tube (B) to a port on the waste bottle cap (C).
IMPORTANT! Avoid excess sagging in the lines; cut both tubes to measure.
IMPORTANT! Tubes should not be kinked, bent or otherwise obstructed. The waste bottle must be lower than the autoclave’s support surface otherwise the reservoirs may not drain correctly.
TIP: Add a small amount of water to the empty waste bottle to give it stability
Connecting your Statclave G4 to a Network
Connecting to a Wired Network
1 Connect Ethernet cable to port at back of unit.
2 From the home screen select the CONNECTIVITY icon.
![]()
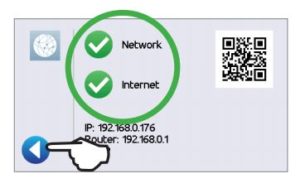
3 Confirm that the unit is connected to both the Network and Internet and press the back icon to return to the home screen.
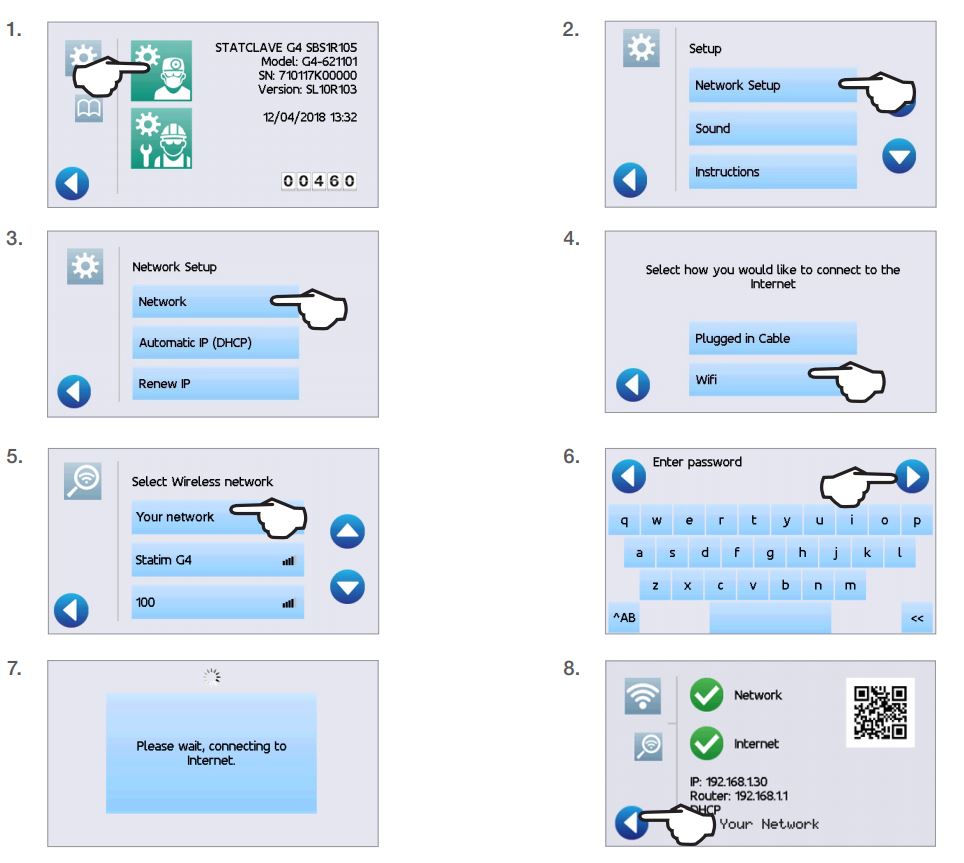
Connecting to a Wireless Network
From the unit’s home screen, select the SETTINGS icon, then follow these steps:
TIPS FROM SCICAN LTD.
Data Security and WiFi –
Ensuring your WiFi® connections are secure is an important element of safeguarding your organization’s data. A WiFi network using WPA2™ provides both security (you can control who connects to it) and privacy (the transmissions cannot be read by others) for communications as they travel across your network. For maximum security, your network should include only devices with the latest in security technology – WiFi Protected Access® 2 (WPA2).
Tips for securing your network
Change the network name (SSID) from the default name. Change the administrative credentials (username and password) that control the configuration settings of your Access Point/Router/Gateway. Enable WPA2-Personal (aka WPA2-PSK) with AES encryption.
Wireless transmission considerations
To comply with Federal Communications Commission and Industry Canada Radiofrequency exposure compliance requirements, the antenna used for this transmitter has been installed to provide a separation distance of at least 20 cm from all persons and must not be co-located or operating in conjunction with any other antenna or transmitter. (The transmission antenna for the wireless card is located in the front fascia.)
See our other posts about Scican Statclave G4 Setup and Operation:
Preparing a Scican Statclave G4 for Use
Scican Statclave G4 Proper Instrument Loading
Running a Cycle on a Scican Statclave G4
*All information taken from SciCan STATCLAVE G4 Chamber Autoclave Operator’s Manual 95-115362 CA EN R3
As always if you have any questions about this process or anything else please feel free to contact us and take advantage of our “FREE TECH SUPPORT.”
We also offer FREE VIRTUAL TECH SUPPORT to “See and Talk” with a “Real Time Live Technician” for any problems you may be in need of help with.
You can also use our “FREE MAINTENANCE PROGRAM”. Take the guesswork and worrying about what unit is due for maintenance and which maintenance cycle it is time for. We will keep track of all your autoclaves and let you know when it’s time for anything.