
Midmark M3 Operating Instructions Leave a comment
In this article, we’re going to show you how to properly operate your Midmark M3 autoclave by using this Midmark M3 Operation Guide. We’ll show you the manufacturer recommended procedure to operate the M3, from basic operation, filling the reservoir, loading trays and cycle selection.
And if you just want to talk to someone for any questions you may have, call our Free Tech Support at 704-966-1650 Option 3.
It’s Time for the Operation
Basic Operation
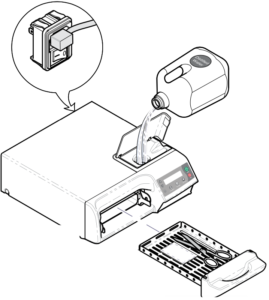
A.)Turn power switch ON (I).
B.) Fill reservoir.
C.) Load tray.
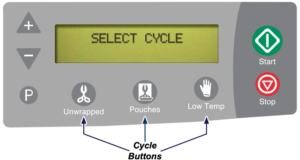
D.) Press desired cycle button.
E.) Press <Start> button.
Note: There is a 10 minute (dry) heat cycle that can be used to pre-heat the chamber, or for additional drying time. Refer to: ‘Additional Heat’ Cycle in this section.
Now for the Power Switch
The power cord must be connected and the power switch must be ON (I) for the sterilizer to operate.

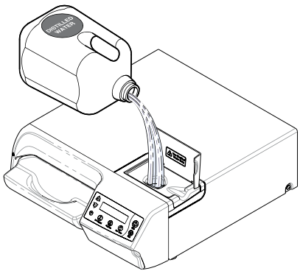
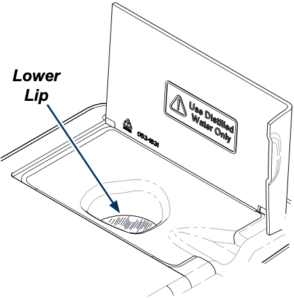
Filling the Reservoir
To fill reservoir…
Pour one (1) gallon of distilled water into fill port. Do not fill above lower lip of fill port.

Qualification Testing
Your sterilizer should be tested after sterilizer installation, malfunctions, relocation, major repairs and after sterilization process failure.
Qualification testing should be performed prior to placing the sterilizer in service. If multiple cycles types are used, e.g. “Pouches” and “Low Temp” each cycle type should be qualified.
Qualification testing should include at least one Biological Indicator (BI) (sometimes referred to as Spore Tests) and one Chemical Indicator (CI).
The test pack should be placed near the front of the tray and performed with items routinely processed and considered to be the most difficult to sterilize. Additional items should be placed in the chamber along with the Biological Indicator and Chemical Indicator so that chamber is fully loaded (don’t exceed the maximum capacities listed in the tables under “Load Size” in this article).
Three consecutive test runs, for each cycle type tested, with negative results from the BIs and the appropriate readings from all physical monitors and chemical indicators demonstrating complete sterilization, provide verification that the sterilizer has been properly installed (or reinstalled after relocation) or repaired to the manufacturer’s specifications and that it will function effectively in the facility in which it is installed. All items processed during qualification testing should be quarantined until the results of the biological testing for all three test runs are available.
On to Loading the Tray
Types of Items 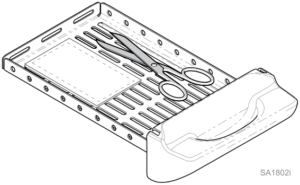
Before placing any instrument in the M3, check with the instrument manufacturer to be sure the materials are compatible with steam sterilization and to verify the acceptability of sterilization parameters.
The M3 is designed to sterilize the following:
- High and low speed handpieces
- Metal instruments
- Rubber / plastic devices (ex. suction cannulas, impression trays, etc.)
- Wrapping / bundling materials (ex. CSR wrap, instrument pouches, etc.)
- Cassettes (Hu-Friedy Signa-Stat [6.5” x 10.5” x 1.25”] or smaller)
- Surgical instruments (ex. ophthalmologic instruments)

Immediate Use Sterilization
The M3 is capable of immediate use sterilization – sterilizing unwrapped instruments for immediate use. Please consider the following when choosing whether or not to sterilize your instruments unwrapped:
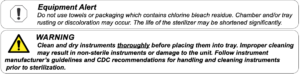
- The sterility of unwrapped instruments is compromised upon exposure to a non-sterile environment. Follow CDC guidelines for using unwrapped, sterilized instruments.
- Due to the sensitive nature of some types of surgery (including, but not limited to ophthalmological), instruments used in such procedures must be wrapped or pouched in order to reduce their exposure to sterilization process residues. The water reservoir should also be drained and refilled with fresh distilled water on a daily basis when processing instruments for these procedures on a routine basis.
Pouching and Wrapping Items
- The M3 is capable of sterilizing pouched or wrapped items.
When pouching or wrapping items, use only sterilizer pouches and wraps that have been cleared by the FDA and labeled for use with the nontraditional steam sterilization cycle parameters, e.g. temperature and exposure time, of the M3 sterilizer. Follow the manufacturer’s instructions for use. - When using cassettes in the M3 follow the manufacturer’s instructions for use.
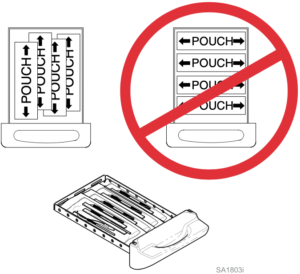
- Pouched items to be sterilized should be placed lengthwise with plastic side of pouch facing up in the M3 tray. The pouches may overlap slightly, but items must not be layered. Refer to diagram below.

Load Size
The M3 Steam Sterilizer can accommodate loads weighing up to 2.4 lbs (1.1 kg).
[Note: This is the weight of the contents in the tray (ex. instruments, cassettes, pouches, etc.). The weight of the tray itself has already been accounted for].

Use the table below as a general guideline for weights of commonly used items. Consult manufacturer’s specifications for the exact weight of any particular instrument.
Item Description Weight* (lbs) Weight* (kg)
Scissors 0.066 0.030
Dental Scalers 0.044 0.020
Forceps 0.033 0.015
Dental Handpiece 0.121 0.055
Suction Cannula 0.022 0.010
Plastic Mouth Mirror 0.018 0.008
Impression Tray 0.033 0.015
Plastic X-Ray Positioning Ring 0.044 0.020
Hu-Friendly Signa-Stat Cassette 1.500 0.680
(*actual weights may vary)
Packing the Tray
In addition to total load weight outlined above, all items must be processed in accordance with Centers for Disease Control and Prevention (CDC), ‘Guidelines for Infection Control in Dental Healthcare Settings’ – 2003, MMWR 2003; 52 (no. RR-17), which states:
“Items to be sterilized should be arranged to permit free circulation of the sterilizing agent (e.g., steam, chemical vapor, or dry heat); manufacturer’s instructions for loading the sterilizer should be followed.”
- All items must fit in M3 tray.
- Loaded tray must slide into chamber opening without scraping.
- Items must not touch one another.
- Pouched items should be loosely packed.
- Pouches may overlap slightly, but items must not be layered.

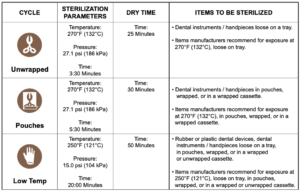
Cycle Selection

Cycle Parameters
Post-Sterilization Processing
After sterilization is complete, all items must be handled in accordance with accepted and documented standards, such as the Centers for Disease Control and Prevention (CDC) document, ‘Guidelines for Infection Control in Dental Healthcare Settings’ – 2003, MMWR 2003; 52 (no. RR-17), as well as any local requirements that may apply.
Qualified personnel responsible for infection control should prepare a protocol for handling sterilized items. This protocol should be followed by all personnel responsible for handling sterilized items.
‘Additional Heat’ Cycle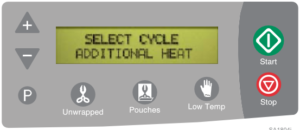
The Additional Heat Cycle activates the dry heaters for ten minutes. This cycle can be used to pre-heat the chamber at the beginning of the workday, or for extended drying time at the end of a cycle.
To pre-heat chamber prior to running a cycle…
A) Press <Start> button when ‘SELECT CYCLE’ appears on display.
B) During the ten minute pre-heat mode, ‘ADDITIONAL HEAT’ will flash on the display.
C) When ‘ADDITIONAL HEAT’ stops flashing, press desired cycle button, then press <Start>
For extended drying time at the end of a cycle…
A) Press <Start> button when ‘SELECT CYCLE’ appears on display.
B) During the ten minute drying mode, ‘ADDITIONAL HEAT’ will flash on the display.
Adjusting the Drying Time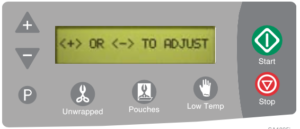
The M3 allows the operator to adjust the drying time from 20 – 60 minutes using 1 minute increments for the three pre-programmed cycles.
To adjust the drying time for a pre-programmed cycle…
A.) After pressing desired cycle button, press <P> button. [Display will show current setting. (ex. DRY TIME: 30 MINUTES)]
B.) Press the <+> / <_> buttons to increase / decrease the drying time.
C.) Press the <P> button to save your changes. (Pressing the <Stop> button cancels the changes and returns to last saved setting.)
You can view the Midmark M3 Installation Guide here.
If you have any questions about this procedure or any other Midmark M3 Tech Issues please contact us and let us help.
As always if you have any questions about this process or anything else please feel free to contact us and take advantage of our “FREE TECH SUPPORT.”
We also offer FREE VIRTUAL TECH SUPPORT to “See and Talk” with a “Real Time Live Technician” for any problems you may be in need of help with.
You can also use our “FREE MAINTENANCE PROGRAM”. Take the guesswork and worrying about what unit is due for maintenance and which maintenance cycle it is time for. We will keep track of all your autoclaves and let you know when it’s time for anything.
The Midmark M3 autoclave is available here.
We have our selection of Sterilization Monitoring products available to purchase here.