
Midmark M3 Installation Instructions Leave a comment
In this article, we’re going to tell you all about the manufacturer’s guide to properly install your Midmark M3 Autoclave. The M3 unit is Midmark’s “compact powerhouse” and requires no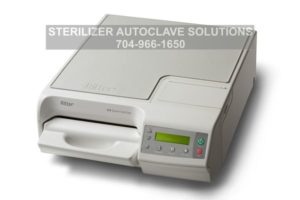 supplemental air or water filtration systems. But also has it’s own built-in safety features. Its quick cycle times, reliability, ease of use and minimal maintenance make it the perfect companion to Midmark’s bigger machines. With all of that, the M3 makes it easier to manage said quick cycles so that you can devote more time to the most important thing, your patients. And if you just want to talk to someone for any questions you may have, call our Free Tech Support at 704-966-1650 Option 3.
Installation Process
Location Requirements
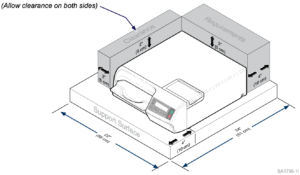
Support Surface
Material should be water-resistant material
(Ex. laminate, stainless steel, stone, etc.)
- Surface must be level to ensure proper operation.
- Surface should meet minimum dimensions listed below:
Dimensions
Depth (front to back)……………..24 in. (61 cm)
Width (side to side)……………….22 in. (56 cm)
Clearance Requirements
To ensure proper air circulation and to allow access to the reservoir fill port and drain coupling, adhere to the minimum clearance requirements listed below.
Clearance Requirements:
Back of unit- Back wall ………………………………………….4 in. (10cm)
Front Sterilizer Feet – Front of Support Surface ………………………………………….4 in. (10cm)
Side of unit- Side wall ………………………………………….2 in. (5cm) each side
Distance above unit* ………………………………………….2 in. (5cm)*
*The minimum clearance for proper air circulation is listed. However, be sure to allow access to the reservoir fill port located on top of the sterilizer.
Operating Environment

Equipment Alert: Unit should be allowed to reach room temperature before operating. Failure to do so could result in damage.
Ambient Temperature Range:………. +68°F to 104°F (+20°C to 40°C) Relative Humidity:………………………. less than 80% (non-condensing)
(Pollution Degree 2, in accordance to IEC664)
Normal Operating Altitude: ………….. less than 6000 ft. (1829 m) above sea level
- Approved for indoor use only
- Environment should be relatively dust-free
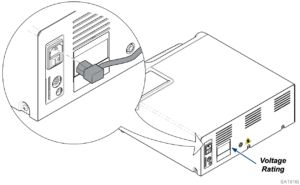
Electrical Ratings/Requirements
Note: To ensure unit is properly grounded, it must be connected to a matching grounded, dedicated, correctly polarized receptacle.
![]() Caution: Use 104-127 VAC, 50/60 HZ alternating current only for 115 VAC rated models and 207-253, 50/60 HZ alternating current only for 230 VAC rated models. Failure to do
Caution: Use 104-127 VAC, 50/60 HZ alternating current only for 115 VAC rated models and 207-253, 50/60 HZ alternating current only for 230 VAC rated models. Failure to do
so could result in electrical shock to personnel and will result in damage to sterilizer.
M3 (115V model): ………………………115 VAC, 50/60 Hz, 12 amp
Max. Power Consumption: …………1400 Watts
Requires*:…………………………………Dedicated supply circuit rated at 120 VAC, 50/60 Hz, 12 amp
M3 (230V model):………………………230 VAC, 50/60 Hz, 6 amp
Max. Power Consumption: …………1400 Watts
Requires*:…………………………………Dedicated supply circuit rated at 230 VAC, 50/60 Hz, 6 amp
*Power source must have over voltage limits less than 1500 watts from mains to ground. (Installation Category II in accordance to IEC 664)
Power Cord Connection
![]()
Warning: Equipment is not suitable for use in the presence of a flammable anesthetic mixture with oxygen, air, or nitrous oxide. Clarification: Equipment is suitable for use in the presence of oxygen, air, or nitrous oxide.
![]()
Warning: Check the serial number label on back panel of sterilizer to verify voltage rating for the unit. Failure to connect sterilizer to an appropriate power supply could result in damage to the unit and electrical shock to personnel.
For optimal performance, allow sterilizer to reach room temperature before operating.
To connect the power cord:
A.) Plug power cord into receptacle on back of sterilizer.
B.) Plug power cord into a properly polarized and grounded receptacle rated for a minimum of 15 amps. A dedicated circuit only used for the sterilizer is recommended.
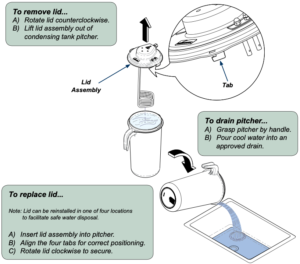
External Condenser Tank
Connections
Note: External Condensing Tank is not needed if M3 is connected to the VistaCoolTM Direct-To-Drain Thermal Reduction System.


If you have any questions about this procedure or any other Midmark M3 Tech Issues please contact us and let us help.
As always if you have any questions about this process or anything else please feel free to contact us and take advantage of our “FREE TECH SUPPORT.”
We also offer FREE VIRTUAL TECH SUPPORT to “See and Talk” with a “Real Time Live Technician” for any problems you may be in need of help with.
You can also use our “FREE MAINTENANCE PROGRAM”. Take the guesswork and worrying about what unit is due for maintenance and which maintenance cycle it is time for. We will keep track of all your autoclaves and let you know when it’s time for anything.