
Midmark M11 “NS” Maintenance Instructions Leave a comment
In this article, we’re going to show you the manufacturer recommended way to properly maintain your Midmark M11 “New Style” Autoclave. The unit’s maintenance schedule consists of daily, weekly and monthly routines that we’ll cover in this article.
And if you just want to talk to someone for any questions you may have, call our Free Tech Support at 704-966-1650 Option 3.
Maintenance Messages
To assure proper operation and maximum sterilizer life, carefully follow all recommendations for periodic maintenance. Recommended maintenance is easy to do and takes very little time.
One of the MOST important steps you can take to prevent problems with your sterilizer, is to ensure that ONLY distilled water or water that meets the referenced water purity specifications – NOT TAP WATER – is used in the sterilizer. Since the sterilizer operates with high water temperatures, any minerals dissolved in the water will form mineral deposits. This can prevent valves from opening or closing properly and can also lead to corrosion in the chamber and tubing.
Maintenance reminders will be displayed on the screen at the appropriate intervals to assist the operator. These reminders are removed from the display screen once a cycle is started.
The user is responsible for establishing a periodic maintenance procedure to assure correct operation of equipment and reliable sterilization of loads. Contact your local Midmark distributor or service representative to develop a program for planned maintenance.
Daily Maintenance
EQUIPMENT ALERT: If the sterilizer is used frequently to process dental handpieces that have been lubricated or dipped in dental milks, drain the water from the reservoir daily. Refill the reservoir with distilled water or water that meets the referenced water purity specifications.
Clean External Surfaces
A) Wash the exterior of the sterilizer each day according to your facility’s procedure for clinical contact surfaces, noting the following: (Use only quaternary disinfectants to disinfect unit. Staining, pitting, discoloration, or softening could occur if phenolic, iodophor, or glutaraldehyde-based disinfectant is used on plastic surfaces of the unit. Also, use of alcohol or aerosol spray cleaner / disinfectant containing substantial amounts of alcohol in the formula can damage the faceplate).
B) Wring excess solution from the cloth.
C) Using soft cloth, wipe all external surfaces.
D) Follow the instructions provided with the cleaner / disinfectant used regarding rinsing and drying of the external surfaces.
Clean Sterilizer Door/Dam Gaskets 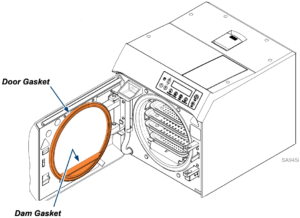
A.) Examine gaskets for possible damage.
B.) Clean gaskets and mating surfaces with a damp cloth.
Weekly Maintenance
EQUIPMENT ALERT: Failure to change water may result in sterilizer malfunction. Do not use bleaching agents or any abrasive materials / substances in chamber (i.e. bleach, steel wool, wire brush, scouring powder, etc.). Failure to comply may result in damage to the chamber and/or other components.
NOTE: Every seven days, the autoclave will automatically display the PERFORM WEEKLY MAINTENANCE message. If power is disconnected, the cycle of weekly messages will be reset.
CAUTION: To prevent burns, allow unit to cool before draining reservoir.
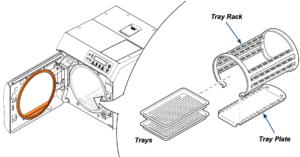
Clean Chamber / Trays (including Rack and Plate)
A.) Disconnect the upper portion of the reservoir drain tube from the panel clips, bend it downward, and drain the reservoir water into a suitable container, e.g. a bucket and dispose of the water.
B.) Remove the Trays, Tray Rack and Tray Plate from the sterilizer.
(Refer to the following page for instructions on removing / installing the tray rack and tray plate).
C.) Wash trays, rack, plate and inside of chamber with mild soap or Speed-Clean and distilled water or water that meets the referenced water purity specifications.
D.) Refill reservoir with distilled water or water that meets the referenced water purity specifications.
WARNING: Allow unit to cool before removing or installing tray rack and plate. Handle metal tray rack carefully to avoid injury. Do not run sterilizer without tray plate in place.
To remove tray rack / plate…
A.) Remove trays.
B.) Using a screwdriver, pry plate up while pulling tray rack / plate out of chamber.
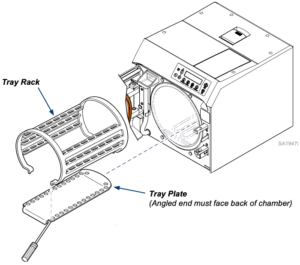
EQUIPMENT ALERT: Install tray rack / plate with angled end of plate toward the back of the chamber. Do not allow plate to contact the water level sensor.
To install tray rack / plate…
A) Insert the tray rack into the tray plate.
B) Place back of tray plate in chamber.
C) Press down on tray rack, while sliding into chamber.
WARNING: DO NOT PROCESS INSTRUMENTS WHILE FLUSHING SYSTEM.
EQUIPMENT ALERT:Use only Speed-Clean to flush system. Failure to flush system with Speed-Clean may result in the premature failure of sterilizer components.
NOTE: Every 28 days, the sterilizer will automatically display the PERFORM MONTHLY MAINTENANCE message. If power is disconnected, the cycle of monthly messages will be reset.
CAUTION: To prevent burns, allow unit to cool before draining reservoir.
Clean Chamber/Plumbing
A.) With a cooled chamber, drain the sterilizer’s reservoir and refill with clean distilled water or water that meets the referenced water purity specifications. Add one ounce of Speed-Clean sterilizer cleaner directly to the bottom of chamber.
B.) Run one Pouches cycle.
C.) Press Stop button when Dry Cycle begins. (Dry Cycle is not needed during maintenance.)
D.) Drain reservoir and refill a second time with clean distilled water or water that meets the referenced water purity specifications.
E.) Rinse by running one Unwrapped cycle. Push the “Stop” button when the drying cycle begins.
F.) Drain and refill reservoir with clean distilled water or water that meets the referenced water purity specifications, then allow sterilizer to cool.
G.) Remove tray plate, rack and trays. Wipe off with a damp cloth.
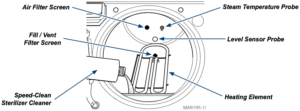
EQUIPMENT ALERT: Use care when wiping the inside of the chamber. Failure to comply may result in damage to the heating element, steam temperature probe and/or level sensor probe.
EQUIPMENT ALERT: Do not operate sterilizer without filters in place.
H.) Remove and clean filters. The Fill/Vent filters are intended to prevent debris from causing valve failures. Between regular monthly cleanings if the fill or vent times become too long or items will not dry the filters should be cleaned. (Refer to the illustration for location of filter screens.)
I.) Grasp filter and gently pull away from chamber wall while twisting slightly. (If necessary, pliers may be used to remove filters)
J.) Clean filters with Speed-Clean and distilled water. A small stiff bristled brush or ultrasonic cleaner may be helpful. Rinse filters with distilled water. Replace filter(s) if debris cannot be removed by cleaning.
K.) Wipe out the inside of chamber.
L.) Install filters. (Press inward, toward chamber wall while twisting slightly).
M.) Install tray plate, rack and trays.
Remove / Clean Door and Dam Gaskets 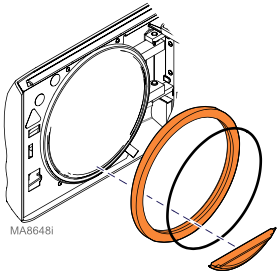
A.) Remove Door and Dam Gaskets from chamber door, then remove the gasket ring from the door gasket.
B.) Clean gaskets and ring with Speed-Clean, distilled water and a soft brush.
C.) Inspect gaskets for damage / shrinking / swelling. Replace gaskets if damage is apparent.
D.) Press gasket ring into the channel in the door gasket and reinstall the gasket in the door.
E.) Install dam gasket.
Check Pressure Relief Valve
(must be checked each month to assure it functions properly)
A.) Press Unwrapped button
B.) Press Start button
CAUTION: During the pressure relief valve check, steam will be vented from under the sterilizer. To keep from being burned, place a steam barrier (a rolled up towel) around the bottom of the sterilizer.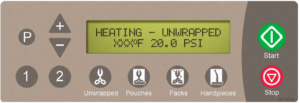
C.) Wait until pressure in chamber reaches 20 PSI (138 kPa).
D.) Pull upward firmly on the pressure relief lever for approximately 3 seconds, then release. (Steam should discharge freely from beneath rear of unit when lever is pulled. If the valve does not close completely when lever is released, pull lever again and release quickly so that it snaps closed. Repeat this until valve seats properly).
E.) Press Stop button
(This aborts the cycle to prevent overheating)
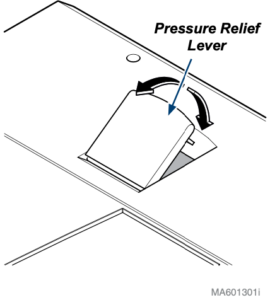
EQUIPMENT ALERT: If excessive force is required to open the pressure relief valve, or if the valve will not reseat properly, the valve must be replaced. (Refer to “Calling for Service” in this manual).
Extended Use Maintenance
The M9® / M9D® are designed and tested to provide exceptional reliability throughout their service life. However, like all electro-mechanical devices they are subject to wear and degradation with use.
To ensure the integrity, performance and safety of all major components it is the responsibility of the user to have the sterilizer performance / operation verified by a Midmark Authorized Service Provider at least every 10 years or 10,000 cycles, which ever comes first. After 10 years or 10,000 cycles of use, an annual inspection by a Midmark Authorized Service Provider is recommended.
If you have any questions about this procedure or any other Midmark M9 Tech Issues please contact us and let us help.
As always if you have any questions about this process or anything else please feel free to contact us and take advantage of our “FREE TECH SUPPORT.”
We also offer FREE VIRTUAL TECH SUPPORT to “See and Talk” with a “Real Time Live Technician” for any problems you may be in need of help with.
You can also use our “FREE MAINTENANCE PROGRAM”. Take the guesswork and worrying about what unit is due for maintenance and which maintenance cycle it is time for. We will keep track of all your autoclaves and let you know when it’s time for anything.
The Midmark M11 Autoclave is available here.
The Midmark M11 Door Gasket Kit available here.