
Midmark M7 Installation Instructions Leave a comment
In this article, we’re going to show you how to properly install your Midmark Ritter M7 Speedclave. Unlike most autoclave instructions, the installation process for the Midmark M7 is much shorter and less verbose. The installation essentially involves paying attention to the dimensions of the unit and the area in which you choose to store it for use. Following these measurements and using the words of warnings throughout will help you install your M7 properly in no time!
And if you just want to talk to someone for any questions you may have, call our Free Tech Support at 704-966-1650 Option 3.
Electrical Requirements
Refer to the serial number label located on the underside of the sterilizer and connect the three prong electrical supply cord to the appropriate electrical supply.
Specifications
- Overall length ……..18.125″ (46.04 cm)
- Overall width ……. 13.56” (34.45 cm)
- Overall height …….. 12.81″ (32.5 cm)
- Counter area ……. 16 1/2″ x 14″ (410 mm x 345 mm)Chamber ……… 7 1/2″ x 15″ (19.0 cm diameter x 38.1 mm deep)
- Chamber Safety Valve …. set at 31 PSI (214 kPa)
Trays
- Large (2) …………. 12″ x 5.625″ x 0.875″ (30.5 cm x 14.3 cm x 2.22 cm)
- Small (1) …………. 12″ x 4.125″ x 0.875″ (30.5 cm x 10.5 cm x 2.22 cm)
Weight
- Empty …………. 32 lb (14.5 kg)
- Operating …………. 33 lb (15.1 kg)
Electrical
- 50 Hz Model ……….230 Volts, 5 Amp, single phase
- 60 Hz Model……….115 Volts, 10 Amp, single phase
- Heater Element …..1150 Watts
- Heater Insulation … 20 Megaohms or better
Sterilizer Location
The sterilizer must be placed on a level surface to ensure proper gravity filling of water in the chamber. If the sterilizer is going to be operated under the unusual condition of heavy duty continuous cycles, locate the sterilizer where excessive emission of steam will not damage materials and equipment in the surrounding area.
Allowing sufficient time between cycles for cooling the unit or refilling the reservoir with water (as outlined in step one of the operating instructions) minimizes the emission of steam from the water reservoir fill area.
 DANGER – EQUIPMENT ALERT: Do not use this sterilizer where explosive anesthetics are stored.
A.) Table Top Height: 31″ (760 mm) to 37″ (920 mm) above the floor. 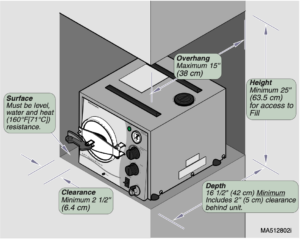
B.) Table Top Surface: Formica, stainless steel or stone. Material to resist spilled water, steam blow-off, discoloration of paint, etc. Heat from bottom of sterilizer will produce about l60°F (71°C) temperature on the surface of the table for short periods of time.
C.) Back Ventilation: Allow about 22″ (540 mm) of counter depth which gives
2 1/2″ (60 mm) of space behind the sterilizer for air circulation when there is a wall behind the sterilizer.
D.) Distance to Side Walls: The sides of the sterilizer should be a minimum of
2 1/2″ (60 mm) from walls, equipment, or other obstructions that might inhibit side air ventilation of the unit.
E.) Distance Above Sterilizer: Wall cabinets or shelves should be no less than 25″ (600 mm) above the counter to provide space for filling the reservoir with water and cooling processed trays.
If you have any questions about this procedure or any other Midmark M7 Tech Issues please contact us and let us help.
As always if you have any questions about this process or anything else please feel free to contact us and take advantage of our “FREE TECH SUPPORT.”
We also offer FREE VIRTUAL TECH SUPPORT to “See and Talk” with a “Real Time Live Technician” for any problems you may be in need of help with.
You can also use our “FREE MAINTENANCE PROGRAM”. Take the guesswork and worrying about what unit is due for maintenance and which maintenance cycle it is time for. We will keep track of all your autoclaves and let you know when it’s time for anything.