
Tuttnauer EZ10 Installation Instructions Leave a comment
In this article, we’re going to show you how to install your Tuttnauer EZ10 tabletop autoclave. The installation process of your Tuttnauer EZ10 autoclave is essentially checking everything and preparing it for operation.
And if you just want to talk to someone for any questions you may have, call our Free Tech Support at 704-966-1650 Option 3.
Installation

 Caution: The sterilizer must be placed on a rigid and leveled surface. The counter must be able to hold the load of the device and loaded material as follows:
Model EZ9 EZ10/EZ10K
Load on Counter lb 106 117
kg 48 53
Note: Make sure while placing the autoclave, to leave space around the machine, to give the technician access to service the machine.
Electrical
The electrical connection should comply with the device’s power requirement. It must also comply with local installation and safety rules and regulations. The voltage supplied to the device must comply with the label ± 5%.
In order to avoid any injury by electrical hazard, it is mandatory for the customer to have installed an earth leakage relay (GFI outlet or circuit breaker) in the electrical circuit to which the autoclave is connected. This relay disconnects all the poles of the electrical power line in case of accidental contact with the autoclave’s metal enclosure, by the operator or another person, leading to a dangerous leakage current.
Note: Keep the back and the right side of the autoclave approximately 1” (25mm) away from the wall to allow for ventilation.
Connect the power cord to the socket on the rear side of the autoclave; plug it into the supply outlet. The autoclave must be connected to a properly grounded outlet.
Setup
Your new Tuttnauer Autoclave was set at the factory and requires a minimal of setup.
- Make sure the counter is level and sturdy.
- Make sure all the feet are on the autoclave and none have been lost.
- Position the autoclave on the counter.
- Fill the reservoir with distilled water
- The unit is ready to operate.
Water Filling
Automatic Water Filling
The proper amount of water for automatic filling in your new Tuttnauer autoclave has been preset at the factory. However, if in routine operation there is inadequate water in the chamber, the operator can adjust the level with the automatic built-in system by doing the following:
- Press STOP key repeatedly until the message “code xxx” appears on the display.
- Use the UP or DN arrow keys to change the code to 105, then press the STOP key.
- A message will be displayed saying “Water in = xx sec”.
- Press UP or DN keys to increase or decrease water inlet time.
- Press the STOP key to enter new water inlet time into memory.
- If necessary, press the STOP key again to bring up the program display.
Note: DO NOT attempt to automatically fill the chamber with the DOOR open. Water will overflow out of the chamber.
Warning: If it becomes necessary to RESET the software program it will be essential to repeat all steps listed above. This will ensure that the correct amount of water enters the chamber for operation.
Checking the Automatic Fill
To check the automatic fill, follow these steps:
- Remove any water that is in the chamber.
- Make sure the unit is turned on.
- Place a collecting vessel under the autoclave’s door.
- With the door open, press and hold the door switch, then press the START key.
- When water starts flowing into the chamber, release the door switch.
- Water should come beyond the groove at the front of the chamber, and a small amount will pour into the collecting vessel.
- After the automatic filling is completed, tilt the autoclave and pour all the water in the chamber into the collecting vessel.
- Measure and verify that the amount of water pumped into the chamber is 500-600 ml.
- If the water is not filling correctly, follow the adjustment procedure above.
Warning: If it becomes necessary to RESET the software program it will be essential to repeat all steps listed above. This will ensure that the correct amount of water enters the chamber for operation.
VERY IMPORTANT – Due to the fact that the water lines are empty when the unit is shipped, air may become trapped in the lines. It is recommended that for the first operation these steps are followed to make sure water is flowing freely.
Open the door, press the Water Inlet key. When water enters the chamber, release the key and remove the water.
Lifting and Carrying
Caution: Before moving the autoclave, make sure that the electric cord is disconnected from the power and there is no pressure in the chamber.
- Disconnect the power supply cord.
- Drain the water from the reservoir and vessel.
To avoid injuries, lifting and carrying should be done by two people.
Do not drop this device!
Loading and Unloading the Device
Safety
Protective equipment, clothes and other safety instructions should be implemented in accordance with local and national regulations and/or rules!
For proper sterilization – Do not overload the chamber. Only autoclavable products shall be used; please refer to the materials or instruments manufacturers instructions for sterilization of unknown materials or instruments.
Loading
Correct loading of the autoclave is essential to successful sterilizing for several reasons. Efficient air removal from the chamber and the load will permit steam penetration and saturation, and allow proper drainage of condensate. Additionally, correct loading will reduce damage to packs and their contents and maximize efficient use of the sterilizer. For detailed loading instructions.
Unloading
On completion of the cycle, the load shall be immediately removed from the sterilizer and a visual inspection made to ascertain that the load is dry, and that sterilizing indicators have made the required color change.
Filling the Water Reservoir
Remove the water reservoir cover. Pour distilled water into the reservoir through the opening on top of the autoclave until it reaches the base of the safety valve holder, approximately 0.7 gallons (3 liters).
Caution: Under no circumstance should water be filled above the safety valve holder.
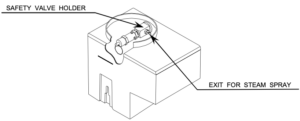
USE DISTILLED WATER ONLY. The impurities in tap water will create the need for more frequent cleaning and maintenance, in addition, they will accumulate and block the hole of the Air Jet. This will prevent the temperature in the chamber from rising properly. This will cause the unit to abort its cycle, spore tests to fail and indicator strips not to change color. It is essential from time to time during heating and sterilization phases that a spray of steam should escape, from the Air Jet, causing a hissing sound. If no escaping steam is evident or no hissing sound heard, follow the instructions in sec 9.4 for cleaning the Air Jet.
As always if you have any questions about this process or anything else please feel free to contact us and take advantage of our “FREE TECH SUPPORT.”
We also offer FREE VIRTUAL TECH SUPPORT to “See and Talk” with a “Real Time Live Technician” for any problems you may be in need of help with.
You can also use our “FREE MAINTENANCE PROGRAM”. Take the guesswork and worrying about what unit is due for maintenance and which maintenance cycle it is time for. We will keep track of all your autoclaves and let you know when it’s time for anything.