
Sterisil System G5 Maintenance Instructions Leave a comment
In this article, we’re going to show you how to properly install and operate your Sterisil G5 Dental Water Purification System.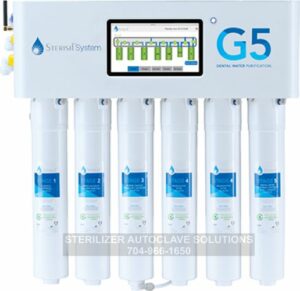
In our previous article about the Sterisil System G5, we showed you how to install and operate your new unit. As well as covering the main points of the System G5’s capabilities as your new EPA registered dental water disinfection/purifier. And to eliminate the possibility of any damage to your unit, maintenance instructions below will help alleviate or even prevent future hazards.
And if you just want to talk to someone for any questions you may have, call our Free Tech Support at 704-966-1650 Option 3.
MAINTENANCE
Thanks to an integrated network of sensors and smart technology, the Sterisil® System G5 is easier than ever to maintain. Visual alerts and audible alarms display prominently on the touchscreen and the PC app the issue at hand.
ALERTS – ATTENTION REQUIRED 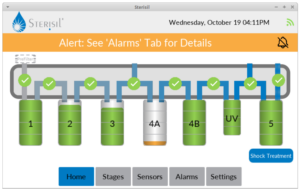
A yellow bar will appear in the top of the touchscreen
or on the PC app when a system function nears the threshold of normal operating parameters. Simply touch the yellow bar to reveal the details, and follow the “next step alert guidance” system to resolve the issue.
ALARMS – REQUIRES IMMEDIATE SERVICE 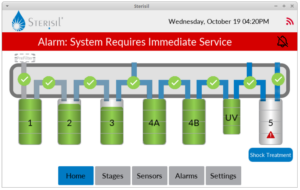
An alarm with a red bar indicates an issue demanding immediate attention. “Alarm: System Requires Immediate Service.” Simply touch the red bar or click on the PC app to reveal the details, and follow the “next step alert guidance” system to resolve the issue.
You may also bring up the details view by touching either the desired Stage number from the “Home” screen or select the “Stages” tab from the bottom row.
STEP BY STEP FILTER REPLACEMENT INSTRUCTIONS: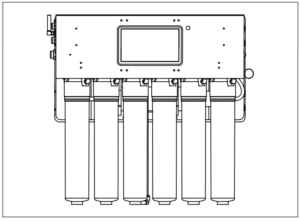
Thanks to internal valving, cartridge change outs are simple and easy. It is not necessary to shut off the source water from the supply tee. Water flow is automatically shut off when a cartridge is removed. Please have a towel nearby for excess water in cartridges.
- Before removing a cartridge, place a large “X” on the one to be replaced to avoid any confusion when the new cartridge is introduced.
- If you are changing the Stage 3 Cartridge, it will be necessary to remove the brine tube from the bottom of the cartridge prior to removal. Simply push in on the collet and pull out on the tubing to remove. You will reinstall this tube by pressing the tubing into the collet once the new Stage 3 Cartridge is in place.
- To remove a cartridge, rotate counter clockwise until the cartridge is free of the valve head. A small amount of water may escape during this process. Don’t panic, this is normal.
- Before placing a new cartridge in the system, write the date in the space provided on the label. Remove the yellow cap from the top of cartridge, and rotate the cartridge clockwise into the
valve head to secure it. Ensure cartridge is fully screwed in. - Reprogram the capacity monitoring from the touchscreen.
- The final step when changing cartridges is to run some water for 60 seconds. For change outs on Stages 1-4, close the RO tank and run the autoclave water. For Stage 5 change outs, close the Dental Storage Tank and run the dental water (Stage 5).
- Open all tanks to finish.
- Cartridges can either be discarded in the trash or returned to Sterisil for recycling. For more information on our recycling program visit sterisil.com/recycle.
![]() CHANGING A CLASS A UV LIGHT
CHANGING A CLASS A UV LIGHT
The Class A UV light on the Sterisil® System G5 is a powerful tool in bacteria reduction. Do not remove the UV bulb with the system plugged in. Never look directly at the bulb when it is powered up and emitting light. Removal and replacement of an expired bulb takes less than 5 minutes and requires no special tools. Replacement may be easier with the cartridges removed from port 5 and 6. Always wear clean gloves when handling a new UV bulb.
- Start by unplugging the system from the power outlet.
- Locate the UV housing behind the cartridges. Pull down on the UV power cable to feed slack for removing the bulb.
- Press in on UV lamp harness (not the ribbed housing sleeve) on the right side of the housing and twist counterclockwise until the bulb releases.
- Pull the bulb completely out of the housing.
- Separate the bulb from the cable.
- Remove the protective wrapping from the new bulb (grab bulb by green ceramic sections only or wear clean rubber gloves as a precaution).
- Connect the bulb to the cable.
- Slide bulb all the way in and carefully rotate clockwise until harness seats itself.
- Push the excess length of cable back into the system.
- Plug In system and wait for full power up.
- Follow the procedure from Phase 5 in the installation manual to reset the monitor.
Cartridges Lifespan
Stage 1 1 Year
Stage 2 9,463L
Stage 3 1 year on the TDS water quality
Stage 4A Dependent on water quality and usage
Stage 4B Dependent on water quality and usage
Class A UV Light Dependent on water quality and usage
Stage 5 - 1,000L 1,000 liters of dental water
Stage 5 - 3,000L 3,000 liters of dental water
Stage 5 - 7,000L 7,000 liters of dental water
Stage 5 - 10,000L 10,000 liters of dental water
As always if you have any questions about this process or anything else please feel free to contact us and take advantage of our “FREE TECH SUPPORT.”
We also offer FREE VIRTUAL TECH SUPPORT to “See and Talk” with a “Real Time Live Technician” for any problems you may be in need of help with.
You can also use our “FREE MAINTENANCE PROGRAM”. Take the guesswork and worrying about what unit is due for maintenance and which maintenance cycle it is time for. We will keep track of all your autoclaves and let you know when it’s time for anything.