
SciCan HYDRIM L110W G4 Installation Guide
Not too long ago, we released an article going over one of SciCan’s instrument washers, the Hydrim L110W G4. And in our usual fashion, not only did we go over the aspects of the machine with you, but now we continue to our guided content. And we start here, with the SciCan Hydrim L110W G4 Installation Guide! The instructions from this guide come from the manufacturers themselves. This is to ensure proper installation the way they originally intended. And if you have any questions about this or anything else, you can call us at 704-966-1650, option 3 for our free tech support.
Installation
Installation should be undertaken by a SciCan approved technician. The use of an unapproved installer may invalidate the warranty.
If the HYDRIM is installed in a Sterilization Center, the manufacturer of the Sterilization Center should allow a 10mm / 1/2” space
at the top, back and both sides of the HYDRIM. This will facilitate installation, and service access to the HYDRIM.
Do not move the HYDRIM into place by maneuvering the open wash chamber door. This may cause to door to become misaligned and leak.
During installation, all consumables should have been added to the machine as appropriate. It is important that this be done before starting the machine.
![]() For safety reasons, do not install the HYDRIM without the top cover.
For safety reasons, do not install the HYDRIM without the top cover.
 Installation Instructions
To open the wash chamber door, plug in the unit, turn it on and press the unlock symbol.
Alternatively, remove the screw in the kickplate and pull the ring.
Tools and supplies required for installation:
- Slot screwdriver
- Channel locks
Specifications
Voltage: 208-240 V
Frequency: 60 Hz
Rated Load: 2.5 kW
Circuit Breaker: 15 A per phase
Weight: 80 kg / 176 lbs
Max. Running Noise: 78 dBA
Full Unit Height: 850 mm / 33.5”
Low Profile Unit Height: 820 mm / 32.3”
Depth: 600 mm / 23.75”
Depth with door open: 1200mm / 47”
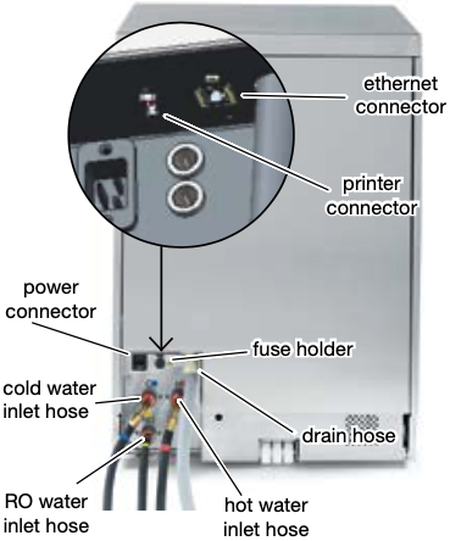
Utility Hook-ups
| Hose / Cord | Length / Diameter | Max. Distance Distance from inlet / drain | Water Pressure | Shut-off valve |
|---|---|---|---|---|
| Hot Inlet | 1.9 m / 6 ft. 3/4” | 1.5 m / 5 ft. | 1-10 bar / 14.5-145 psi | Yes |
| Cold Inlet | 1.9 m / 6 ft. 3/4” | 1.5 m / 5 ft. | 1-10 bar / 14.5-145 psi | Yes |
| R/O Inlet | 1.9 m / 6 ft. 3/4” | 1.5 m / 5 ft. | 1-10 bar / 14.5-145 psi | Yes |
| Drain | 1.5 m / 5 ft. 3/4” | -- | -- | -- |
| Electrical | 1.8 m AWG 14-3 | -- | -- | -- |
Leveling the HYDRIM
The unit is standing on three supports: rollers (wheels) at the back and two legs at the front.
- Remove the front kickplate. Push the HYDRIM into place while lifting the strap at the front to allow the unit to roll on the rollers.
- Adjust the front legs as required until the HYDRIM is level.
- The rear two legs are used only if the floor is uneven or cannot provide support to the rollers.
- Tuck the strap under the machine before replacing the kickplate, so as not to interfere with the exhaust air vents.
Connecting the Water Inlet Hoses
Connect the hot and cold water inlet hoses to the hot and cold water supply.
Drain requirements:
Connect the drain hose to the drain outlet. The drain hose can be attached to existing drain lines using a 3.5 cm / 1.5” or larger standpipe / P-trap combination. If the hose is connected directly to the drain line, fittings and adapters should not reduce water flow. The drain hose should be attached to the main drain at a point no more than 1 meter /3 ft. above the base of the HYDRIM. A floor drain is acceptable (check local codes).
Electrical requirements:
Connect the electrical cord to the power supply. The HYDRIM must have a dedicated circuit equipped with a 15A fuse. The outlet must be grounded.
Additional Information:
- The HYDRIM unit is heavy. Use a forklift or dolly and exercise caution when moving it.
- The HYDRIM should be serviced on site.
- The HYDRIM is equipped with an air gap / anti-suction device to prevent backflow of dirty water into the water supply. No other air gap device is necessary.
- If you need to extend the water inlet and drain hoses, ensure that you use commercial grade plumbing hose.
- The maximum length of the drain hose is 3.3 m / 13 ft.
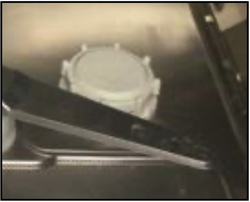
Install the Water Softening Salt
Unscrew the salt container lid (shown right) and pour 1 liter / 1 quart of water into the water softener. Add 1 kg / 2.2 lbs of water softening salt in the same manner. Screw the salt container cap on tightly.
Handling and Installing the HIP Cleaning Solution
The HIP cleaning solution is used in dilute form as a detergent for the cleaning of surgical instruments in the HYDRIM range of washers and washer disinfector. It is a colorless and almost odorless liquid which is completely soluble in water.
The pH range of the concentrated solution is between 9.3 to 9.8 and the solution is therefore alkaline. It is therefore advised that certain precautionary measures are observed when handling and during the loading of the solution into the machine, and when removing and disposing of the empty box.
Recommended precautionary measures with regard to safe handling of HIP cleaning solution:
- Always wear undamaged gloves made of natural or butyl rubber, nitrile, or neoprene (Surgical gloves are ideal).
- Always wear eye protection.
- Protect exposed skin on arms.
- If solution is spilled on clothing, remove the item of clothing and wash affected skin with plenty of water, in accordance with the Material Safety Data Sheet requirements.
- Use good industrial hygiene practices in handling this material. When handling, do not eat or drink.
- After handling the product, remove and dispose of gloves and wash hands prior to removing eye protection.
- Do not use the personal protective equipment you use for clinical activities to handle HIP products.
- Always ensure that personal protective equipment, if contaminated with HIP cleaning solution, is cleaned, or disposed of as appropriate.
For comprehensive data on HIP cleaning solution, please visit the link to the Medical Safety Data Sheet here.
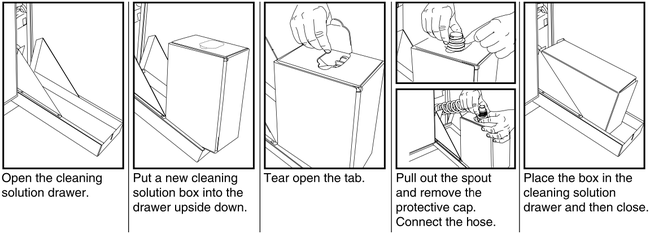
To install the HIP cleaning solution box, follow these steps:
Installing Cleaning Solution
 Technician Installation Test: Turn on the shut-off valves. Run a cycle, checking for leaks in the plumbing connections.
Water Quality 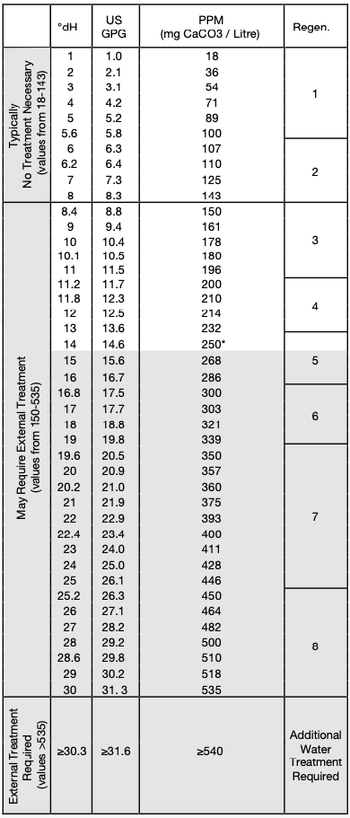
The quality of the water being used in the HYDRIM to clean the instruments is very critical to achieving satisfactory cleaning results and to protecting the instruments and the internal parts of the unit from deterioration.
Drinking water typically contains many dissolved solids. The amount of dissolved solids greatly depends on the local natural geological conditions and they can cause stains, spots and corrosion on instruments and on the internal parts of the HYDRIM. Among others, Iron, Manganese, Chloride, and Calcium Carbonate (CaCO3) are the dominant dissolved solids that affect the cleaning results when using a washer.
Iron and Manganese can cause orange and brown or black stains on the instruments and on the internal parts of the HYDRIM. Chloride is usually responsible for causing stains, spotting, pitting and scaling. If the instruments or the inner parts of the HYDRIM L110w G4, such as the chamber, show any of these spots or stains, a water test may be required to determine the cause. The installation of a water treatment system may be required to reduce the amount of dissolved solids in the water and to improve the cleaning performance of the HYDRIM.
Calcium Carbonate is the principle cause of water hardness and leaves white spots or scales. The HYDRIM is equipped with a built-in water softening system that must be adjusted according to the local water hardness. Please see the next section of this manual for recommended regeneration settings.
Before using the HYDRIM, SciCan recommends testing the water and recording
the results for water hardness, pH value, and water conductivity for future reference.
IMPORTANT: The HYDRIM’s water softening system reduces the water hardness by taking out Calcium Carbonate. If your water testing results show that your water hardness is outside the unit’s range of adjustment, or if other dissolved solids in the water cause stains or deposits on the instruments or chamber, an external water treatment system may be required.
Testing Water Quality
The HYDRIM L110w G4 is equipped with a built-in water softening system that must be adjusted according to the local water hardness. To read local water hardness, proceed as follows:
- The water test kit included with your HYDRIM contains three water hardness test strips in bags. Take a water sample from the location where the machine will be installed.
- Open one of the bags, remove the test strip and dip it into the water.
- Compare the color of the strip with the chart on the back of the bag Determine the water hardness according to the chart on the water test kit envelope.
- Power the unit on and select the Settings key from the main menu.
- Go to the Setup Menu and select “Set Regeneration”.
- Using the up and down arrows, set the water softener regeneration level according to the water hardness table in this section. If your water hardness falls between two settings, select the higher setting.
- Unscrew the water softener container lid from the bottom right of the chamber and pour at least 1.0 liters (0.26 gal) of water
into the water softener container. Then fill the salt container to the top (maximum 1 kg/ 2.2 lbs.) with salt. Close by screwing the lid tightly back into place and run a complete cycle with no instruments. An improper seal can lead to corrosion.
NOTE: Values listed below are only valid if a flow restrictor is installed in HYDRIM L110w G4. Please verify with your authorized dealer if your HYDRIM L110w G4 has a flow restrictor installed.
*Please note: The water test strip is only accurate up to 250 ppm. If the reading on the test strip exceeds 250 ppm and/or if the location in which the HYDRIM is installed has known water quality problems, having a more detailed and accurate water test done by a test lab is strongly recommended.
As always if you have any questions about this process or anything else please feel free to contact us and take advantage of our “FREE TECH SUPPORT.”
We also offer FREE VIRTUAL TECH SUPPORT to “See and Talk” with a “Real Time Live Technician” for any problems you may be in need of help with.
You can also use our “FREE MAINTENANCE PROGRAM”. Take the guesswork and worrying about what unit is due for maintenance and which maintenance cycle it is time for. We will keep track of all your autoclaves and let you know when it’s time for anything.
The SciCan Hydrim L110W G4 Instrument Washer is available on our site here.