
SciCan HYDRIM L110W G4 Operation Guide
Recently, we’ve gone over the specs and features of SciCan’s Hydrim L110W G4 instrument washer, and even how to install it. This instrument washer is a cut above the rest. Powered by SciCan’s G4 technology, making a modern machine with a marvelous work ethic. And in this article, we’re going to go over the way to operate your L110W G4 unit. These operation instructions come from the manufacturers themselves, to ensure your machine runs in proper working order. And if you have any questions about this or anything else, you can call us at 704-966-1650, option 3 for our free tech support.
Operation
Instrument Reprocessing Recommendations
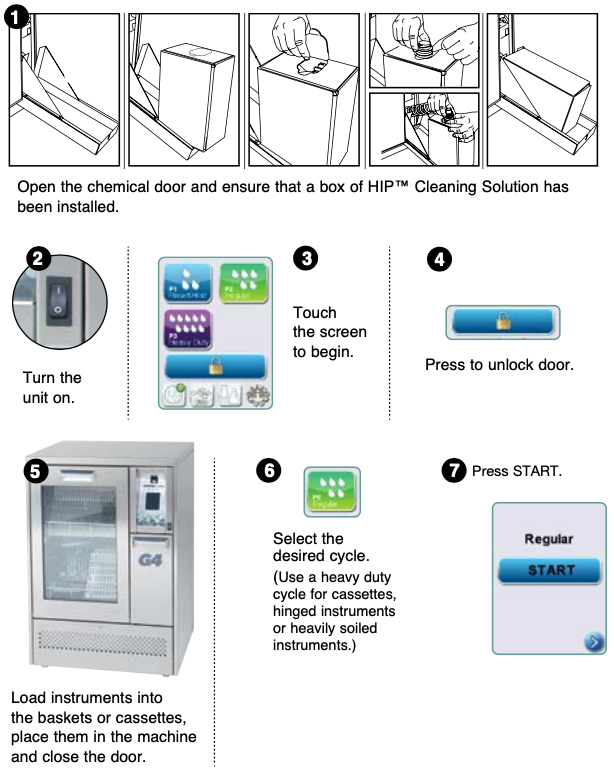
The HYDRIM L110w G4 is designed to clean general dental and medical instruments. Terminal sterilization MUST follow processing in the HYDRIM L110w G4.
Prior to placing instruments in the HYDRIM, consult the instrument manufacturer’s reprocessing instructions.
Examples of medical and dental instruments suitable for cleaning in the HYDRIM L110w G4 include:
- Stainless steel scalers, spatulas and hemostats.
- Stainless steel retractors, needle holders, skin hooks, tissue forceps, scissors, curettes, and other stainless steel instruments free of deep cavities.
For best results, instruments processed in the HYDRIM L110w G4 should have the following properties:
- Heat resistance to a temperature of up to 70°C / 158°F
- Corrosion resistance in the presence of heat and alkalinity.
Burs, microkeratomes, phaco tubing, fiberoptics and electrical equipment should not be processed in the HYDRIM.
Nickel-plated instruments, or instruments containing aluminum or colour anodized aluminum as well as single use instruments are not suited for processing in the HYDRIM.
HIP (HYDRIM Cleaning Solution with Instrument Protection) has been carefully formulated to provide outstanding material compatibility with a wide range of metals and coatings. However, some manufacturers’ instruments or instrument coatings may not be compatible.
Please consult the instrument manufacturer for their recommended cleaning procedures. In general, it is not recommended to process carbon steel and chrome plated instruments in the HYDRIM.
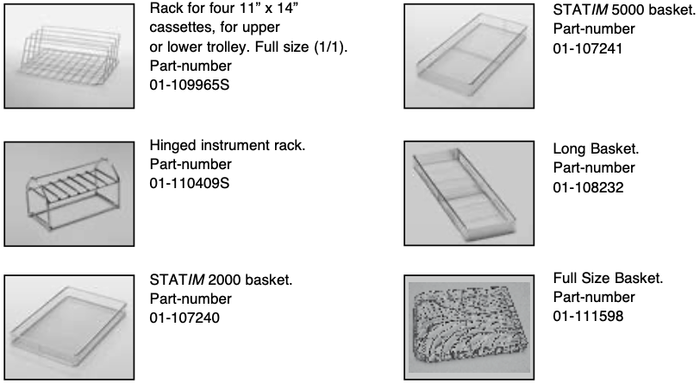
All hinged instruments should be placed in open position in open baskets or in the hinged instrument rack (SciCan part number 01-110409S) in P3 Heavy-Duty cycle.
When processing small or light objects in the HYDRIM use the basket with lid (SciCan part number 01-109966S).
Only the outer surfaces of dental handpieces can be cleaned in the HYDRIM L110w G4 with the handpiece holder (9 handpieces, PN 01-113113S or 21 Handpieces, PN 01-113112S).
Set-able materials, such as cements, amalgam, and composites need to be removed from the instruments after use at chairside. The HYDRIM will not be able to clean them off the instruments.
Cycle Description Chart
Cycle Prewash Wash Intermediate Rinse Rinse Dry Total Time** w/o Drying Water Consumption
P0 – Machine
Cleaning Cycle
No initial draining. <30oC/86°F (cold)
3 minutesN/A N/A <30ºC (cold)
2 minutesN/A 7 minutes 16 L
4.23 Gal
P1 – Rinse and Hold Cycle*
Use to prevent soil from drying on instruments when they will not be washed within one hour.<30oC/86°F (cold)
3 minutesN/A N/A 60oC/140°F
1 minuteN/A 17 minutes 16 L 4.23 Gal
P2 – Regular
Cycle
Use for moderately soiled loose instruments.N/A 50oC/122°F
5-15 minutes (default 5 minutes)<60ºC/140°F 1 minute 60ºC/140°F***
1-10 minutes (default 1 minute)1-20 minutes (default 10 minutes) 25 minutes 24L 6.34 Gal
P3 – Heavy Duty
Cycle
Use for heavily soiled instruments and cassettes.<30oC/86°F (cold)
3 minutes50ºC/122°F
5-15 minutes (default 9 minutes)<60ºC/140°F 1 minute 60ºC/140°F 1 minute 1-20 minutes (default 10 minutes) 34 minutes 32L 8.45 Gal
Hints and Tips for Best Cleaning Results
Remove all cement, composite material and amalgam from instruments at chairside prior to processing in the Hydrim.
- Use only accessories, such as baskets, cassettes, trolleys and racks to hold instruments that are designed for the HYDRIM L110w G4.
- Use accessories for their intended purpose only. For example, do not place hinged instruments in cassettes. Use the hinged instrument rack instead.
- Disassemble instruments if possible.
- Do not overlap instruments. Each instrument must be kept separate.
- All instruments must be placed in the instrument washer in such a way as to allow good rinsing of all surfaces. Any surface that is shielded from water and detergent cannot
be cleaned. - Open hinged instruments widely when placed in baskets or hinged instrument rack (PN 01-110409S). Closed hinged instruments cannot be cleaned.
- Place suction tubes in the rack for vertical instruments and ensure that water can flow unrestricted in and out of the tubes. Do not place suction tubes horizontally in a basket or in a cassette. For instruments containing lumens, such as dental handpieces, only the external surfaces are cleaned.
- Place trays and other concave shaped items at an angle to ensure water can run off surfaces easily.
- Do not overload the HYDRIM.
- Verify the Hydrim setup: Ensure that the washer spray arms are free of any blockage and can rotate freely. – Ensure that the mesh filters in the chamber drain are free from debris.
- To achieve best cleaning results, instruments should be processed in the HYDRIM as soon as possible. If immediate cleaning is not possible, it is recommended to process the instruments using the P1 Rinse and Hold program immediately after use on the patient.
- Visually inspect instruments for cleanliness and integrity (corrosion, material changes) after cleaning and repair or replace instruments if necessary.
- If process enforced is activated, the operator must confirm that the instruments are visually clean after a complete cycle is finished.
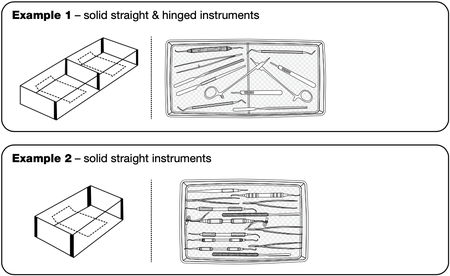
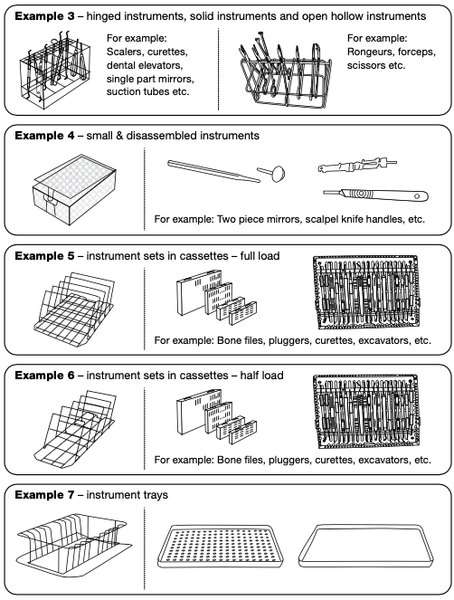
Recommended Load Configurations
The intended purpose of the L110w G4 washer is a clinical general instrument washer, predominantly aimed at the general dental and medical markets. There will be many combinations of instruments that can be processed in the L110w G4 unit depending on:
- Size of practice
- Types of procedures undertaken at any one time
- Specialization of practice
- Instrument management protocols
It is difficult to illustrate all the possible combinations available, so below we have given examples of the most common typical basket loadings, the recommended loading
of general instruments, and the worst case loading, for which the unit has been type tested and validated.
Handle all instruments with care to prevent personal injuries through punctures for example. Follow local health and safety regulations for preventing accidents, bodily harm and personal injuries.
Observe the instrument manufacturer’s recommendations for cleaning and care. When loading the unit, arrange loose instruments so that they do not touch one another. Instruments with concave surfaces or cavities should be placed so that water can drain freely.
Sample Loading:
Baskets and Accessories
The following are included with the Hydrim:
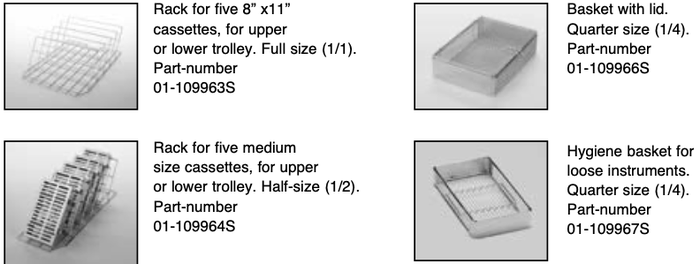
The following are optional:
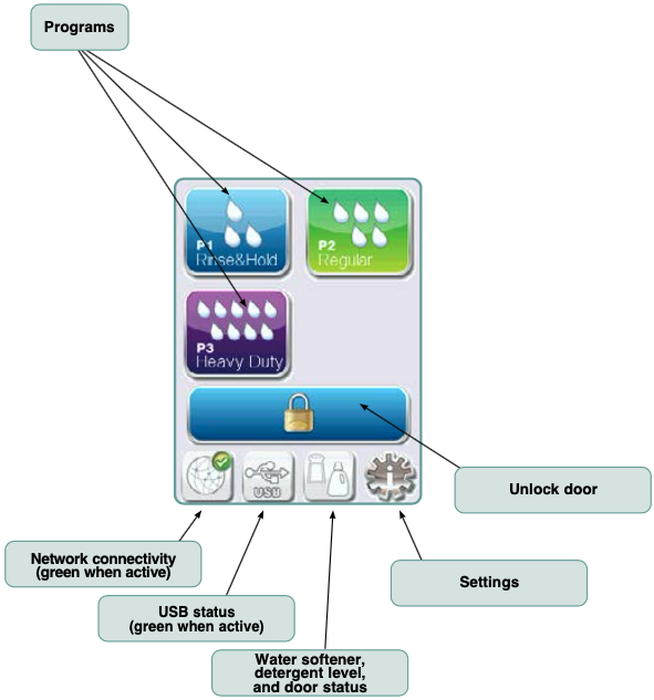
Touchscreen Overview
Setup Menu Overview
 Setting the Language
- The messages displayed by your HYDRIM can be presented in a number of different languages. To change the current language, follow these steps:
- Settings – User/Technician – Setup
- Scroll to “Language” and select.
- From the “LANGUAGE” screen, press the “up and down arrows” to scroll through the list of languages. When you have found the desired language, press the “right arrow” icon to save your selection and return to the Setup menu.
Setting the Country
- Settings – User/Technician – Setup
- Scroll to “Country” and select.
- Using the keypad, type the name of the country and press “EN” to select. Press the “right arrow” icon to save and return to the Setup menu.
Setting the Time
- Settings – User/Technician – Setup
- Scroll to “Time” and select.
- From the TIME screen, use the keypad to set the time. Press “EN” to save and the “right arrow” icon to return to the Setup menu.
- To change your unit to display 12-hour time format (24-hour time format is the default setting), go to the Setup menu and use the “up and down arrow” icons to scroll to TIME 12/24, select it and toggle to 12. Press the “right arrow” icon to save and return to the Setup menu.
- To activate daylight savings time (DST), go to the Setup menu and use the “up and down arrow” icons to scroll to DST ON/OFF and select. Use the “up and down arrow” icons to toggle DST ON or OFF and press the “right arrow” icon to save and return to the Setup menu. If connected to the network, the time will automatically adjust to the DST.
Assigning the Unit Identifier Number
- Settings – User/Technician – Setup
- Scroll to “Unit No” and select.
- Using the keypad, select a maximum of 3 digits to be used as the unit’s identifier number. Press “EN” to save and the “right arrow” icon to return to the Setup menu.
Adjusting the Screensaver Delay
To change the length of time before the screensaver is activated, follow these steps:
- Settings – User/Technician – Setup
- Scroll to “Screensaver” and select.
- Use the “up and down arrow” icons to scroll through your time options. When you have found the amount of time you require, press it. Press the “right arrow” icon to save and return to the setup menu.
Adjusting the Temperature Display
- Settings – User/Technician – Setup
- Scroll to “Temperature C/F” and select.
- Use the “up and down arrow” icons to choose between having information displayed in degrees Celsius or Fahrenheit. Press the “right arrow” icon to save and return to the Setup menu.
Turning the Button Sound ON or OFF
The HYDRIM is preset to beep when a button is pressed. If you would like to turn the button sound off, follow these steps:
NOTE: Turning OFF the button sound does NOT turn off other alarms and cycle notification beeps.
- Settings – User/Technician – Setup
- Scroll to “Beep ON/OFF” and select.
- Use the “up and down arrow” icons to scroll through your ON or OFF options and select it by pressing it. Press the “right arrow” icon to save and move back to the Setup menu.
Adjusting the Beep Button Volume
- Settings – User/Technician – Setup
- Scroll to “Beep Volume” and select.
- Use the “up and down arrow” icons to scroll through the volume settings. Select the one you want by pressing it. Press the “right arrow” icon to save and move back to the Setup menu.
Adjusting the Salt Regeneration
Salt regeneration should be set according to the local water hardness. See Testing Water Quality for instructions on determining correct settings. To set salt regeneration, follow these steps:
- Settings – User/Technician – Setup
- Scroll to “Set Regeneration” and select.
- Use the “up and down arrow” icons to change the value. The default setting is 1. Press the “right arrow” icon to save and move back to the Setup menu.
Adjusting the Screen Contrast
The touchscreen is calibrated for the lighting condition of most sterilization centers. Should you need to adjust the contrast for your office, follow these steps:
- Settings – User/Technician – Setup
- Scroll to “LCD Contrast” and select.
- Use the “up and down arrow” icons to scroll through your contrast options. When you have found the contrast you require, press it. Press the “right arrow” icon to save and move back to the Setup menu.
Changing the Touch Screen Display Themes
The touchscreen themes (i.e. icons and background colors) can be changed to one of the preset options. To change themes follow these steps:
- Settings – User/Technician – Setup
- Scroll to “Theme” and select.
- In the “Change Theme” screen, use the “up and down arrow” icons to scroll through your available options. As you scroll, each theme will display on the touchscreen. Press the “right arrow” icon to save and move back to the Setup menu.
Creating a User Name
Up to four unique User Names can be created. To assign a User Name follow these steps:
- Settings – User/Technician – Setup
- Scroll to “User” and select.
- To assign a user name, select “User name” and use the alphabetic keypad to enter a name (up to 12 characters) and press “EN” to save.

Creating a User PIN
From the User PIN screen, you can assign up to four PINs. To assign a PIN, follow these steps:
- Settings – User/Technician – Setup
- Scroll to “User” and select.
- To assign a user PIN, select “User PIN” and use the numeric keypad to enter a number (up to 4 digits) and select “EN” to save and the “right arrow” icon to move to the confirmation screen.
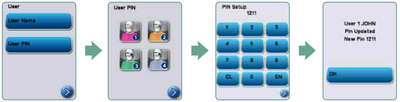
5. If all of the information presented in the confirmation screen is correct, press OK to be returned to the User PIN screen. To make a correction, select the User PIN you want to change and repeat the process described above.
Setting Up Process Enforced Usage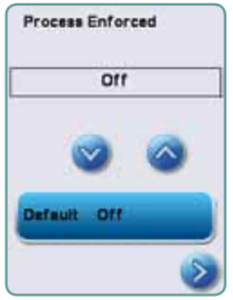
When process enforced usage is activated, users are required to enter a PIN at the end of a cycle. For process enforced usage to function, User IDs and PINs must first be assigned. To set up User ID and PINs, refer to sections of the respective names on creating a user name and PIN. To activate process enforced usage, follow these steps:
- Settings – User/Technician – Setup
- Scroll to “Process Enforced” and select.
- Use the “up and down arrow” icons to toggle process enforced function ON or OFF. Press the “right arrow” icon to save and move back to the Setup menu.
NOTE: Any user can stop a cycle even with process enforced usage ON. However, the cycle data will record that an unauthorized user has stopped the cycle.
Connecting to a Network
The HYDRIM C61w G4 has a 10/100Base-T Ethernet port located at the back of the unit. To connect your HYDRIM to a network using a router, follow these steps:
1. Connect your network cable to the Ethernet port at the back of the unit. If your office uses a router, the router should automatically assign the unit an IP address. A red X on the network icon means the unit is not connected. A yellow check mark means the unit has
an IP address but is not connected to the Internet and cannot send emails. A green check mark means the Internet connection is set up properly and the unit can send out emails.
NOTE: In some circumstances, where you do not have a router, for example when using Windows Network Sharing, you may have to assign a dedicated or ‘static’ IP address. To assign a static IP address, contact your local network administrator.
2. From the main screen, press the Network icon. The Network screen displays information about your HYDRIM’s connectivity, including its IP address.
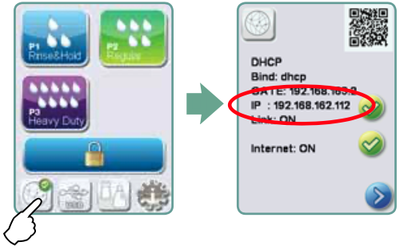
3. Type the IP address displayed on the touchscreen into the browser of any web enabled device to access your unit’s web portal. When the Network icon is active (for example when sending email) it will turn green.
NOTE: Use QR code if connecting to a mobile device.
NOTE: Connection time will vary depending on your network speed, and making an initial connection can take longer.
Connecting to a Wireless Network
The HYDRIM can be configured for wireless use by connecting the Ethernet port to an external wireless bridge / access point. SciCan currently recommends the use of the D-Link® DAP-1522 Xtreme N® Duo Wireless Bridge. Contact your network administrator to learn more about setting up a wireless bridge.
Activating the Hydrim L110W G4
Interrupting/Aborting a Cycle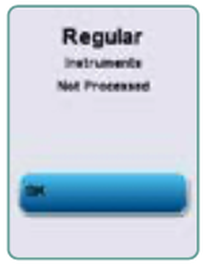
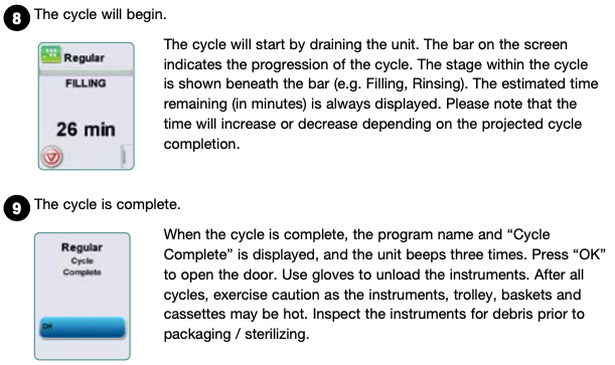
The door of the HYDRIM is locked during the cycle. If the STOP button is pressed, the cycle is aborted and cannot be re-started. The message “Draining. Please wait” will appear. The unit will drain. Then the message “Instruments not processed” will appear. Press OK. Open the door by pressing the lock icon.
Use gloves if handling the instruments. Exercise caution as instruments, trolley, baskets and cassettes may be hot. The cycle must be repeated to ensure that instruments are properly processed.
NOTE: If the drying phase of the cycle is interrupted, the critical parts of the cycle are complete and the message displaying the program name and “Cycle Complete. Drying interrupted” will appear.
Additional User and Setup Menu Functions
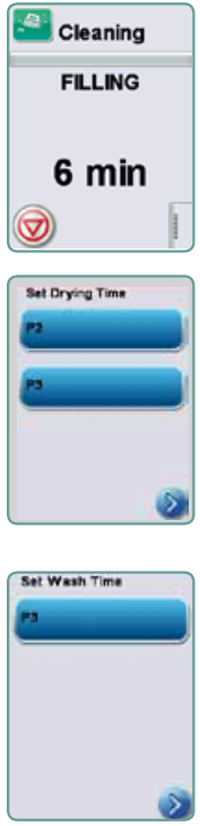
Chamber Cleaning
This cycle is used to periodically remove hard water deposits from the chamber walls and racks. Pour 0.5 liters of vinegar into the chamber before starting the cycle. Touch “cleaning.” A cleaning cycle, similar to a normal wash cycle, will run. Failure to clean chamber can promote corrosion.
Set Drying Time
The drying times for P2 and P3 can be set independently. Touch
the cycle for which you want to set the drying time. Use the up and down arrows to select the desired drying time. Touch “default” if you wish to return to the factory default. Use the back arrow to return to the previous screen.
Set Wash Time
The wash time for P3 can be set independently. Touch the cycle for which you want to set the wash time. Use the up and down arrows to select the desired wash time. Touch “default” if you wish to return to the factory default. Use the back arrow to return to the previous screen.
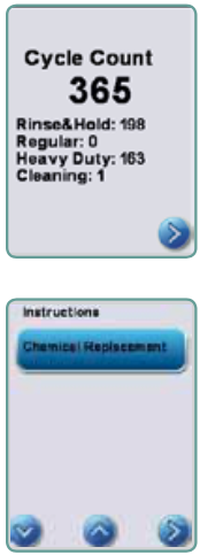
Cycle Count
This allows the user to see how many cycles have been run on the HYDRIM. Touch cycle count and the number of cycles (completed and aborted) will be displayed. This cannot be reset. Touch the back arrow to return to the previous menu.
Instructions
Users can access a database of pictorial instructions on how to perform routine maintenance such as installing the cleaning solution.
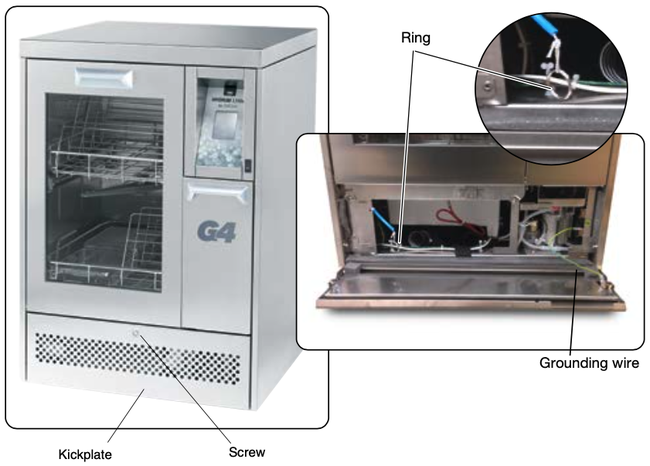
Opening the Door in Case of Power Failure
If there is a power failure, remove the kickplate of the HYDRIM. Remove the screw with a screwdriver and lift the kickplate up and toward you. Locate the ring and pull it to open the door. Exercise caution! There may be fluid remaining in the unit and the instruments may be hot. Instruments that have not completed the cycle should not be used and should be reprocessed. When replacing the kickplate, ensure that the grounding wire is attached.
As always if you have any questions about this process or anything else please feel free to contact us and take advantage of our “FREE TECH SUPPORT.”
We also offer FREE VIRTUAL TECH SUPPORT to “See and Talk” with a “Real Time Live Technician” for any problems you may be in need of help with.
You can also use our “FREE MAINTENANCE PROGRAM”. Take the guesswork and worrying about what unit is due for maintenance and which maintenance cycle it is time for. We will keep track of all your autoclaves and let you know when it’s time for anything.
The SciCan Hydrim L110W G4 Instrument Washer is available on our site here.