
Tuttnauer 2540MKA Maintenance Guide
Not too long ago, we released an article going over Tuttnauer’s latest development, their 2540MKA sterilizer. As we do with our content, we gave an overview of the unit…Going over different qualities, benefits and specifications about the unit itself. So now we’re moving on to our next guide, the Tuttnauer 2540MKA Maintenance Guide. Maintenance is extremely important to ensure the longevity of your autoclaves, which makes this guide just as important. And to ensure proper maintenance procedures, these instructions come from the manufacturer’s themselves.
If you have any questions about this or anything else, you can call us at 704-966-1650, option 3 for our free tech support.
Maintenance Guide
The maintenance operations described in this chapter need to be followed as indicated to keep the device in good working condition.
The instructions that follow can easily be carried out by the office personnel and do not require a service technician.
Daily
Clean door gasket with a soft cloth. The gasket should be clean and smooth.
Weekly
1. Take out the tray holder and trays. Clean the tray holder and trays with a cleaning agent & water and with a cloth sponge. You may use diluted lemon acid (25-50 CC lemon acid in 1 liter of water) as cleaning agent. If detergent is used, rinse the tray holder and trays immediately with water to avoid stains on then metal.
![]() Caution
Caution
Do not use steel wool or steel brush as this can damage the chamber!
2. Put a few drops of oil on the 2 door pins and door tightening bolts.
3. Clean the outer parts of the autoclave with a soft cloth.
4. Once a week, or after 20 cycles (whichever comes first), drain the water from the reservoir, and refill with fresh mineral-free water water (see Operation Guide).
5. Once a week check and clean the air jet. To ensure that the temperature in the chamber rises correctly it is necessary to keep the air jet clean (see Operation Guide).
Periodically
- Once a week clean and descale the chamber, copper tubes and the reservoir using ‘Chamber Brite™’ (see para. 9.).
- Clean the strainer once a month as per para. 8.7. Cleaning frequency may be reduced according to previous maintenance.
- Once every month activate the safety valve (see para. 8.5).
- Replace the door gasket every 12 months (see para. 8.4).
- Once a year tighten the screws of the heaters and the electrical connections at the heaters, valves and connectors (to be done by a qualified technician).
- Replace the air filter every 6 months (see para. 8.4).
- Once a year calibrate the thermostat (to be done by a qualified technician).
- Perform safety tests (pressure vessel, efficiency, electrical) according to local rules or regulations. Only an authorized inspector may perform this test.
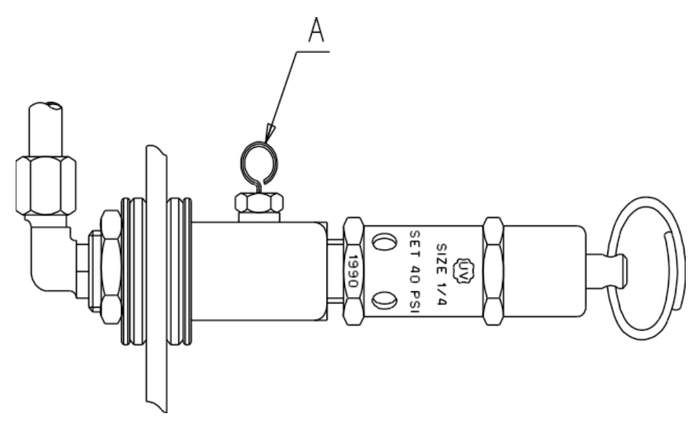
Draining the Reservoir
Caution:
Before starting, ensure that the electric cord is disconnected and there is no pressure in the autoclave.
The drain valve is located on the front left side of the autoclave after the door is opened. The function of the drain valve is to drain the water reservoir.
- Connect the silicone hose, supplied with the autoclave, to drain into a bucket.
- Turn drain valve counter clockwise to the open position.
- Fully drain the reservoir
- With a quart of tap water flush out the reservoir
- Turn drain valve clockwise to the close position.
- Connect the electric cord to power source.
- Fill the reservoir with mineral-free water to just below the safety valve (see sec 7.2)
- Turn on the main power switch.
- The autoclave is now ready for use.
 Cleaning the Air Jet
(Located in the water reservoir.)
A dirty air jet is the number one cause of failed spore tests
The elimination of air from the sterilization chamber during heat up is critical to the proper operation of the autoclave. Failure of the air removal system will be responsible for incomplete sterilization, indicator strips that do not turn and failed spore tests.
The air jet consists of a small orifice with a clean out wire inserted in it (wire is permanently installed and will not come out). It is required that the air jet be cleaned once per week or more often if necessary, to remove any accumulated dirt and debris.
It is preferred to clean the air jet when the unit is running a cycle and under pressure. This is so that any loosened debris will be blown away, however, it can be done while the unit is idle.
- Remove the water reservoir cover.
- Clean the hole of the jet by manipulating the air trap wire back and forth 10 times
It is important to clean the hole of the air trap, as described at point 2 before starting operation of the autoclave, for the first time.
Replacing the Door Gasket
Pull off the gasket from the door groove. Install the new gasket as described in drawings 1, 2 and 3 below.
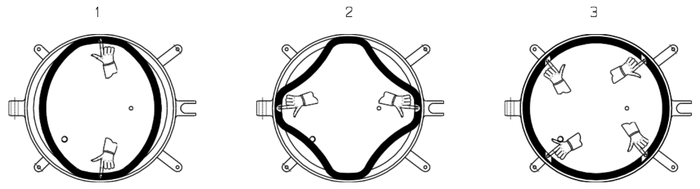
Caution!
This gasket is designed with a trapezoidal cross section. The gasket should be placed with the widest side towards the door.
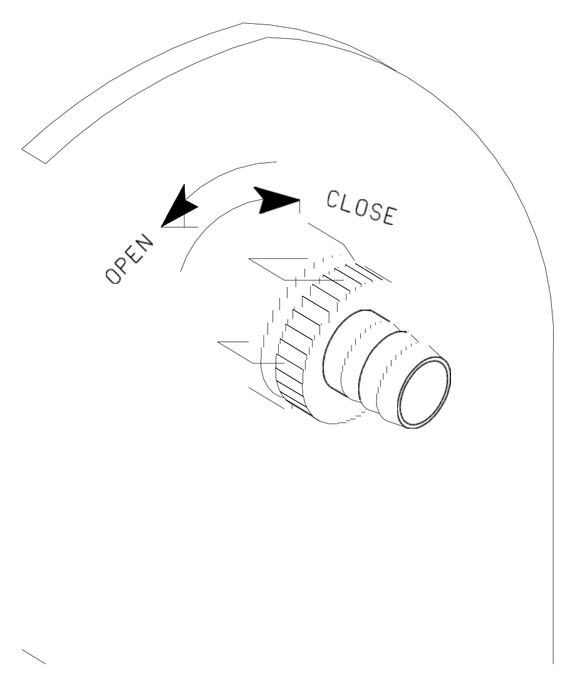
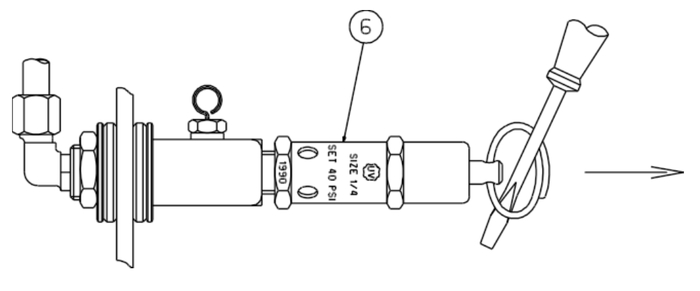
Checking the Safety Valve
(Located in the water reservoir)
In order to prevent the safety valve from becoming blocked, it is necessary to allow the steam pressure to escape through the valve. This procedure should be done every month as follows:
1. Run a sterilization cycle with a sterilization temperature of 134oC (273oF) according to the manual.
2. Allow a pressure of approximately 29 psi (200 kpa) to build up in the chamber.
3. Remove water reservoir cover
![]() Caution!
Caution!
This next step will expose you to HOT STEAM
![]() Caution!
Caution!
To avoid being burned, by hot steam, do not place your face over the safety valve.
4. Pull the ring of the safety valve using a tool, i.e. screwdriver, hook etc and open the safety valve for 2 seconds then release. Be careful not to burn your hands.
5. Verify that the valve releases steam and closes immediately.
6. If the safety valve is stuck in the ‘open” position, stop the autoclave operation and let the pressure decrease to zero (atmospheric pressure) as follows:
- Close (turn to “0”) the STER timer.
- Turn the STE+DRY timer to 2 minutes.
- Verify that the pressure decreases to “0”.
7. After the pressure in the chamber decrease to zero, pull the valve ring to release the valve.
8. Repeat operations 1 to 5.
9. If the valve is stuck again in the open position, call for service.
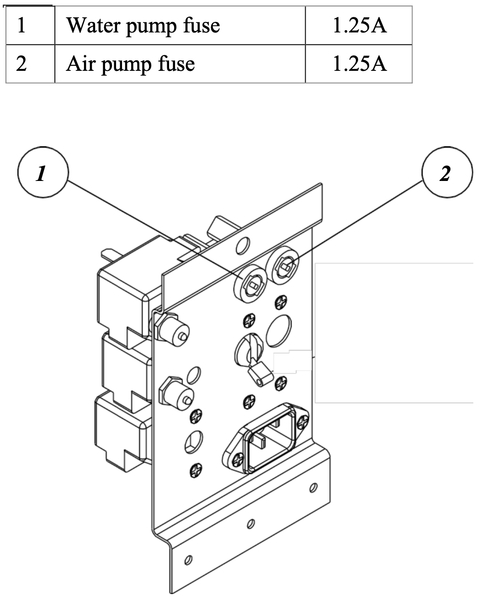
 Replacing the Cartridge Fuse
![]() Caution
Caution
Make sure that the electrical power cord is disconnected!
Use a screwdriver to unlock the fuse holder cover by turning it counter clockwise a little, and pull it out.
Insert a new cartridge into the holder and turn the cover clockwise until locked.
Make sure that the correct fuse is installed as marked in the following settings:
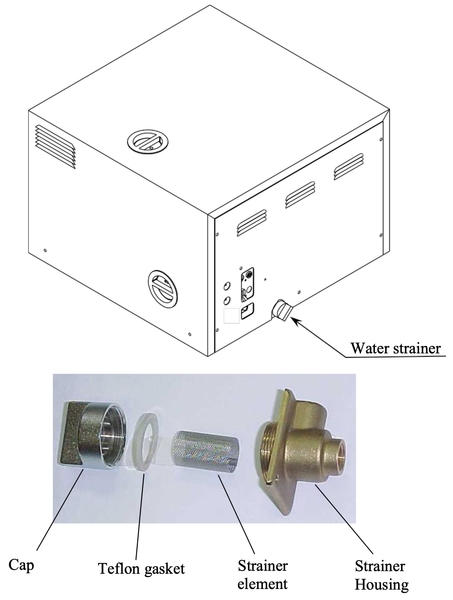
 Cleaning Water Outlet Strainer
Caution!
Before proceeding, Make sure that the electric cord is disconnected and there is no pressure in the autoclave.
- Open the strainer cover.
- Remove the strainer element.
- Rinse the strainer with water, using a brush if necessary.
- Reinstall the strainer element.
- Close the strainer cover.
CAUTION
Do not touch the strainer’s cover, mounted on the exhaust line, during and short after operation. Touching the hot strainer’s cover may cause severe injuries. If maintenance operation is performed while strainer cover is hot, use heat resistant gloves to avoid injuries.
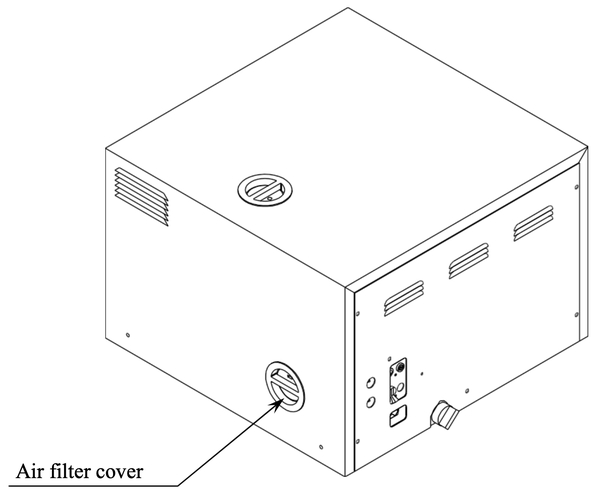
 Replacing the Air Filter
In order to ventilate the chamber during the dry phase and to assist in cooling the chamber at the end of the cycle, filtered atmospheric air enters the chamber via a solenoid valve. The filtration of the air is performed by the bacteriological filter that is placed at the inlet of the chamber.
The filter is mounted near an opening on the right sidewall of the autoclave enclosure, to ease access for replacing it.
- To replace the filter proceed as follows:
- Remove the securing screws (see “REAR VIEW”) and the filter cover by turning the cover counter- clockwise until the handle is at a vertical position.
- Pull out the cover.
- Cut the tie wrap fixing the flexible tubing connecting the filter to the copper pipe, and pull off the filter.
- Pull out the filter through the opening.
- Replace the filter with a new one connecting it with the flexible tubing and tightening it with a tie wrap.
- Re-assemble the cover and lock it into position by turning it a 1⁄4 turn. Fasten the securing screws.
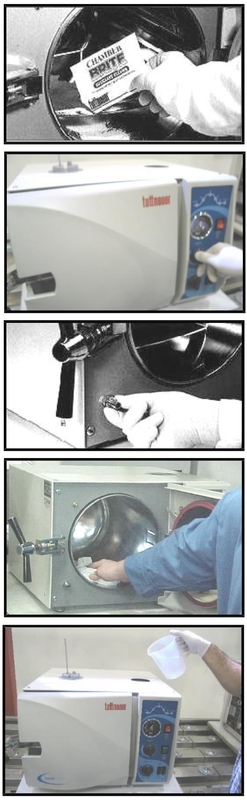
Cleaning with Chamber Brite
CHAMBER BRITE is a cleaning and descaling agent designed specifically for the cleaning and removal of water deposits, oxides and other sediments that are found in steam sterilizers. The material is a combination of acidic salts and additional cleaning materials.
Chamber Brite autoclave cleaner has been formulated specifically to be a fast, powerful and easy to use cleaner for steam sterilizers.”
If the autoclave is not cleaned regularly dirt and debris will build up and clog the tubing and valves. This dirt can also be transmitted to the instruments during sterilization. In addition a layer of dirt on the stainless steel chamber traps moisture against the metal and will lead to the chamber becoming porous and failing.”
“It is recommended that your autoclave be cleaned with chamber Brite once per week”
![]() Caution! NEVER use bleach, steel wool, a steel brush or anything abrasive to scrub or clean the chamber.
Caution! NEVER use bleach, steel wool, a steel brush or anything abrasive to scrub or clean the chamber.
Cleaning Procedure
1. Important – all steps in this procedure must be completed without interruption.
2. When the autoclave chamber is cold, remove instruments and trays from the autoclave.
3. Open the door and spread the contents of a packet in a straight even line along the bottom of the chamber, from back to front.
4. Let water enter the chamber and perform a 134°C cycle with:
— timer (6): TIMER STER. set to 15 minutes (heating time + sterilization)
— timer (7): TIMER STE +DRY set to 20 minutes.
5. At the end of the cycle open the door and wait 5 minutes.
6. Drain the water from the reservoir.
7. Fill the water reservoir with fresh mineral-free water.
8. Let water enter the chamber and perform a 134°C cycle with:
— timer (6): TIMER STER. set to 15 minutes (heating time + sterilization)
— timer (7): TIMER STE +DRY set to 20 minutes.
9. At the end of the cycle open the door and wait 5 minutes.
10. Drain the water from the reservoir.
11. Fill the water reservoir with fresh mineral-free water.
12. Turn the autoclave off and allow chamber to cool.
13. Remove the tray holder; wipe the interior of the chamber with a damp cloth.
14. Fill the reservoir with mineral-free water only.
15. Wipe the tray holder with a damp cloth and return it to the chamber.
16. Turn fill knob to fill position and allow a small amount of water (2-4 ounces) to fill chamber. Remove water from chamber.
17. The autoclave is ready to use.
IM![]() PORTANT: DO NOT sterilize instruments during the cleaning process!!!
PORTANT: DO NOT sterilize instruments during the cleaning process!!!
![]() CAUTION: Keep out of reach of children. Contains mildly acidic ingredients. Avoid contact with the skin, eyes or clothing. Wash hands well after touching the powder, in the case of eye contact flush with continuous running water for at least 15 minutes. If irritation persists get medical attention. If accidentally swallowed, do not induce vomiting, drink large amounts of water and obtain medical attention. MSDS available upon request.
CAUTION: Keep out of reach of children. Contains mildly acidic ingredients. Avoid contact with the skin, eyes or clothing. Wash hands well after touching the powder, in the case of eye contact flush with continuous running water for at least 15 minutes. If irritation persists get medical attention. If accidentally swallowed, do not induce vomiting, drink large amounts of water and obtain medical attention. MSDS available upon request.
Use one packet of CHAMBER BRITE.
Clean every 20 cycles or as needed.
* Total cycle time for cleaning the autoclave is 15 minutes at 134°C (273°F).
As always if you have any questions about this process or anything else please feel free to contact us and take advantage of our “FREE TECH SUPPORT.”
We also offer FREE VIRTUAL TECH SUPPORT to “See and Talk” with a “Real Time Live Technician” for any problems you may be in need of help with.
You can also use our “FREE MAINTENANCE PROGRAM”. Take the guesswork and worrying about what unit is due for maintenance and which maintenance cycle it is time for. We will keep track of all your autoclaves and let you know when it’s time for anything.
The Tuttnauer 2540MKA Sterilizer is available to purchase here.
The Operation Guide for the Tuttnauer 2540MKA is available here.
The Installation Guide for the Tuttnauer 2540MKA is available here.