
Tuttnauer T-Classic 9 Start and Operation Guide
The Tuttnauer T-Classic 9 autoclave is another of Tuttnauer’s new machines that SAS has added to its lineup. The T-Classic 9 is Tuttnauer’s lightest ever unit that still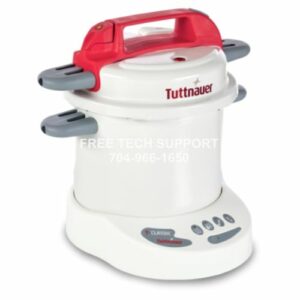 packs a punch. At just a little over 11 lbs, the T-Classic 9 can service small to medium practices while providing both power and portability in its small, yet impressive build.
Recently, we’ve written about the Tuttnauer T-Classic 9 in this article here on our site. Going in-depth on it’s features and specs, showing you what the Tuttnauer T-Classic 9 can do for your small to medium practice.
But in this article, we’ll be going in-depth on the general start and operation processes for the Tuttnauer T-Classic 9. This Tuttnauer T-Classic 9 start and operation operation guide comes directly from Tuttnauer. Ensuring that the installation process is done properly to manufacturer specifications.
Operating Symbols, Displays and Controls
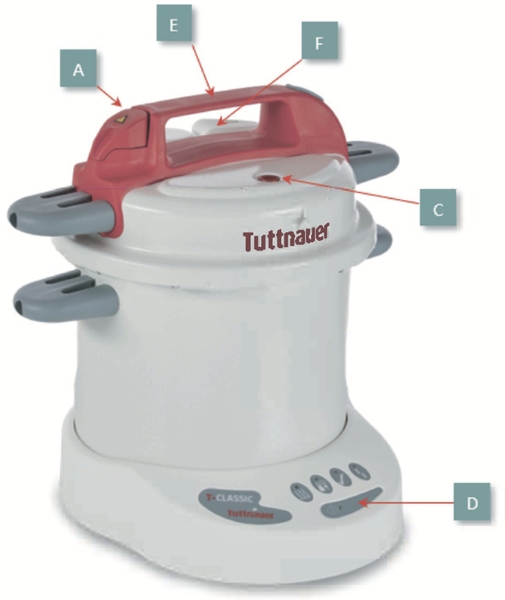
The following descriptions refer to the pictures of the controls, display lights and operating symbols opposite.
 Controls:
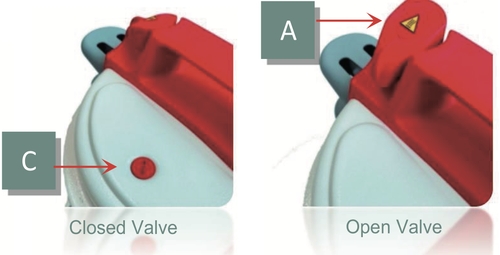
A Depressurization Valve
B Start Cycle Button
C Pressure Rise Indicator
D Display Panel
E Top Handle
Do not touch the top handle during or immediately after the cycle has completed as it may be hot.
F Steam Duct – WARNING HOT PART!
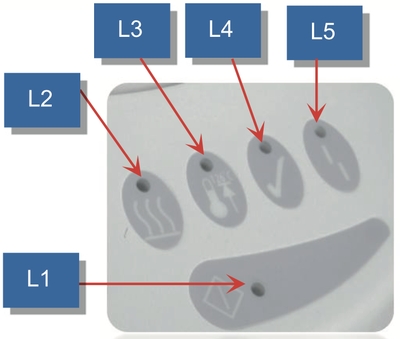
 Display lights:
- L1 Power “On” light illuminates GREEN
- L2 Heating light illuminates ORANGE
- L3 Sterilizing light illuminates Y .OW
- L4 Sterilizing complete light illuminates GREEN
- L5 Fault light illuminates RED
Warning symbols:
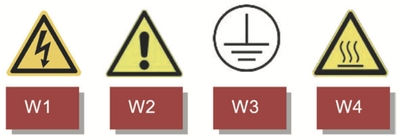 W1 Caution, electric shock hazard
- W2 Warning, read manual before using the autoclave
- W3 Warning, unit must be earthed/grounded
- W4 Warning, heat hazard
WARNING! Do not touch the body or lid when the autoclave is in operation. as these parts become hot
WARNING! The main outlet MUST BE GROUNDED. The main plug should always be easily accessible as it is to be relied upon as “the means of disconnection”.
Getting Started
Before using the autoclave for the first time please take time to read the following guide to familiarize yourself with the operation of the unit.
We strongly recommend that all users of the autoclave are trained in its operation.
The autoclave is very easy to use. By following this simple operating sequence in conjunction with the pictures of the autoclave, its controls, display panel and operating symbols (see guide above), you will be able to ensure your instruments are correctly sterilized every time.
Water
Fill the unit to the water level line on the inside of the chamber with 0.75 litres of distilled or de-ionised water.
DO NOT USE TAP WATER OR OVERFILL — CHECK WATER LEVEL AFTER EVERY CYCLE
Loading
Place the instruments into the instrument basket or cassettes, and place in the unit.
Please see Technical specification for loading capacities.
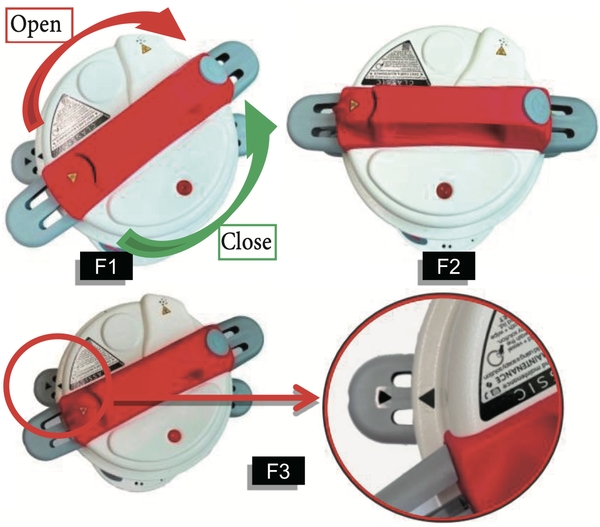
Closing
Always place the lid on the autoclave with the Depressurization Valve (A) open. Align the two black triangles on the cover and body as shown in (F3) and turn in a clockwise direction (F1) ensuring the lid is completely closed (F2). Close the Depressurization Valve (A) so it is aligned with the top handle on the lid. Never leave the autoclave in the position as shown in (F1).
 Power Connection
Attach the cable supplied to the rear of the unit and plug into a GROUNDED main electrical socket of the CORRECT voltage. Lights: (L1) illuminates GREEN. If this flashes continuously, then there is an error, and you should contact Tuttnauer for further assistance.
Starting
Start the sterilizing cycle by pressing button (B).
Lights:
- L1 illuminates GREEN
- L2 illuminates ORANGE
As the temperature rises, air will be displaced by steam through the Air Bleed Device located in the lid, until it closes with an audible “click”, sealing the unit.
The Pressure Rise Indicator (C) will rise indicating the unit is now pressurized.
Sterilizing Temperature is reached when:
Lights:
- L1 illuminates GREEN
- L2 flashes ORANGE
- L3 illuminates YELLOW
Sterilizing Cycle is complete when:
- L1 flashes GREEN
- L4 illuminates GREEN
Note: L4 remains GREEN until a new cycle is started or the unit is disconnected from the mains power.
 Depressurization
Once the sterilizing cycle has been completed, the unit needs to be depressurized and allowed to cool down before the lid is opened and sterilized instruments can be removed.
The time taken to reach the point at whcih this is safe to do so it can be shortened by manually depressurizing the unit. Open the Depressurization Valve (A) by turning slowly in an anti-clockwise position. The Pressure Rise Indicator (C) will drop once the steam has been released.
 Warning! There will be a visual and audible release of steam from the rear of the Steam Duct.
Unlocking
Once the pressure has been released – the lid may be unlocked. Ensure the Depressurization Valve (A) is open. Remove the lid by turning in an anti-clockwise direction (F1).
Unloading
Lift off the lid, gently place upside down on a solid work surface and leave to cool. Ensure the Depressurization Valve (A) is in the closed position to avoid damaging it.
The basket or cassettes containing the sterilized instruments can now be lifted out of the unit. To avoid damage, replace the lid as described in step “Closing”.
Cycle Verification
We recommend the use of a chemical indicator loaded to verify the sterilization cycle. Simply place the indicator strip in with the load. Tuttnauer dealers can supply the chemical and biological indicators.
Please note if any of the above indicator tests fail — contact an authorized technician.
STERILIZATION CYCLE HAS NOT BEEN ACHIEVED.
WARNING! Always consult with your instrument manufacturer IFUs for their suitability for autoclaving and the maximum temperature which the instruments can withstand.
Continued Operation
To ensure your autoclave gives you the years of service for which it was designed, it is important to remember a few “Do’s” and “Don’ts” with regards to the operation of the unit and follow simple care and maintenance procedures:
Do ensure that….
- You read the instructions and always follow the operating sequence.
- The work surface on which you will place the autoclave is flat, solid and heat resistant.
- The instruments are designed to withstand the sterilizing temperature, are thoroughly cleaned and rinsed before sterilizing, and are not any longer than the maximum length, or exceed the load weight, specified – see technical specs section of the overview article here.
- The water level is maintained regularly with clean distilled or deionized water only.
- The unit is in a “draft free” environment and is positioned not less than 10 inches from adjacent walls.
- You only use the Tuttnauer green high pressure sealing gasket and ensure that it is changed if visibly damaged, or when shrinkage has occurred.
- The lid is securely closed when the unit is not in use, to avoid the risk of accidental damage. Never leave in position as shown in F1.
- You have the model details, serial number and date of purchase when contacting Tuttnauer or your supplier.
- Change your water daily.
DO NOT…!
- Touch the unit while it’s in operation – it gets HOT!
- Attempt to remove the lid during operation.
- Lose the operating manual included with the unit.
- Add any chemicals whatsoever to the water.
- Attempt to sterilize volatile substances, toxic materials, or inappropriate loads.
- Place the unit on heat sensitive surfaces polished wood or glass.
- Open the Depressurization Valve (A) during the sterilization cycle.
- Leave the Depressurization Valve (A) in the “open” position when placing the lid upside down on a work surface.
- Immerse the unit or electrical cord in water when cleaning.
- Use abrasive materials or lubricants when cleaning.
- Drop or abuse the unit.
- Use in areas or risk associated with flammable materials or gasses.
- Attempt to change fuses until the unit has been unplugged from the fuse mains. Only qualified persons should change fuses.
- Reach over the unit when removing the cover, doing os may cause burns from rising heat and steam.
- Press the start button once the cycle has been started as this will re-set the cycle timer to zero.
As always if you have any questions about this process or anything else please feel free to contact us and take advantage of our “FREE TECH SUPPORT.”
We also offer FREE VIRTUAL TECH SUPPORT to “See and Talk” with a “Real Time Live Technician” for any problems you may be in need of help with.
You can also use our “FREE MAINTENANCE PROGRAM”. Take the guesswork and worrying about what unit is due for maintenance and which maintenance cycle it is time for. We will keep track of all your autoclaves and let you know when it’s time for anything.
You can find the Tuttnauer T-Classic 9 here using the link to our website.