
Tuttnauer T-Edge 11S Control Panel Guide
In this article, we’ll be going in-depth into the control panel on the Tuttnauer T-Edge 11S. We’ve written an overview about the T-Edge 11S which you can find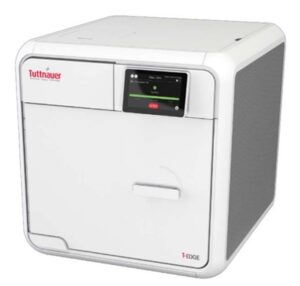 here on our site. We also have an Installation Guide on our site here for proper installation of your T-Edge 11S. As well as an operation guide for proper operation here.
The T-Edge 11S is a modern autoclave with lots of benefits for your practice, and even a unique feature. The T-Edge 11S has the ability to be upgraded from a gravity displacement cycle to a pre/post vacuum cycle. With all that and more, the T-Edge 11S can be a great addition to any practice.
This Tuttnauer T-Edge 11S control panel guide comes directly from Tuttnauer. Ensuring that the installation process is done properly to manufacturer specifications. If you’d like to see a digital version of the T-Edge 11S manual, we have a link to it on our website from our resources tab here.
Control Panel
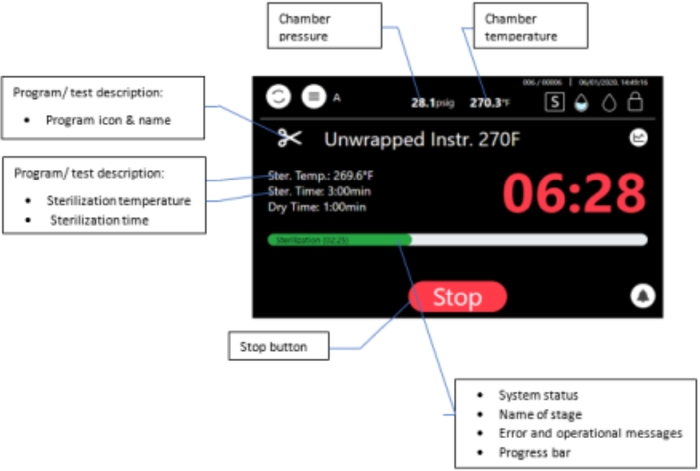
The display is a graphic Touch screen LCD panel used to display the autoclave current status, any Operational or Error Messages and for operating the machine.
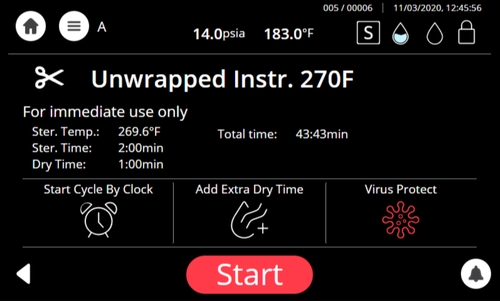
Image 1: Home screen –Program Select Screen
This screen will be presented when the autoclave is switched on:
![]()
Additional programs are accessible by paging using the side arrows:
![]()
Home Screen Description and Functions
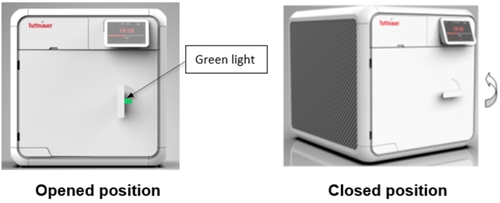
Opening the Device Door
This machine is equipped with an electronic door lock. The door is locked when either the
system is running a sterilization cycle, or there is pressure in the chamber, or the power is off.
If you need to open the door after cycle completes, press the confirm button: Showing Class S
In any case, if the door is not locked, it can be opened as illustrated below. Turn the handle counterclockwise and pull out to open the door.
Starting a Cycle
It is recommended to perform B&D test cycle at the beginning of each working day.
1.) Before each cycle, check visually that the gasket is intact, not loose and clean.
2.) Load the autoclave properly
3.) Choose the appropriate sterilization program.
4.) Each sterilization program screen contains a Virus Protect option.
Notes:
- The program can only be selected when the door is open.
- The Virus Protect is not for use for Textile and Porous programs
5.) The selected programs are shown below:
Class B:
![]()
Class S:
![]()
6.) The next screen will prompt the selected program information
7.) Close the door by both:
Pushing the door gently;
Turning the handle clockwise while pushing the door until it comes to the closed position, then releasing the handle.
When the door is closed, the open-door symbol is replaced with the closed-door symbol.
8.) Press the Start button to start the cycle.
For cycle process description, see Sterilization Cycle Description.
Warning! Do not remove the top cover during a running cycle. Hot water / steam may exit!
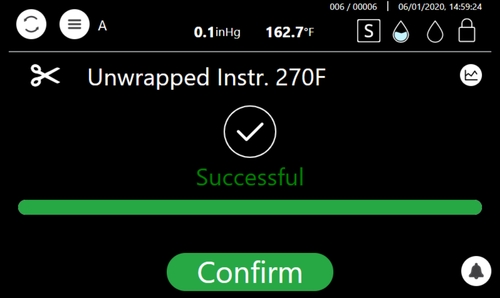
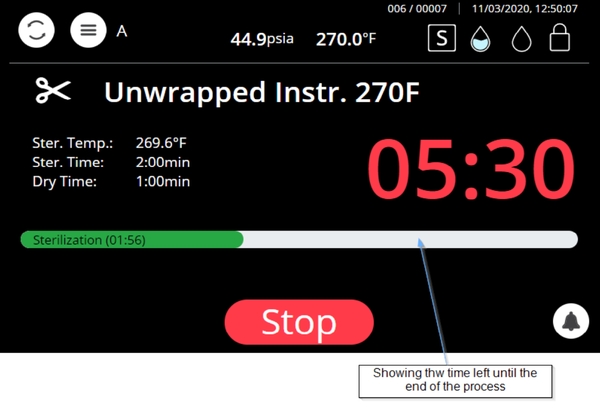
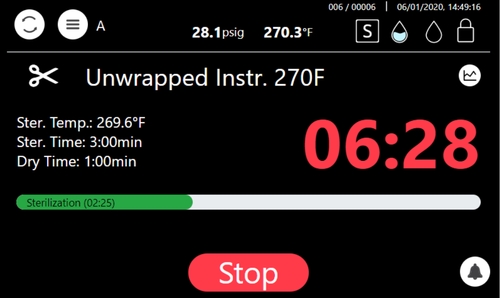
After pressing start, the sterilization process starts
Image 3: screen display while “Unwrapped 134” sterilization program is in progress
Virus Protect Program
The Virus Protect is a program that eliminates viruses and is performed prior to a sterilization cycle.
Note: The Virus Protect is not for use for Textile and Porous programs.
1.) Select from a sterilization cycle, the Virus Protect option.
![]()
2.) Raise the temperature to 230°F (110°C) and wait for a period of 10 minutes, for the Virus
Protect process to complete and if, for example, the Unwrapped Instr. sterilization program is selected, the screen below is displayed if the virus protect is successfully completed.
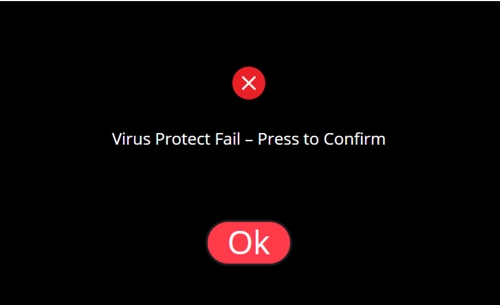
Note: If the Virus Protect program fails, the confirmation message below appears. After pressing on OK in this message, the system will release air outside of the autoclave.
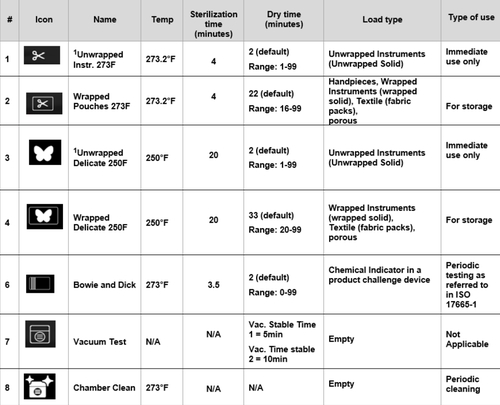
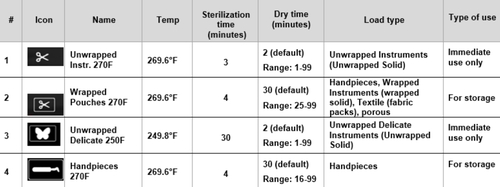
Available Sterilization Programs and Test Programs
Class B
Notes:
The Unwrapped sterilization program can be used for sterilizing lumen device of no longer than 9″ (230mm) and no smaller than 0.13″ (3.4mm).
Class S
Maximum Load Weight per Load Type
Class B
| Load type | Maximum Load Weight | Suitable for programs |
|---|---|---|
| Textile, porous | ~4.4 lbs (2.0kg) | Wrapped |
| Solid Unwrapped | ~20 lbs (9.0kg) | Unwrapped |
| Solid Wrapped | ~12 lbs (5.4kg) | Wrapped |
Class S
| Load type | Maximum Load Weight | Suitable for programs |
|---|---|---|
| Solid Unwrapped | ~17.6 lbs (8.0kg) | Unwrapped |
| Solid Wrapped | ~9.9 lbs (4.5kg) | Wrapped |
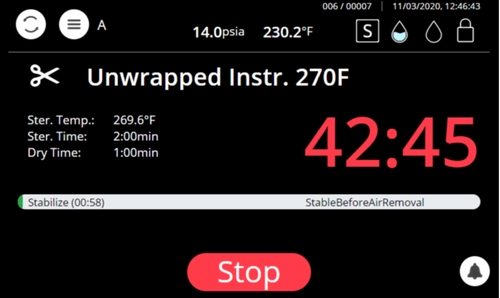
Description of the Sterilization Cycle Stages
Air-removal stage: Pre vacuum pulses are performed. For wrapped cycles, there are 2-3 pulses and the vacuum are deeper.
Heating stage: steam is inserted into the chamber until the sterilization temperature is reached
Sterilization: sterilization temperature is maintained constant during the sterilization time.
Fast exhaust: steam is exhausted out of the chamber at a fast rate until pressure decreases to ambient pressure.
Drying: performed with the door closed by pulling vacuum and using the accumulated heat in the chamber and the load to remove leftover moisture from the instruments and wraps.
Descriptions of the Vacuum Test Stages
Vacuum is produced in the chamber, down to P1=2.17 psi (15 kPa.) At this stage all the valves close. The autoclave remains in this stage for 5 minutes. This period enables the condition in the chamber to reach equilibrium. After the 5 minutes have elapsed, the cycle ‘history record’ records the pressure that is referred to as P2. At this point the test begins and lasts 10 minutes. At the end of the test, the cycle ‘history record’ records the results. The pressure at the end of the test is referred to as P3.
Notes:
- During the test period the autoclave is not heated. Even if the vacuum test is completed, the operator shall check the test results and consider whether the test results are acceptable or not.
- Perform the Vacuum Test on a completely dry chamber. Preferably following a cycle with a Drying procedure i.e., a Wrapped cycle, and after the Chamber was cooled i.e., Sleep mode/Turned off.
Description of Bowie-Dick Test Stages
Air-removal stage: vacuum pulses are performed.
Heating stage: steam is inserted into the chamber until the sterilization temperature and pressure are reached.
Sterilization stage: temperature and pressure are maintained constant at the pre-set level for sterilization time.
Fast exhaust stage: steam is exhausted out of the chamber at a fast rate until pressure decreases to ambient pressure.
Drying stage: heating of chamber followed by a vacuum break (air inlet) to remove leftover moisture from the instruments and wraps. Air inlet to reach atmospheric pressure.
Cycle Succeeded / Cycle Failed Notifications and Follow-on
Cycle Succeeded
When the cycle has ended successfully, the following “Successful” message is displayed:
Push the confirm button to confirm the “Successful” message. Proceed to chapter “Opening the door and Unloading”.
Cycle Failed
In the event of a failure at any stage, the exhaust valve will be opened to release pressure from the chamber, the message “Fail” and a relevant failure message will be displayed on the screen:
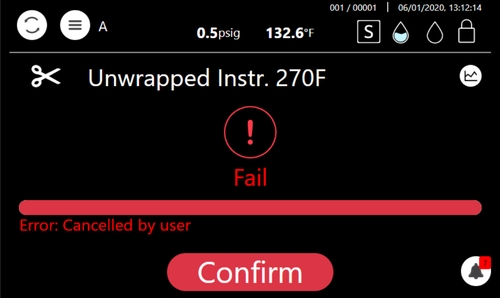
Warning! The load has not completed a sterilization cycle; therefore, it is not sterile. Handle it as a contaminated load.
Any failure means that the load is not sterile.
Aborting a cycle
It is possible to stop the cycle while the autoclave is operating. Press the Stop button at any stage (except exhaust) of the process to stop the operation.
If the cycle is aborted, the load is not sterile. A “fail” message will be displayed
with an error message explaining the reason for the failure. An alternating buzzer signal will sound to notify the user.
Press the button to confirm the displayed message.
Warning! The load has not completed the cycle; therefore, it is not sterile. Handle it as a contaminated load.
Custom Programs
Custom programs are not FDA approved! Validation of the sterilized cycle is the user’s responsibility.
T-Edge 11 offers the user a customized program, adjusted in order to sterilize items that cannot be sterilized in any of the preceding default programs.
To utilize a customized program:
- Have your dealer or service technician create a customized program. This can be done by duplicating one of the preinstalled programs. The new program becomes a customized program with a new name (per customer’s request), a unique icon and specific settings are available for modification.
1.) Select from the Home screen, the Custom program.
![]()
2.) The Custom program is displayed below with the modified settings.
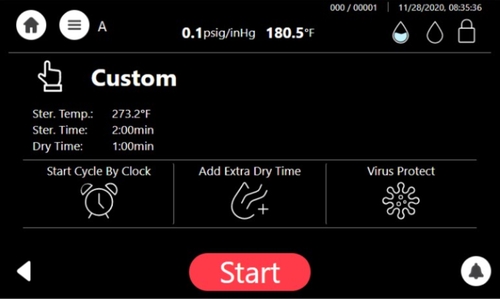
3.) Press “Start” to begin the customized cycle.
Cycles History
The Cycles history menu enables printing a specific cycle.
On the Quick Option screen, press the Settings icon, then browse to Advanced Options / Handle cycles / Cycles history
The following screen is displayed with the status of the cycle.
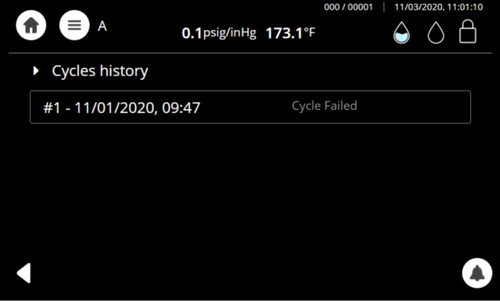
If you select a cycle history from the screen above, a Cycle content screen appears
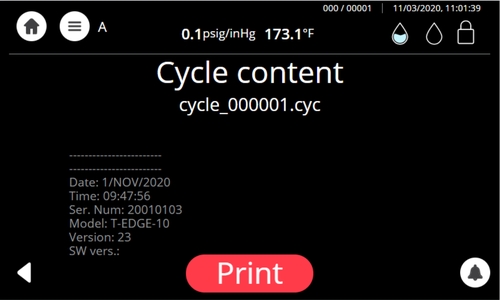
Press “Print” to receive the entire printout of the selected cycle history.
Opening the door and Unloading
1.) Push the “Confirm” button to confirm the “Successful” or the “error” message to unlock the door.
2.) Open the door
Caution!
Open the door a little to release the steam from the chamber. Only after the steam escaped, open the door widely.
Warning!
To avoid severe injuries from hot steam and condensed hot water that may drip out when opening the door, it is strictly forbidden to lean on the autoclave. It is strictly forbidden to place your hand or any part of your body over or under the door.
3.) Use the tray handle or wear heat-resistant gloves to remove the load from the autoclave.
4.) After unloading, visually inspect the load to ascertain that it is dry, and that sterilization indicators have made the required color change.
Caution: Water droplets and visible signs of moisture on sterile packaging or the tape used to secure it, may compromise sterility of processed loads or be indicative of a sterilization process failure. Visually check outside wrapper for dryness. If there are water droplets or visible moisture on the exterior of the package or on the tape used to secure it, the pack or instrument tray is considered unacceptable.
Warning! The sterility of the instruments processed in unwrapped cycles cannot be maintained if exposed to non-sterile environment.
Checking Waste Water Level
When the waste water level is high, the general alarm symbol will appear. A relevant text alarm will appear in the alarms list. This situation is normal, but the operator cannot run a new cycle before draining the waste water reservoir (see Draining the Reservoirs below).
Draining the Reservoirs
This procedure applies to the mineral-free water reservoir (left) and to the waste-water reservoir (on the right).
Note: Improper Water level icon appears when the water reservoir needs to be filled or drained.
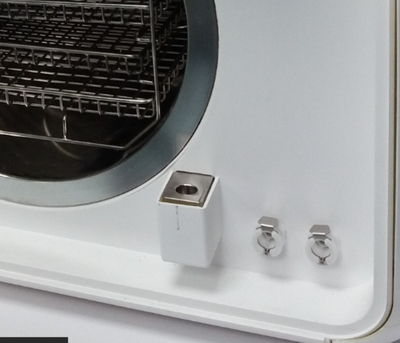
The drain valves are located on the front right side of the autoclave after the door is opened.
To drain the reservoir:
1.) See item (5) with the plastic hose (6) attached to it (supplied with the autoclave).
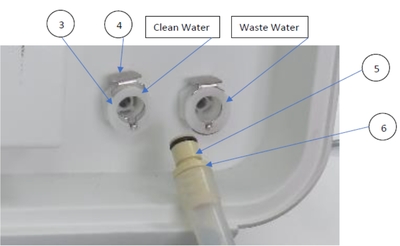
2.) Put the other end of the hose into a drain bucket.
3.) Insert part (5) into valve (3) and press it until you hear a click. The drain valve opens immediately.
4.) When the water reservoir is empty, press part (4). Item (5) will pop out approx. 1/8″(3mm) and the drain valve will be closed. Remove item (6) with the plastic tube.
Caution: Never reuse waste water.
5.) If the drained reservoir is the clean-water reservoir, fill reservoir with distilled water until it reaches the full level. (Approximately 219 Ounces /6.5 liters).
The autoclave is now ready for use.
Waste Water Draining
Caution! Waste water should be brought into the public net in accordance with the local rules or requirements i.e ONLY NON-HAZARDOUS LIQUIDS SHALL BE DISPOSED IN PUBLIC SEWAGE!
Connect the autoclave’s drain to the building’s drainage pipe. The drainage shall be of an open type, withstanding temperature of, at least, 140°F. (Applicable for device with automatic water inlet system only).
As always if you have any questions about this process or anything else please feel free to contact us and take advantage of our “FREE TECH SUPPORT.”
We also offer FREE VIRTUAL TECH SUPPORT to “See and Talk” with a “Real Time Live Technician” for any problems you may be in need of help with.
You can also use our “FREE MAINTENANCE PROGRAM”. Take the guesswork and worrying about what unit is due for maintenance and which maintenance cycle it is time for. We will keep track of all your autoclaves and let you know when it’s time for anything.
The Tuttnauer T-Edge 11S is available here on our site.
Parts for the Tuttnauer T-Edge line of autoclaves is also available on our site here.