Tuttnauer T-Edge 11S Operation Guide
In this article, we’ll be going in-depth on the operation process for the Tuttnauer T-Edge 11S. We’ve written an overview about the T-Edge 11S which you can find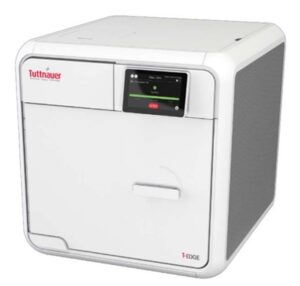 here on our site. And we also have an Installation Guide on our site here for proper installation of your T-Edge 11S.
The T-Edge 11S is a modern autoclave with lots of benefits for your practice, and even a unique feature. The T-Edge 11S has the ability to be upgraded from a gravity displacement cycle to a pre/post vacuum cycle. With all that and more, the T-Edge 11S can be a great addition to any practice.
This Tuttnauer T-Edge 11S operation guide comes directly from Tuttnauer. Ensuring that the installation process is done properly to manufacturer specifications. If you’d like to see a digital version of the T-Edge 11S manual, we have a link to it on our website from our resources tab here.
Operation Guide
Pre-sterilization Cleaning and Disinfection of Instruments and their Loading into the Device
![]() Caution! Instruments should not be loaded into the autoclave to be sterilized unless Steam Sterilization is instructed in their User Manual. The instructed Steam Sterilization Program should be verified against the programs available in this autoclave.
Caution! Instruments should not be loaded into the autoclave to be sterilized unless Steam Sterilization is instructed in their User Manual. The instructed Steam Sterilization Program should be verified against the programs available in this autoclave.
![]() Caution! Never use the autoclave to sterilize corrosive products (acids, bases, or phenols) volatile compounds or solutions (ethanol, methanol or chloroform), or radioactive substances.
Caution! Never use the autoclave to sterilize corrosive products (acids, bases, or phenols) volatile compounds or solutions (ethanol, methanol or chloroform), or radioactive substances.
The most important stage begins with removing debris by cleaning and rinsing. Effective cleaning is affected by several factors: water quality, type, concentration and quality of a cleaner, effective washing method, and adequate rinsing and drying.
Cleaning dried blood is especially difficult because it flows and dries in difficult- to-clean locations. It shall be washed away. Mechanically scrubbing, high pH detergents, enzymatic solutions, and water spray at high pressure will clean this contamination.
Note: Consult the Medical Device manufacturer relating adequate and most effective cleaning method and cleaning agents.
Instruments which are composed of several components shall be dismantled.
Disinfection is the next step. It is important for safe handling. There are various methods and means for disinfection like soaking in liquid chemical disinfectants or hot water disinfection.
Packaging. The target in packing medical items is to assure that the contained goods are sterile and maintaining them sterile till opening the package.
There are various methods and techniques used in preparation and packaging of surgical instruments.
Check the instructions of the item manufacturer as to the proper procedure for cleaning and sterilizing each item. The item manufacturer’s instructions always supersede any other instructions.
- Clean instruments immediately after use to remove any residue. It is recommended that all instruments be ultrasonically cleaned using Tuttnauer’s Clean & Simple enzymatic cleaning tablets or other suitable solution.
- After cleaning, rinse instruments under tap water for 30 seconds and pat or air dry to remove residual minerals. If your tap water has a high mineral content, then rinse a second time in a bath of distilled water to remove minerals and pat dry.
- Launder textile wraps prior to sterilization, thoroughly rinse wraps laundered in chlorine bleach. Chlorine bleach can harm your stainless- steel instrument and the sterilizer.
- Follow the instrument manufacturer’s instructions on the use of products for cleaning and lubricating instrument that have been ultrasonically cleaned.
- Be sure that instruments of dissimilar metal (stainless steel, carbon steel, etc.) are separated. Carbon steel instruments should be bagged or placed on autoclaveable towels and not directly on stainless steel trays (mixing will result in damage to the instruments or trays from the oxidation of these materials).
- Load items within the boundaries of the tray so that they do not touch the chamber walls or fall off when the tray is moved. Items should not be allowed to touch the walls of the Chamber as the hot metal can damage the item.
- Don’t overload the Sterilizer trays. Overloading will cause inadequate sterilization & drying.
- Make sure that all instruments remain apart during the sterilization cycle. Surfaces that are hidden because items are covering other items will not be exposed to the steam and will not be sterilized.
- Disassemble or sufficiently loosen multiple-part instruments prior to packaging to permit the sterilizing agent to come into direct contact with all parts of the instrument.
- Verify that packaging methods are in accordance with the good practice approach and the packaging materials used are in agreement with applicable standards.
- Tilt on edge items prone to entrap air and moisture, e.g. hollowware, so that only minimal resistance to air removal exist, the passage of steam and condensate will be met.
- Wrapped instruments should be placed in material which will allow steam penetration and promote drying, such as autoclave bag, autoclave paper, or muslin towels.
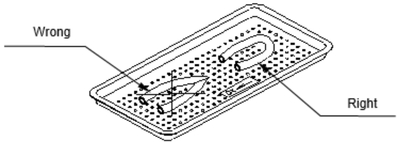
- When loading pouches on the tray, put them with paper side up, nylon side towards the tray (see the figure below).
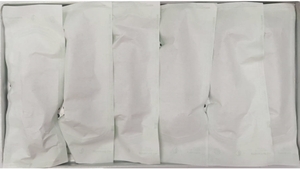
- Tubing should be rinsed after cleaning. When placed in the tray, make sure that both ends of the tubing are open and there are no sharp bends or twists.
- Cassettes should be placed on the tray rack in place of the trays. They should not be touching each other or the Chamber walls. There should be about 1″ (2.5cm) between cassettes or packs for proper steam circulation.
- If spotting is detected on the instruments it is necessary to determine if the spot is dirt or rust. The first step would be to use an ordinary eraser to remove the spot. If there is no pitting under the spot, then the spot is only dirt. Dirt spots on an instrument may be an indication that the autoclave needs to be cleaned or that the instruments were not adequately cleaned or dried prior to sterilization. If removal of the spot reveals pitting, then the spot is most likely rust. Rust spots on an instrument are not uncommon on inexpensive instruments. It may also be an indication that the instruments were rinsed in tap water with a high mineral content. These minerals when exposed to high temperature and steam will accelerate the oxidation of the metal. One suggestion would be to final rinse the instruments in a distilled water bath and pat dry to absorb residual water and minerals.
- If the instruments exhibit a discoloration this can be due to the mixing of carbon steel and stainless steel. When these two metals come into contact with each other electrolysis occurs that breaks down the metal. The best solution is to separately wrap the carbon steel instrument to insulate it from other instruments on the tray and the tray itself.
Operation Instructions
Turning on the Device
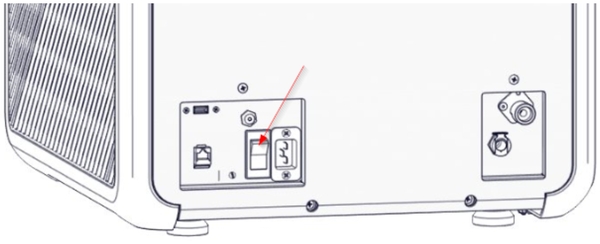
Plug the power cord into the socket on the rear panel of the autoclave (see the rear view) and into the wall outlet.
Turn ON the semi-automatic ON/ OFF bottom Switch located on the rear panel of the autoclave (see the rear view).
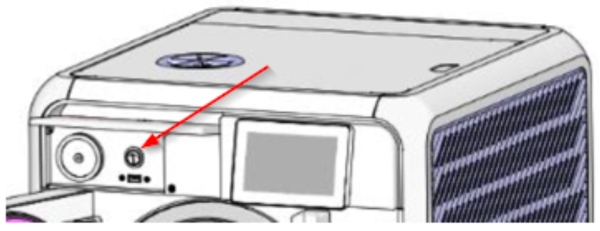
 Turn on the ON/OFF switch mounted under the cover on the front of the autoclave (see below)
Filling Water
Cautions! In the beginning of each day, check water level in the reservoir.
Note: Improper Water level icon appears when the water reservoir needs to be filled.
A general alarm symbol will appear.
Proper Water level icon appears when the water reservoir is properly filled.
The water level icon appears when the water level in the reservoir is full. When this icon appear, do not fill water!
Note: A new icon was added to the row of icons for the dirty water reservoir
![]()
The following screen shows that the Waste water tank is full.
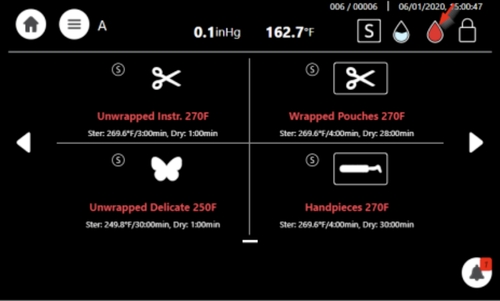
The following screen shows that the Waste water tank is empty.
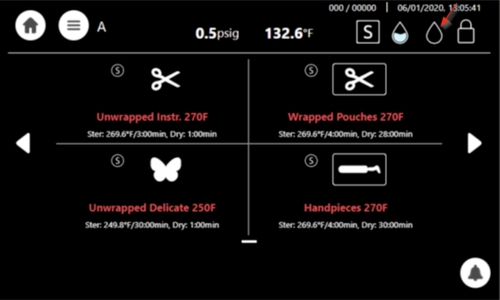
Caution! Before filling the reservoir, verify that the autoclave is idle and there is no pressure in the chamber.
Filling Water in the Reservoir
Note: Use only water having the characteristics stated in Water Quality. Using tap water will clog the system and invalidate the manufacturer’s guarantee.
To fill water in the reservoir:
Lift up the water reservoir cover (see below).
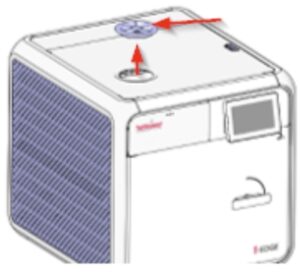
Pour water into the reservoir through the water filter on top of the autoclave unit. In case you fill too much water, it will spill on the counter.
The clean water level indicator will change from a red water droplet symbol to a blue water droplet, as shown below:
![]()
The screen below displays a full clean water tank.
![]()
Setting the Date and Time
Note: The Initial log-in including setting of drying time as well as other initial parameters will be performed only by a qualified technician upon installation
On the main screen, press the menu symbol to open the Quick Option screen.
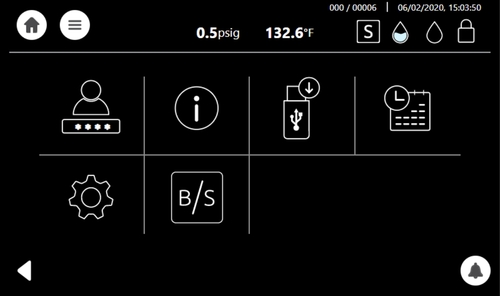
From the Quick Option screen, select the Set Date and Time icon.
Note: The only functionality to be performed by the user (on a regular basis) is setting the date and time.
Select day, month and year, as depicted:
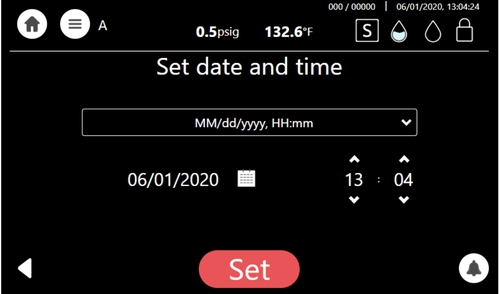
After adjusting the date and time, the system will automatically restart.
Class S and Class B
Class B: General description
Class B (that conform to European standard) mainly provides deeper vacuum in the autoclave chamber than Class S, and therefore include more complete air removal from the most difficult load types. It allows the system to perform vacuum in difficult hollow or porous instruments and perform effective sterilization of these materials.
Class S: General description
Class S used in the USA obtain weaker vacuum level and is less effective than Class B in the sterilization of hollow instruments.
The following tables provide:
- Table A for types of sterilization cycles
- Table B provides the T-Edge 11, Class B sterilization programs.
- Table C provides the T-Edge 11, Class S sterilization programs.
Table A — Types of Sterilization Cycles
Class B Class S
The sterilization of products as represented by the test loads in the standard.
For products that lie within the limits specified for the relevant test loads, this includes:
solid products
porous products and lumen devices
wrapped (single and multiple-layer) or non-wrappedThe sterilization of products as specified by the manufacturer of the sterilizer including non-wrapped solid products and at least one of the following:
porous products, small porous items
lumen devices, bowls and receivers
single-layer wrapped products
multiple-layer wrapped products
Table B — Class B: Sterilization Cycles
Cycle Name Sterilization Temp.
1 Pre / Post Vac Unwrapped Instr. 273°F 273°F
2 Pre / Post Vac Wrapped Pouches 273°F 273°F
3 Pre / Post Vac Unwrapped Delicate 250°F 250°F
4 Pre / Post Vac Wrapped Delicate 250°F 250°F
5 Chamber Clean
6 Bowie and Dick 273°F
7 Vacuum test
Table C — Class S: Sterilization Cycles
| Cycle Name | Sterilization Temp. | |
|---|---|---|
| 1 | Unwrapped Instr. 270°F | 270°F |
| 2 | Wrapped Pouches 270°F | 270°F |
| 3 | Unwrapped Delicate 250°F | 250°F |
| 4 | Handpieces 270°F | 270°F |
| 5 | Chamber Clean | N/A |
Setting Class S and Class B
Your autoclave contains Class S as a standard. If you (the customer) would like to upgrade your system to a Class B, please contact Tuttnauer USA representatives or your dealer. Tuttnauer will ask you for the autoclave serial number. In return Tuttnauer will provide you with a code/password.
After entering the new code password by the customer user, the autoclave will contain now the Class B features.
The following details the procedure to access Class B and how to switch from Class S to B, and from Class B to S.
1.) From the Quick Option screen press the “B/S” icon to select Class B.
![]()
Note: The autoclave is presently in Class S.
2.) Press on the required class “S&B” icon type.
3.) The Class Settings screen is displayed, and the Class B is now displayed.
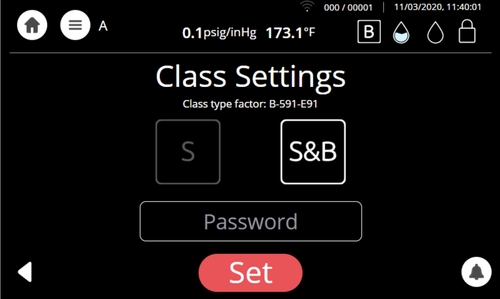
4.) Enter Password
5.) Click on “Set”.
6.) A Class Settings message will appear confirming the action completing successfully.
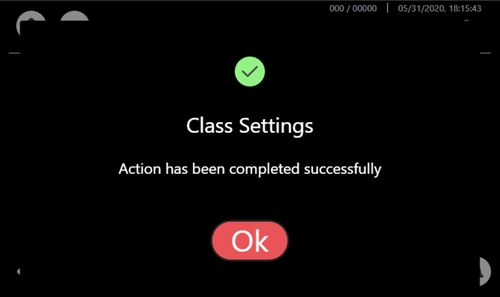
7.) Press “Ok” to complete conversion.
The autoclave is now converted to Class B and the screens displayed will have a Class B identification.
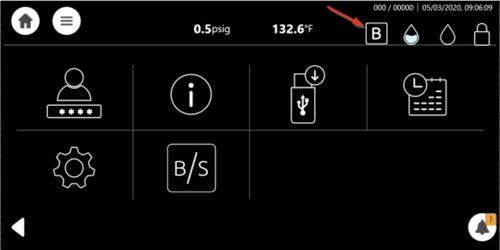
Note: the Class B sign is on the screen header.
The entire autoclave is now in Class B system, a sample of the screens after the conversion to
Class B are shown below:
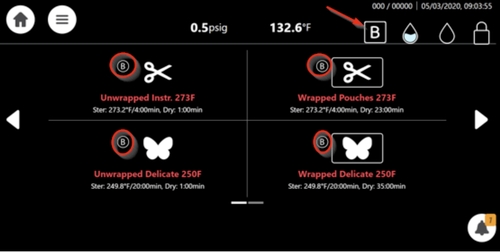
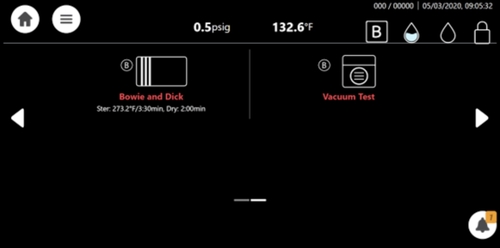
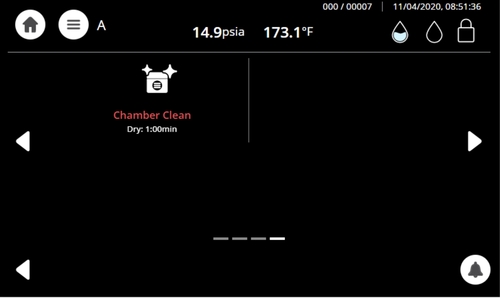
Note: It is possible to switch back from Class B to Class S if desired, following the steps above, by selecting S in step 3 above instead of S&B. Entering the code password is required.
As always if you have any questions about this process or anything else please feel free to contact us and take advantage of our “FREE TECH SUPPORT.”
We also offer FREE VIRTUAL TECH SUPPORT to “See and Talk” with a “Real Time Live Technician” for any problems you may be in need of help with.
You can also use our “FREE MAINTENANCE PROGRAM”. Take the guesswork and worrying about what unit is due for maintenance and which maintenance cycle it is time for. We will keep track of all your autoclaves and let you know when it’s time for anything.
The Tuttnauer T-Edge 11S is available here on our site.
Parts for the Tuttnauer T-Edge line of autoclaves is also available on our site here.
