Midmark M11 “Old Style” Operation Guide
Proper installation, operation and maintenance are the most important things to know in terms of autoclave ownership. Improper installation can lead to the machine not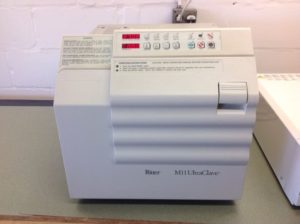 functioning properly. Improper operation can lead to complications with sterilization. And neglecting maintenance will ensure that your sterilizer will never work properly again…
But here at Sterilizer Autoclave Solutions, we make it our job to provide you with the proper knowledge to make sure everything goes smoothly. So in this article, we’d like to talk about one of Midmark’s classic offerings, their M11 “Old Style” autoclave. Specifically, this article will go over the operation guide for the M11 “Old Style”, with instructions provided by the manufacturer, Midmark. Proper operation of any autoclave is vital to ensuring a smooth and efficient workflow… as well as preserving the longevity of your autoclave.
If you have any questions about the Midmark M11 “Old Style” autoclave or anything else, please give us a call at 704-966-1650 Option 3 for our Free Tech Support line.
Operation Guide
![]() DANGER
DANGER
Do not use this sterilizer in an explosive or oxygen-rich atmosphere, or where flammable anesthetics are stored. To do so could result in an explosion or fire.
If the sterilizer malfunctions, immediately unplug sterilizer. If the sterilizer continues to malfunction, call for service; do not attempt to repair the sterilizer yourself.
![]() EQUIPMENT ALERT
EQUIPMENT ALERT
For optimal sterilizer performance, allow the sterilizer to reach room temperature before operating.
Recommended Steam Sterilization Monitoring Program
Physical monitors (temperature and pressure measuring devices) can be used to help detect failures in sterilizer function. The sterilizer notifies the user if sterilization conditions fall outside of established limits. It is recommended that the Printer Accessory be used to create a record of each load’s actual cycle time, temperature, and pressure.
Process monitors, such as biological indicators and chemical indicators, should be included in each sterilization cycle. The process monitors detect whether the cycle parameters were delivered. Process monitors cannot establish that a processed item is actually sterile. If the monitors detect a failure, the user must determine the source of the failure. Failures could result from improper packaging, loading, or sterilizer malfunction. Follow the process monitor manufacturer’s instructions for proper selection, storage, use, and interpretation of their devices.
Follow the appropriate agency (state dental or medical board) for sterilization monitoring guidelines for your office. Additional information can also be obtained from CDC, AAMI, OSAP, and ADA regarding monitoring programs or other sterilization issues.
Sterilizer Preparation Before Operation
EQUIPMENT ALERT
Check the serial number label (1) on the back panel of the sterilizer to verify the voltage rating for the unit. Failure to do so could result in damage to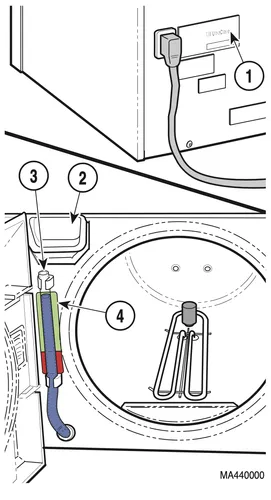 the unit
1.) Locate the sterilizer and plug in its power cord in accordance with the Installation instructions contained earlier in this manual.
![]() EQUIPMENT ALERT
EQUIPMENT ALERT
Use only distilled or demineralized water. Normal tap water contains minerals, especially chlorides, which have corrosive effects on stainless steel. Failure to use distilled or demineralized water may cause serious deterioration and premature failure of the stainless steel chamber which could result in serious injury or death.
2.) Open the door and pour distilled or demineralized water into the fill opening (2) until the water level found in the Level Indicator Tube (3) is at the top of the red / green fill level label (4).
3.) If the unit has a printer (optional equipment), turn the printer to ON.
Cleaning Instruments
![]() DANGER
DANGER
Clean and dry instruments before putting them into the sterilizer. Incomplete and improper cleaning of instruments will impede sterilization and will result in unsterile instruments which could lead to personal injury or death.
- Clean instruments in accordance with instrument manufacturers’ and OSHA’s recommendations.
- Thoroughly wash instruments to remove gross debris (either mechanically or using an ultrasonic cleaner).
- Rinse instruments thoroughly.
- Dry instruments.
Guidelines For Loading Trays
Sterilizer loading is critical to effective sterilization. Protective coverings designed to be used in steam sterilization processes should be used to help en- sure that items retain sterility until used. A proper load for a sterilizer is deter- mined by the number of items to be sterilized, their characteristics, and how they are prepared and positioned within the sterilizer. A single large item may be the maximum load for that type of item while the maximum load for very small items may contain hundreds of items. Large and small items can be included in the same load.
The sterilization process will be effective if items are properly prepared and positioned, so they get adequate contact with steam for the correct amount of time.
The M11 sterilizers are equipped with two large and two small trays to maximize the number of items that can be processed at one time and provide separation for better steam flow and penetration. Four properly loaded trays, as noted in the chart on page 15 (two large and two small), is the maximum load for the M11 sterilizers.
General Guidelines
- Sterilize jointed instruments in an open position.
- Place all containers so the opening allows steam to enter and air to leave the container (containers are usually positioned on their side or with the opening tilted slightly down).
- Pouch or wrap items to preserve sterility after processing. Use only protective coverings designed and recommended for use with steam sterilization.
- Do not wrap items too tightly. Steam penetration will be affected if an item has excessive wrapping.
- Do not stack trays on one another. Using Midmark’s standard tray rack and trays provides proper tray spacing.
- Position loads on trays with appropriate space between items. Adequate space is required between items to allow proper steam flow and drying.
- Place unwrapped items on a towel or absorbent paper.
- Vented liquid containers should not be filled to more than 75% of their capacity to allow for fluid expansion and to prevent overflow. Depending on the user’s desired results, many different container styles may be accept- able. Careful consideration of the liquid to be sterilized should guide the user in selection and use of appropriate containers and closures. Always consult the liquid and/or container manufacturer for information on sterilization. Not recommended for sterilization of liquids intended for direct patient contact.
Loads Including Dental Handpieces and/or Instruments
NOTE
Dental handpieces should only be sterilized when placed in a pouch and in the POUCHES cycle. Only one handpiece should be placed in each pouch.
The maximum M11 load shall be nine handpieces (in the pouch rack) and 75 instruments. Other combinations of fewer handpieces and items can be processed in a single load if that allows for efficient sterilization. If a load surpasses these limits, we recommend dividing the load and running multiple cycles. Listed below are the maximum recommended loads for each tray:
| Load Type | M11 Large / Deep Tray | M11 Small Tray | Sterilizer Total |
|---|---|---|---|
| Solid Items | 45 instruments - 1224 grams (2.7 lbs.) or | 30 instruments - 816 grams (1.8 lbs.) or | 150 instruments - 4.1 kg (9.0 lbs) or |
| Handpieces | 9 in rack or | 9 in rack or | 9 handpieces in rack and 75 instruments or |
| Liquids* | 3 - 198 ml (6.76 oz) containers or | 2 - 198 ml (6.76 oz) containers or | 3-198ml(6.76oz) containers or |
| Packs** | 4,424.5 cu. cm up to 5.0 cm thick (270 cu. in. up to 2 in. thick) | 3,195.5 cu. cm up to 5.0 cm thick (195 cu. in. up to 2 in. thick) | 15,240 cu. cm up to 5.0 cm thick (930 cu. in. up to 2 in. thick) |
*Not recommended for sterilization of liquids intended for direct patient contact.
**Packs to have a minimum of 1/4 in. (6.3 mm) space between each other and away from all sterilizer surfaces.
Operation
![]() WARNING
WARNING
Do not use this sterilizer in an explosive or oxygen-rich atmosphere, or where flammable anesthetics are stored. To do so could result in an explosion or fire.
Do not use this sterilizer for sterilizing volatile substances or for any purpose other than its intended design. Burns and toxic or explosive conditions could result.
Clean and dry instruments before putting them into the sterilizer. Incomplete and improper cleaning of instruments will impede sterilization and will result in unsterile instruments which could lead to personal injury or death.
If the sterilizer malfunctions, immediately unplug sterilizer. If the sterilizer continues to malfunction, call for service; do not attempt to repair the sterilizer yourself. Operation
Do not force door handle at any time. Chamber pressure may cause door to open with extreme force. If the door handle does not move freely, allow unit to cool and depressurize for 40 minutes before opening door. Failure to adhere could result in serious personal injury or death.
![]() EQUIPMENT ALERT
EQUIPMENT ALERT
Do not use toweling or packaging which may contain chlorine bleach residue. Doing so could result in trays and/or chamber rusting or discoloring. In extreme cases, the life of the chamber may be sig- nificantly shortened.
NOTE
Use sterility monitors with each sterilization load. Also, if a sterilizing cycle is terminated prematurely, reprocess the instruments to ensure the sterility of the load.
Refer to the following steps for a detailed description of the program operating procedures:
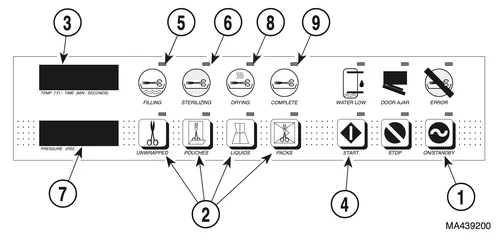
1.) Press the ON / STANDBY button (1).
- The Selector / Indicator panel turns on (displays will illuminate).
- The Program Indicator lamps (2) flash until a sterilization program is
selected.
NOTE
Before operating the sterilizer, be sure the door handle is completely de- pressed (latched). If the handle is not fully latched, the sterilizer will alert the operator with an audible beep and will not start until the door handle is latched.
2.) Close and latch the door; the sterilizer will not operate unless the door is closed.
![]() EQUIPMENT ALERT
EQUIPMENT ALERT
Processing goods using an incorrect sterilization program could result in unsterile goods and may damage instruments. Consult with your supply manufacturer for specific sterilization instructions.
3.) Select a sterilization program in accordance with the Standard Cycle Parameters (see table later in this manual).
- The Temperature / Time display (3) displays the selected program’s parameters alternately.
- If an incorrect program selection is made, select the correct program cycle by pressing the correct program cycle button (2).
![]() EQUIPMENT ALERT
EQUIPMENT ALERT
Processing goods using an incorrect sterilization program could result in unsterile goods and may damage instruments. Consult with your supply manufacturer for specific sterilization instructions.
4.) Press the START button (4).
- The sterilizer automatically begins processing its sterilization load.
- The FILLING lamp (5) illuminates and the chamber automatically fills to the correct level.
- The STERILIZING lamp (6) illuminates, indicating that the sterilizer is in the heating and sterilization phase of the selected cycle.
- When the correct temperature (3) and pressure (7) are reached, the sterilizer begins its time countdown. The selected exposure time and temperature are maintained throughout the sterilization phase.
- When the exposure time is complete, the sterilizer vents the chamber of all steam and water back into the reservoir tank.
![]() WARNING
WARNING
Keep clear when the door is ready to open. Five series of three audible beeps will be heard prior to partial door opening. Leave door in this position until steam dissipates. Failure to do so could result in severe burns from steam being released.
- When venting is complete and the pressure inside the chamber is reduced to zero, the sterilizer signals the operator with five series of three audible beeps, warning the operator that the sterilizer door is opening.
- The door opens, the DRYING lamp (8) illuminates, and the sterilizer begins a 30 minute drying phase (unless Liquids cycle was selected).
![]() CAUTION
CAUTION
The processed load and metal inner surfaces will be hot at the completion of the drying phase. Avoid contact. Failure to do so could result in serious burns.
NOTE
The sterility of wrapped or packed instruments cannot be ensured unless the wrapped or packed instruments are allowed to dry fully.
- Leave the sterilization load in the chamber to dry or remove the sterilization load from the chamber if drying is not necessary.
- When the 30 minute drying phase is complete, the sterilizer signals the operator that the drying phase is complete with five series of three audible beeps and the COMPLETE lamp (9) illuminates to indicate that the pro- gram cycle is complete.
- Remove the sterilizer load from the chamber.
5.) Press the ON/STANDBY button (1) to return the sterilizer to the STANDBY mode or if additional sterilization program cycles are desired, restart the sterilizer at this time.
Standard Cycle Parameters
The following table lists the standard cycle parameters for the four different types of sterilizer loads (follow state and federal guidelines regarding sterilization of single use devices and instruments).
| CYCLE | TEMP / PRESSURE/TIME (mini- mums) | ITEMS TO BE STERILIZED (Always consult the item manufacturer’s recommendations for sterilization.) |
|---|---|---|
| Unwrapped | 132°C (270°F) / 186 kPa (27 psi) for 3 minutes | Instruments loose on a tray. Open glass or metal canisters. Tubing not used in surgical procedures. Items manufacturers recommend for exposure at 132°C (270°F) for 3 minutes. The sterility of un- wrapped items is compromised on exposure to a non-sterile environment. |
| Pouches | 132°C (270°F) / 186 kPa (27 psi) for 15 minutes | Instruments and dental handpieces. Loosely wrapped individual instru- ments. Multiple layers of instruments separated by fabric. Wrapped trays of loose instruments. Tubing not used in surgical procedures. Items manufactur- ers recommend for exposure at 132°C (270°F) for 15 minutes. |
| Liquids | 121°C (250°F) / 104 kPa (15 psi) for 30 minutes | Liquids or gels that could boil over with rapid depressurization. Cycle includes special vent and dry functions. Not recommended for sterilization of liquids intended for direct patient contact. |
| Packs | 121°C (250°F) / 104 kPa (15 psi) for 30 minutes | Textiles and surgical packs wrapped for sterilization. Items, except liquids, manu- facturers recommend for exposure at 121°C (250°F) for 30 minutes. |
As always if you have any questions about this process or anything else please feel free to contact us and take advantage of our “FREE TECH SUPPORT.”
We also offer FREE VIRTUAL TECH SUPPORT to “See and Talk” with a “Real Time Live Technician” for any problems you may be in need of help with.
You can also use our “FREE MAINTENANCE PROGRAM”. Take the guesswork and worrying about what unit is due for maintenance and which maintenance cycle it is time for. We will keep track of all your autoclaves and let you know when it’s time for anything.
The Installation Guide for the Midmark M11 “Old Style” is available on our site to view here. →
You can view the Midmark M11 “Old Style” autoclave on our website here for more info. →
