
DuraSonic Ultrasonic Cleaner Installation and Operation Leave a comment
In this guide, we’re going to show you how to install your DuraSonic Ultrasonic Cleaner. The DuraSonic cleaners are listed for purchase by the size of the chamber. They all share the same form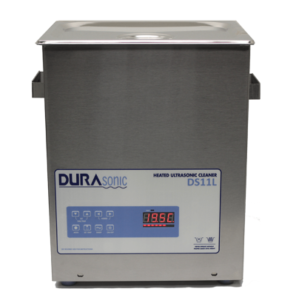 factor, but are listed by the gallon to differentiate them from one another.
And if you just want to talk to someone for any questions you may have, call our Free Tech Support at 704-966-1650 Option 3.
Unboxing and Installation
Unpacking the Unit
Please check your cleaner and its carton carefully for any external or internal damage. If you find damage, contact your shipping carrier immediately, before contacting your distributor. Please retain your packaging for future use.
Installing the Unit
Check the plate on the back of the cleaner for correct power requirements. Position your cleaner within easy reach of a standard grounded electrical outlet. Do not place the cleaner on a circuit which could become overloaded. Connect the Machine to GFI outlet.
If your cleaner does not operate correctly, first refer to the troubleshooting section for possible causes, or contact an authorized service center listed at the back of this manual, for additional information.
Operation Guide
TO SET TIME: TURN OFF ULTRASONICS, USE MODE TO SELECT TIMER, USE UP/DOWN ARROWS TO SET TIME.
TO SET TEMP: PRESS TWICE “SET TEMP”, USE UP/DOWN ARROWS TO SET TEMP, PRESS ONCE “SET TEMP” RED LED BLINKS WHEN HEATER IS ON, PRESS “SET TEMP” TO TOGGLE HEAT FROM ON TO OFF.
TO ADUST ULTRASONIC POWER: USE LEFT/RIGHT ARROWS.
TO TURN MACHINE ON: FLIP BACK POWER SWITCH TO ON, AND PRESS FRONT “ON/OFF” BUTTON.
TO TURN MACHINE OFF: TURN OFF ULTRASONICS FROM THE FRONT “ON/OFF” BUTTON, AND FLIP BACK POWER SWITCH TO OFF.
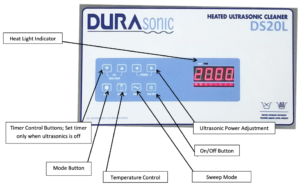
Explanation of Controls
HEAT – Activates heat to 55C° maximum
TIMER – Activates ultrasonics and sets time
Turn Knob to desired heat. Turn clockwise to hold position for continuous heat operation.
Before You Start Cleaning
- Do not place parts or containers directly on the bottom of the cleaning tanks; use a tray or wire to suspend items.
- Do not allow the solution to drop more 1 1⁄2” from top of tank.
- Do not ever use alcohol, gasoline or flammable solutions. Doing so could cause a
fire or explosion. Use only water-based solutions. - Do not ever use mineral acids. These could damage the tank.
Failure to comply with these cautions will void your warranty.
1.) Select your cleaning solution (refer for solution effects on metals)
2.) Allowing for the volume of the parts you will be cleaning and operation level line (one inch from the top)
3.) Add cleaning solution to the tank of water
4.) Plug the cleaner into a ground outlet
Note: If this is the first time you are running the cleaner, or if you have changed cleaning solution, you must degas the solution. If not, skip to “Cleaning Items”.
Degassing
1,) Turn the HEAT ON
2.) Turn the TIMER to 5-10 and let the cleaner run to allow the solution to “degas”.
Cleaning Items
1.) Set the TIMER for the amount of time you wish the items to be cleaned.
2.) Place the items into a basket.
3.) Slowly lower the basket into the tank. Do not allow items to contact the tank bottom.
4.) When items are clean and time is up, slowly remove them from the cleaner.
5.) Rinse the clean items with clean water and dry them, if necessary.
Draining Your Cleaner
Warning: Do not immerse the cleaner in water. Unplug the cleaner from the power source.
2L, 3L, 4L, and 6L models do not have a drain. To empty, use the side of the rim to pour the used solution into a waste disposal unit, rinse the tank thoroughly and refill with new solution.
Optimizing Your Cleaner
Cleaning – check the tank for contamination whenever you change solution. If necessary, remove contaminants with a nonabrasive cloth and water.
Emptying – always unplug the cleaner before emptying the tank. Empty the solution into a waste disposal unit.
Filling – always unplug the line cord before filling the tank. Fill the cleaner to the operating level (one inch from the top with beaker/tray in place), using warm tap water.
Low solution level – will cause the cleaner to fail. When you remove heavy or bulky loads from the cleaner, the solution level may drop below the operating level. If so, be sure to replace lost solution and degas, if necessary, depending on the amount used.
Overload – do not rest any items on the tank bottom. Weight on the tank bottom dampens sound energy and will cause damage to the transducer. Instead, use a tray and/or beaker positioning cover to support all items. Allow at least one inch between the tank bottom and the beaker or receptacle for adequate cavitation.
Covers – allow the cleaner to heat up faster, to a higher temperature, and avoid excessive liquid evaporation.
Heater – the heater may cause some discoloration of the tank wall. This is normal and will not affect the performance of the unit.
Solution – the fastest method to heat your cleaner is to fill with warm solution, use heat, ultrasonics (which also adds heat), and a cover.
Solution activity – the amount of visible activity is not necessarily related to optimum cavitation for cleaning.
Degassing – fresh solutions contain many dissolved gases (usually air), which reduce effective ultrasonic action. Although solutions will naturally degas over time. Solutions that have been sitting unused for 24 hours or longer have reabsorbed some gases.
Heat – increases the chemical activity of cleaning solutions.
Surface tension – can be reduced by adding solution to the bath. Reduced surface tension will increase cavitation intensity and enhance cleaning.
Solvents – never use solvents. Vapors of flammable solutions will collect under the cleaner, where ignition is possible from electrical components.
Renewal– replace cleaning solutions often to increase ultrasonic cleaning activity. Solutions, as with most chemicals, will become depleted over time. Solutions can become contaminated with suspended soil particles which coat the tank bottom, inhibiting ultrasonic activity.
Application Hints
CAUTION:
- Never clean novelty or inexpensive jewelry in the cleaner. The combination of heat and vibration may loosen a cement-held setting.
- Never clean gemstones such as emerald, amethyst, pearl, opal, coral, turquoise, peridot or lapis lazuli in the cleaner.
First time cleaning – first experiment with one piece, then proceed with the remainder. Solution level- Be sure to maintain solution level within 1 1⁄2” of top of the tank. Surface activity can vary with liquid level.
Load size – It is faster and more efficient to run several small loads rather than a few big loads.
Placing items – Never allow items to sit on the bottom of the tank. Always place them in a tray or beaker or suspend in the solution.
Rinsing items – After cleaning, use a clean water bath to rinse away chemicals adhering to items.
Lubricating items – When necessary, re-Iubricate items immediately after cleaning.
Drying items – Air drying at room temperature works for some items. Place parts requiring faster drying time under hot air blowers or in ovens.
Cleaning Methods
There are two methods of cleaning – direct and indirect. Each has advantages and disadvantages. When in doubt, run test samples using both methods to decide which one produces the best results for you.
Direct method
- Items in perforated insert tray
- Item suspended
How it works:
- Fill the tank with warm water and a cleaning solution.
- Place the items to be cleaned in a perforated tray and lower them into the tank. You
can also suspend items on a wire and then immerse them in the solution.
The advantages of this method are the simplicity of operation and cleaning effectiveness.
Indirect method
- Items laid randomly in solid insert tray
- Items placed in beakers
How it works:
- Fill the tank with warm water and a cleaning solution.
- Pour your solution medium into one or more beakers or into a solid insert tray.
- Place the beakers in a beaker positioning cover or a solid insert tray to fit your
cleaner. Beakers should not touch the tank’s bottom.
The advantages of this method are:
• Removed soil stays in the beaker or tray so you can easily examine, filter or discard it.
• You can use one or more solutions at the same time.
– Two completely different cleaning solutions.
– One beaker or tray with a cleaning solution and one with a rinse solution.
• Cleaning solution in your tank needs to be changed less often.
Cleaning Solutions
CAUTION: Do not use alcohol, gasoline, bleach, mineral acids, solutions with a flash point, semi-aqueous or combustible liquids in ultrasonic tanks, or you will void the warranty. Only use non-flammable solutions and water-based solutions.
Solution Types
Water-based solutions are either slightly acidic or alkaline. They include detergents, soaps and industrial cleaners designed to remove specific soils.
Acidic water-based solutions: remove rust, tarnish or scale. They range from mild solutions that remove tarnish, to concentrated, and inhibited acidic solutions that remove investment plaster, milk-stone, zinc oxide and rust from steel and cast iron as well as smut and heat-treat scale from hardened steel.
Alkaline water-based solutions: include carbonates, silicates and caustics. These cause emulsifying action, which keeps soil from redepositing on the cleaned surface, and improves cleaning action in hard water.
Alkaline Strength:
Mild – Removes light oils and greases, cutting oils and coolant compounds.
Mild to Strong – Removes heavy grease and oil, waxes, vegetable oils, inks, wax or fat- base buffing and polishing compounds, milk residues and carbohydrates.
Heavy-Duty – Removes mill scale; heat-treat scale, corrosion or oxides.
Change the cleaning solution periodically. Cleaning solutions can become contaminated with suspended soil particles which coat the tank bottom. This coating dampens the ultrasonic action and reduces cleaning efficiency. Certain solutions will cavitate better than others. Contact your local distributor for further information.
Heat and cavitation: increase the chemical activity of cleaning solutions. Some materials may be damaged by this stronger chemical action. When in doubt, test run samples of items to be cleaned. Caustic solutions: used to remove rust from steels, metal alloy corrosion and a variety of tenacious soils.
Solution Amounts
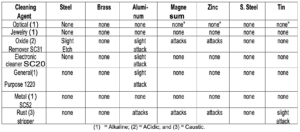
Solution amounts may vary. The amount you use depends on the detergent and the type of soil to be removed. Follow instructions on the solution container and refer to the table below for the effects of solutions on metals.
Chemicals Harmful to Your Tank
The following chemicals will harm your ultrasonic tank and the action of ultrasonics and higher operating temperatures will increase their chemical activity. Do not use these or similar chemicals directly or in dilution in your ultrasonic tank or you will void your warranty.
- Acetophenone
- Aluminum Chloride
- Aluminum Fluoride
- Aluminum Sulphate
- Ammonium Bifluoride
- Ammonium Chloride
- Ammonium Hydroxide
- Amyl Chloride
- Antimony Trichloride
- Aqua Regia
- Bromine
- Calcium Bisulfate
- Calcium Bisulfite
- Calcium Hypochloride
- Chloracetic Acid
Solution Effects on Metals
- Chloric Acid
- Chlorine, Anhydrous
- Chromic Acid
- Copper Chloride
- Copper Fluoborate
- Ethyl Chloride
- Ferric Chloride
- Ferrous Chloride
- Ferris Sulfate
- Fluoboric Acid
- Fluorine
- Hydrobromic Acid
- Hydrochloric Acid
- Hydrocyanic Acid Hydrofluoric Acid
- Hydrofluosilicic Acid Iodoform
Mercuric Chloride - Muriatic Acid
- Phosphoric (crude)
- Sodium Hypochlorite
- Potassium Chloride
- Stannic Chloride
- Stannous Chloride
- Sulfur chloride
- Sulfuric Acid
- Zinc Chlorid
You can read more of our articles on BioSonic Cleaners at the following links
Intro to the BioSonic UC150 Ultrasonic Cleaner
BioSonic UC50 Ultrasonic Cleaner Operating Instructions
As always if you have any questions about this process or anything else please feel free to contact us and take advantage of our “FREE TECH SUPPORT.”
We also offer FREE VIRTUAL TECH SUPPORT to “See and Talk” with a “Real Time Live Technician” for any problems you may be in need of help with.
You can also use our “FREE MAINTENANCE PROGRAM”. Take the guesswork and worrying about what unit is due for maintenance and which maintenance cycle it is time for. We will keep track of all your autoclaves and let you know when it’s time for anything.
The Durasonic Ultrasonic Cleaner (.75 gal) is available here.
The Durasonic Ultrasonic Cleaner (1 gal) is available here.
The Durasonic Ultrasonic Cleaner (1.5 gal) is available here.
The Durasonic Ultrasonic Cleaner (2.1 gal) is available here.
The Durasonic Ultrasonic Cleaner (3 gal) is available here.
The Durasonic Ultrasonic Cleaner (4 gal) is available here.
The Durasonic Ultrasonic Cleaner (6.6 gal) is available here.