

Midmark M7 Operation Instructions Leave a comment
In this article, we’re going to show you how to properly operate your Midmark Ritter M7 Speedclave. We’ll show you the manufacturer recommended way to operate your Midmark M7 unit. We’ll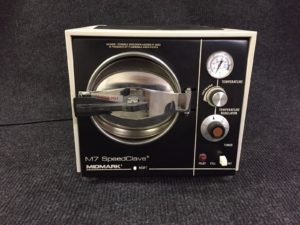 cover things like controls, loading, preparation and operation.
And if you just want to talk to someone for any questions you may have, call our Free Tech Support at 704-966-1650 Option 3.
Instrument Cleaning
- Clean instruments in accordance with the Manufacturer of the instruments and OSHA’s recommendations.
- Thoroughly wash instruments to remove gross debris (either manually or using an ultrasonic cleaner).
- Rinse instruments thoroughly and dry.
Loading Trays
- Sterilize jointed instruments in an open position.
- Place all containers so opening allows steam to enter and air to leave. Containers are usually positioned on side with opening tilted slightly down.
- Pouch or wrap items to preserve sterility after processing.
- Use only coverings designed and recommended for steam sterilization.
- Do not wrap items too tightly. Steam penetration will be affected.
- Do not stack trays on one another. Use Midmark’s tray rack trays provided.
- Position loads on trays with appropriate spacing between items for proper steam flow and drying.
- Place unwrapped items on a towel.
Maximum Capacities
Load Type M7 Large Tray M7 Small Tray Sterilizer Total
Solid Items 21 instruments - 1100 grams (2.4 lbs.) or 14 instruments - 700 grams(1.6lbs.) or
56 instruments - 2.9 kg (6.4 lbs.) or
Packs (**) 1080 cu. cm up to 2.5 cm thick
(66 cu. in. up to 1in. thick)
1080 cu. cm up to 2.5 cm thick
(66 cu. in. up to 1in. thick)
2940 cu. cm up to 2.5 cm thick (180 cu. in. up to 1 in. thick)
** Packs to have a minimum of 1/4 in. (6.3 mm) space between each other and away from all sterilizer surfaces.
Recommended Temperatures and Times
Temp. / Pressure / Exposure Time* (Minimums)
270°F (132°C)
27 PSI (186 kPa)
3 Minutes Exposure Time*
*Instruments loose on a tray.
*Open glass or metal canisters.
*Tubing not used in surgical procedures.
*Items manufacturer recommends exposure at 270°F (132°C) for 3 minutes.
*Sterility of unwrapped items is compromised on exposure to a non-sterile environment.
270°F (132°C)
27 PSI (186 kPa)
15 Minutes Exposure Time*
*Instruments loose on a tray.
*Loosely wrapped individual instruments.
*Multiple wrapped instruments separated by fabric.
*Wrapped trays of loose instruments.
*Tubing not used in surgical procedures.
*Items manufacturer recommends exposure at 270°F (132°C) for 15 minutes.
250°F (121°C)
15 PSI (104 kPa)
30 Minutes Exposure Time*
*Textiles and surgical packs wrapped for sterilization.
*Items, except liquids, manufacturer recommends for exposure at 250° (121°C) for 30 minutes.
*Exposure Time is the total time required for sterilization of the load.
This period begins when the sterilizer reaches the sterilization temperature. Sterilization temperature must be held for the amount of time as recommended in the above chart. Not included in Exposure Time are the time it takes to reach sterilization temperature and the time it takes to cool back down.
Suggested Extended Times At Reduced Temperature For Higher Altitudes
Altitudes higher than 1000 ft. (305 m) above sea level, maximum temperature that unit achieves may be less than 270°F (132°C).
Use the following to process items at the higher altitudes:
- Unwrapped Items – 250°F (121°C) for 15 minutes exposure time*.
- Wrapped Items – 250°F (121°C) for 20 minutes exposure time*.
Controls and Indicators
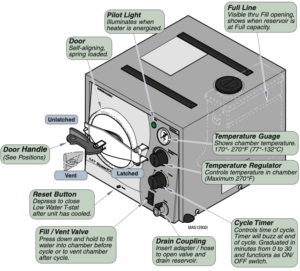
Preparation Before Operation
EQUIPMENT ALERT: Assure Sterilizer electrical specifications, as shown on Model / Serial Number label, match the electrical supply before plugging unit into outlet.
1.) Plug Unit In – Plug Sterilizer into an outlet that has a dedicated circuit
EQUIPMENT ALERT: Use only distilled or demineralized water. Do Not use normal tap water as the minerals and chlorides in the water could adversely affect the life and reliability of the Sterilizer and articles being sterilized.
2.) Fill Reservoir – Remove cap and fill with distilled / demineralized water to Full mark.

NOTE:
Do not overfill reservoir. Overfilling may cause:
- Water splashing out reservoir.
- Water siphoning back into chamber during venting.
- Sterilized products could remain wet
- Water could run out bottom of door
Operation
Now we’re going to show you how to operate your Midmark M7.
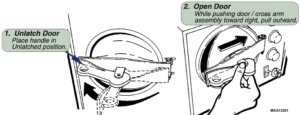
Opening Door
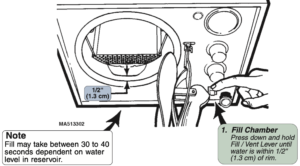
Filling Chamber with Water
Place Trays Into the Chamber
1. PackTrays – Pack trays (see Loading Trays) then load into chamber.
NOTE: Always include a process monitor strip with each load. Use only Gravity Displacement Steam Sterilizer monitor strips.
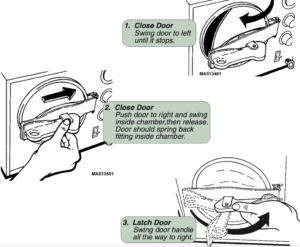
Close and Latch Door
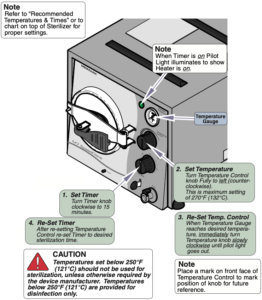
Set Time and Temperature
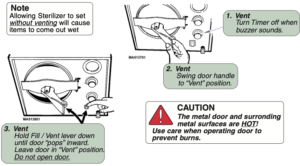
Venting Sterilizer
Drying

If you have any questions about this procedure or any other Midmark M7 Tech Issues please contact us and let us help.
As always if you have any questions about this process or anything else please feel free to contact us and take advantage of our “FREE TECH SUPPORT.”
We also offer FREE VIRTUAL TECH SUPPORT to “See and Talk” with a “Real Time Live Technician” for any problems you may be in need of help with.
You can also use our “FREE MAINTENANCE PROGRAM”. Take the guesswork and worrying about what unit is due for maintenance and which maintenance cycle it is time for. We will keep track of all your autoclaves and let you know when it’s time for anything.