

SciCan Bravo G4 Setup Guide
In this article, we’re going to use the official guide to help you in setting up your new SciCan Bravo G4 unit! This setup guide is exact to the resources provided. But if you have any further questions or prefer to speak to a technician live, call our Free Tech Support at 704-966-1650 Option 3.
The Setup
![]()
The safety of every system which integrates the device is the responsibility of the system assembler.
The first and essential step for a proper operation of the sterilizer, its durability over time and complete use of its features, is a correct and careful commissioning. Moreover, this precaution will avoid the danger of physical injury or property damage, not to mention malfunctions and damage to the device.
Please meticulously follow the instructions contained hereafter in this chapter.
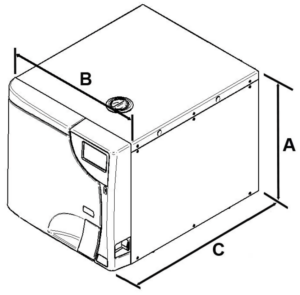
Dimensions and Weight 17 L 22 L
A. Height (total) 456 mm / 17.95 in 456 mm / 17.95 in
B. Width (total) 480 mm / 18.90 in 480 mm / 18.90 in
C. Depth (excluding rear connections)
Note: the sterilizer can be positioned on a surface only 550 mm / 21.65 in deep600 mm / 23.62 in 600 mm / 23.62 in
Total weight (device only - no trays or holder, no water) 49.60 kg / 110.23 lbs
51.30 kg / 113.09 lbs
Total weight (max. load, including trays & holder, max. clean water) 62.50 kg / 137.78 lbs 66 kg / 145.50 lbs
Overall Dimensions
Centre distance and maximum overall dimensions of the sterilizer feet, with and without rear spacers (mm/in):

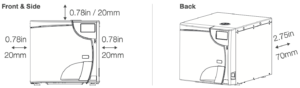
Compartment Dimensions For Built-In Installation
When installing the sterilizer inside a cabinet, you must provide adequate space all around the device to provide effective ventilation as well as an opening in the back (D) – 180 sq.cm / 27,90 sq. inches – that, in addition to allowing the passage of the power cord, will also provide an adequate air flow and the optimum cooling of the heat exchanger.
Mount the rear spacers supplied to ensure that the sterilizer is placed at the correct distance from the wall.
The compartment where the sterilizer will be installed must have the following minimum dimensions:
Compartment Dimensions Chamber Volume 17-22 L
A. Height 470 mm / 18.50 in
B. Width 520 mm / 20.47 in
C. Depth 670 mm / 26.38 in
![]()
Compartment dimensions lower than those shown may compromise the correct circulation of air around the device and may not provide adequate cooling, with the consequent deterioration of performance and/ or possible damage.
If the main switch is inaccessible when installed in the compartment, use an electric plug that incorporates an on/off switch. Do not remove the upper cover nor any other external part. The device must be completely installed in the compartment.
General Precautions for Installation
To ensure a correct operation of the device and/or avoid risky situations, respect the following warnings:
- Install the sterilizer on a flat and perfectly horizontal surface.
- Make sure that the support surface is strong enough to support the device weight (about 90kg/198.42 lbs, complete with water in hydrostatic test configuration).
- Leave adequate space for ventilation all around the sterilizer, in particular in the rear area.
- If the device is built into a cabinet, be sure to respect the warnings in the previous paragraph, avoiding any obstructions of the air intakes.
- Do not install the sterilizer too close to tubs, sinks or similar places, avoiding contact with water or liquids. This could cause short circuits and/or potentially dangerous situations for the operator.
- Do not install the sterilizer in excessively humid or poorly ventilated environments.
- Do not install the machine in environments with flammable and/or explosive gasses or vapors.
- Install the device so that the supply cable is not bent or squeezed.
- Supply cable must freely run all the way to the electrical outlet.
- Install the device so that any external filling/drainage tubes are not bent or squeezed.
Power Supply
- The electrical system to which the sterilizer will be connected must match the electrical characteristics of the device.
- Plate data is shown on the back of the machine.
Electrical Connections
This information is shown on the back of the machine.
The sterilizer must be connected to a socket of the electric system having adequate capacity for the device and properly grounded, in accordance with laws and/or regulations in force.
![]()
The manufacturer is not responsible for any damage caused by the installation of the sterilizer with unsuited and/or not properly grounded electric systems.
Always connect the power cord directly to the power outlet. Do not use extensions, adapters or other accessories.
Direct Connection To A Centralized Draining Point
- Remove the cap holding clip and the cap on the rear of the autoclave.
- Fit the plastic tube on the elbow union (supplied).
- Fit the union and then refit the clip.
- Fasten the clamp (supplied) to the drain siphon.
- Cut the tube to the right length and insert its free end into the centralized draining point union locking it with the dedicated ring nut.
Make sure that the tube is not bent, crushed or obstructed in any way.
The following diagram provides an arrangement of the components:
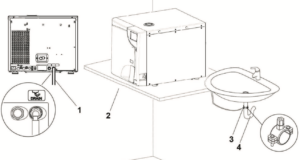
1.) At the centralized draining point
2.) Resting surface
3.) Clamp
4.) Drain siphon
The position of the union of the centralized draining point must be lower than the resting surface of the sterilizer. Otherwise, the tank may not be emptied correctly.
If an automatic filling system (external pump or H2O AUX EV kit (AUX SV) is connected the use of the direct drain connection is required.
In case of fault or failure, this system allows any excess water produced by the automatic filling system to flow into the centralized draining point, thus preventing flooding.
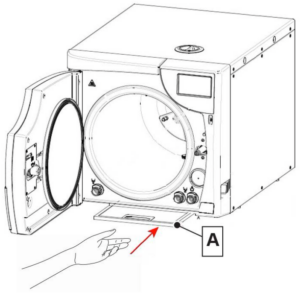
Anti-Dust Filter Installation
Complete the autoclave positioning and install the anti-dust filter (A) by inserting it into the guides in the lower part of the device. Insert the filter until it is flush with the front of the unit and cannot be pushed further back.
As always if you have any questions about this process or anything else please feel free to contact us and take advantage of our “FREE TECH SUPPORT.”
We also offer FREE VIRTUAL TECH SUPPORT to “See and Talk” with a “Real Time Live Technician” for any problems you may be in need of help with.
You can also use our “FREE MAINTENANCE PROGRAM”. Take the guesswork and worrying about what unit is due for maintenance and which maintenance cycle it is time for. We will keep track of all your autoclaves and let you know when it’s time for anything.
The SciCan Bravo G4 17L unit is available for purchase here.
The SciCan Bravo G4 21L unit is available for purchase here.