

Tuttnauer T-Top Control Panel Guide
The Tuttnauer T-Top autoclave is Tuttnauer’s newest machine that we have the pleasure to bring to SAS. This 21-liter mechanical marvel was designed for small to medium medical and dental practices. Aiming to maximize workflow through a wealth of exciting modern features. Recently, we’ve written about the Tuttnauer T-Top, going in-depth on it’s features and specs, and created an installation guide and operation guide using manufacturer’s instructions as well here.
But in this article, we’ll go over the control panel guide for the Tuttnauer T-Top. The control panel instructions help to properly navigate the intuitive navigation and touchscreen system to perform a variety of important functions. This Tuttnauer T-Top Control Panel guide comes directly from Tuttnauer. Ensuring that the installation process is done properly to manufacturer specifications.
Control Panel
The display is a graphic Touch screen LCD panel used to display the autoclave current status, any Operational or Error Messages and for operating the machine.
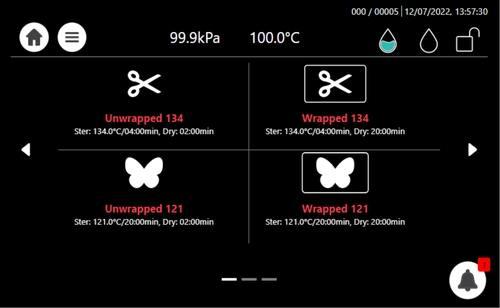
Home screen –Program Select Screen
This screen will be presented when the autoclave is switched on:
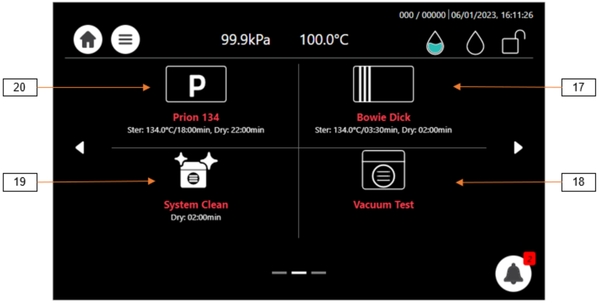
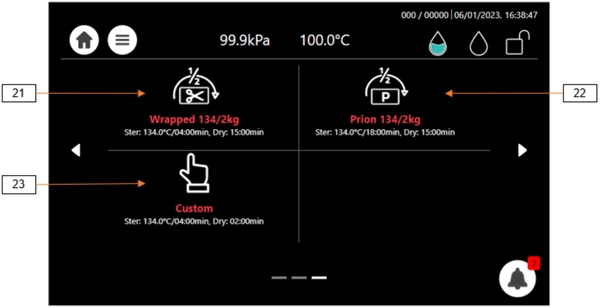
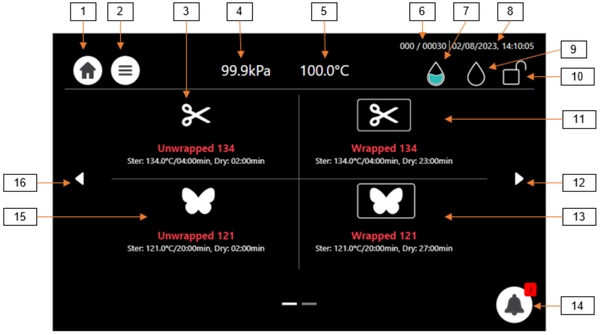 Additional programs are accessible by paging using the side arrows:
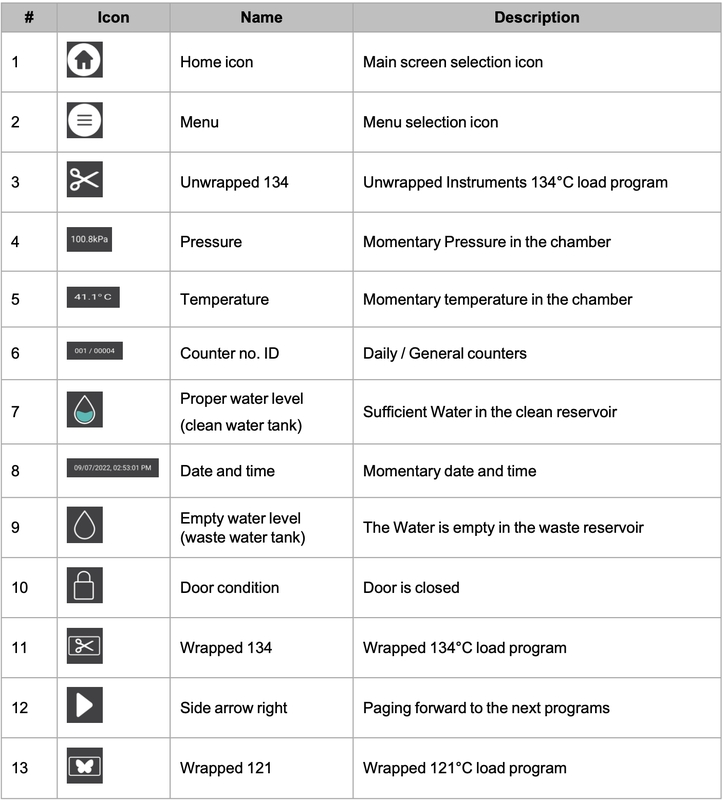
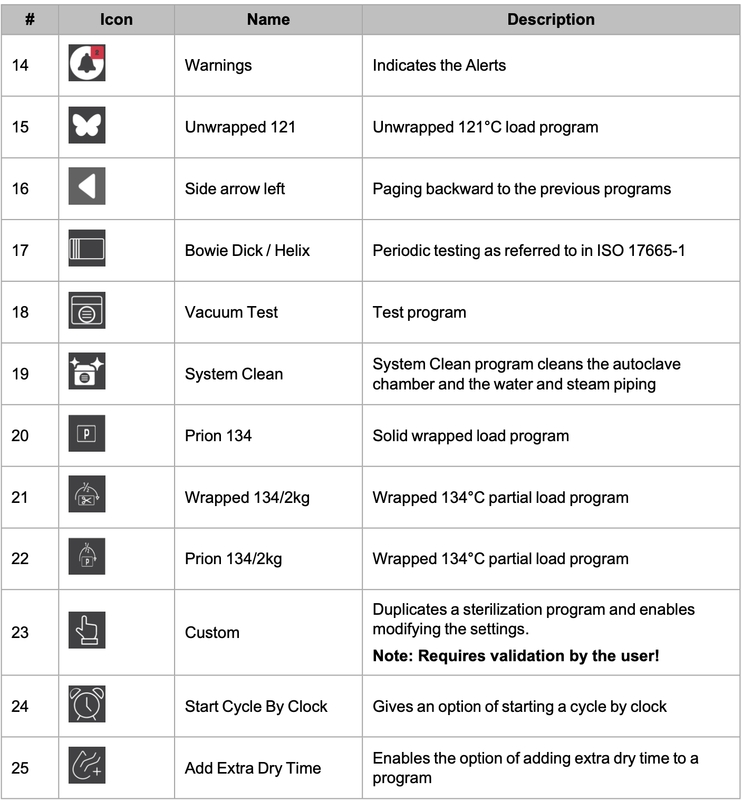
 Home screen Description and Functions
 Note: Information on Prion sterilization program
In some European countries*, there is a national regulation, that requires to include a Prion cycle on a class B autoclave, as part of a general prion decontamination program.
Prions are abnormally altered proteins associated with the risk of infection with Creutzfeldt-Jakob disease and other encephalopathies.
For the Prion cycle, only the physical sterilization parameters were validated (i.e. sterilization holding time, sterilization temperature) as the national regulations require this validation only. There is no regulatory requirement to validate the sterilization effect on the Prion protein such as elimination or deactivation.
In accordance with the regulations, the sterilization temperature is 134°C and the sterilization holding time is 18 minutes.
*See for example:
- French regulation:”Information set recommendations relatives aux petits sterilisateurs a la vapeur d’eau” published 27.12.2005
- Swiss regulation: “Verordnung über die Prävention der Creutzfeldt- Jakob- Krankheit bei chirurgischen und medizinischen Eingriffen (CJKV)” published 20.11.2002.
Opening the Device Door
Warnings!
During loading and unloading use safety gloves and glasses in accordance with local safety regulations and good practice.
If applicable: Do not remove the top cover during a running cycle. Hot water/steam may exit!
This machine is equipped with an electronic door lock. The door is locked when either the system is running a sterilization cycle, or there is pressure in the chamber, or the power is off.
If you need to open the door after cycle completes, press “Confirm:
 If the door is not locked, it can be opened as illustrated below.
 Starting a Cycle
It is recommended to perform B&D test cycle at the beginning of each working day.
Before each cycle, check visually that the gasket is intact, not loose and clean.
Load the autoclave properly (see ).
Choose the appropriate sterilization program.
The selected programs are shown below:
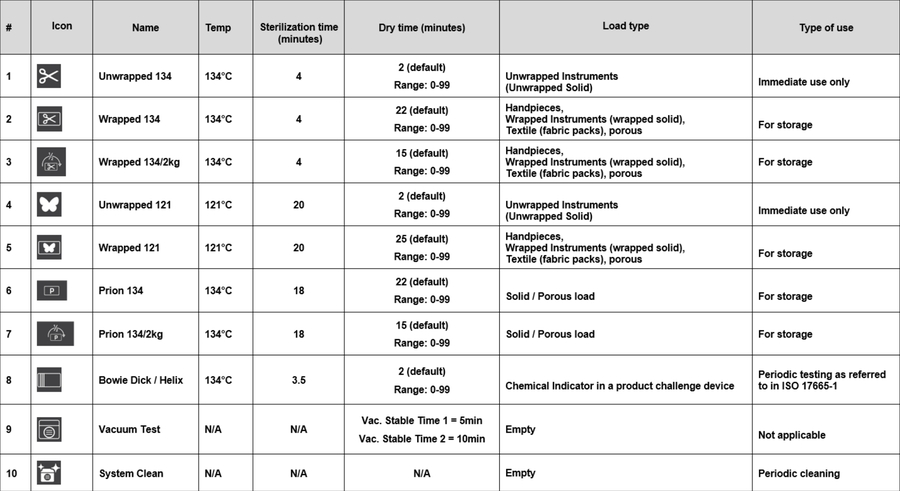
 See section 7.4 for available sterilization and test programs.
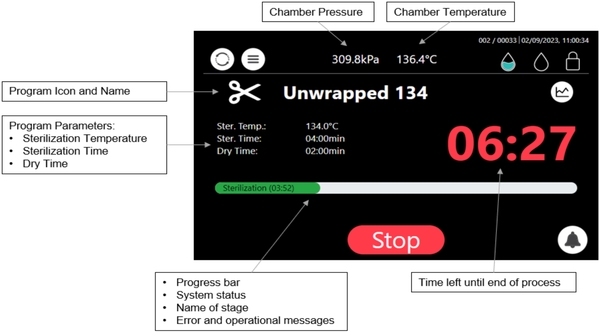
5. The next screen will prompt the selected program information.
 Close the door by both:
- Pushing the door gently;
- Pulling the handle while pushing the door until it comes to the closed position, then releasing the handle.
When the door is closed, the open-door symbol is replaced with the closed-door symbol.
Press the “start” button to start the cycle.
For cycle process description, see Sterilization Cycle Description.
![]() Warning!
Warning!
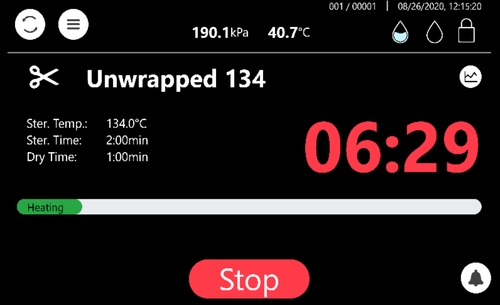
Do not remove the top cover during a running cycle. Hot water / steam may exit! After pressing start, the sterilization process starts Screen display while “Unwrapped 134” sterilization program is in progress.
 Note: For the results of the cycle, see description in section 7.4
Available Sterilization and Test Programs
 Notes:
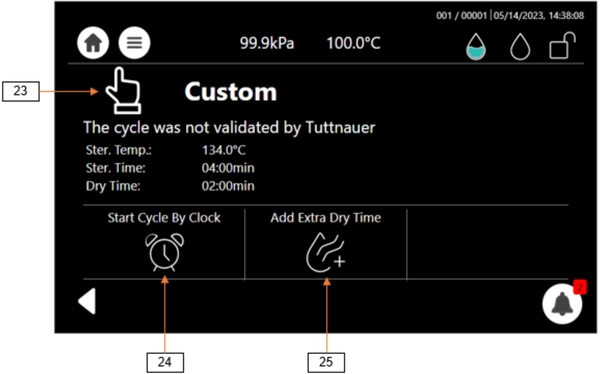
At the end of the cycle, visually inspect and verify that the instruments are dry. If moisture is detected on the instruments, increase the dry time by clicking the “Add Extra Dry Time” icon, before restarting the cycle.
Maximum Load Weight per Load Type
![]() Warning!
Warning!
Do not overload! Exceeding the maximum load weight (see table below), may result in moist instruments, consequently leading the user to increase the dry time.
(Table)
Description of the Sterilization Cycle Stages
Air-removal stage: Pre vacuum pulses are performed. For wrapped cycles, there are 2-3 pulses and the vacuum are deeper.
Heating stage: steam is inserted into the chamber until the sterilization temperature is reached.
Sterilization: sterilization temperature is maintained constant during the sterilization time.
Exhaust: steam is exhausted out of the chamber at a fast rate until pressure decreases to ambient pressure.
Drying: performed with the door closed by pulling vacuum and using the accumulated heat in the chamber and the load to remove leftover moisture from the instruments and wraps.
Description of the Vacuum Test Stages
Vacuum is produced in the chamber, down to P1=2.17 psi (15 kPa.) At this stage all the valves close. The autoclave remains in this stage for 5 minutes. This period enables the condition in the chamber to reach equilibrium. After the 5 minutes have elapsed, the cycle ‘history record’ records the pressure that is referred to as P2. At this point the test begins and lasts 10 minutes. At the end of the test, the cycle ‘history record’ records the results. The pressure at the end of the test is referred to as P3.
Notes:
- During the test period the autoclave is not heated. Even if the vacuum test is completed, the operator shall check the test results and consider whether the test results are acceptable or not.
- Perform the Vacuum Test on a completely dry chamber. Preferably following a cycle with a Drying procedure i.e., a Wrapped cycle, and after the Chamber was cooled i.e., Sleep mode/Turned off
Description of Bowie-Dick/Helix Test Stages Air-removal stage: vacuum pulses are performed.
Heating stage: steam is inserted into the chamber until the sterilization temperature and pressure are reached.
Sterilization stage: temperature and pressure are maintained constant at the pre-set level for sterilization time.
Fast exhaust stage: steam is exhausted out of the chamber at a fast rate until pressure decreases to ambient pressure.
Drying stage: heating of chamber followed by a vacuum break (air inlet) to remove leftover moisture from the instruments and wraps. Air inlet to reach atmospheric pressure.
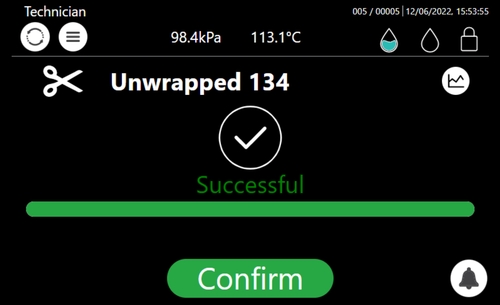
Cycle Succeeded / Cycle Failed Notifications and Follow-on
Cycle Succeeded
When the cycle has ended successfully, the following “Successful” message is displayed:
Push the confirm button to confirm the “Successful” message. Proceed to chapter “Opening the door and Unloading”.
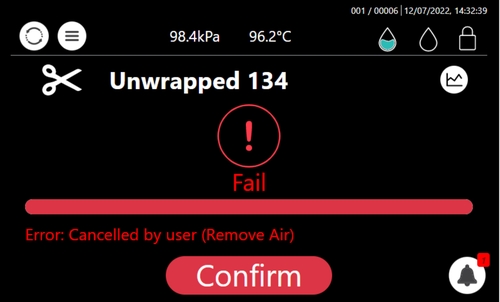
Cycle Failed
In the event of a failure at any stage, the exhaust valve will be opened to release pressure from the
chamber, the message “Fail” and a relevant failure message will be displayed on the screen:
 Warning!
The load has not completed a sterilization cycle; therefore, it is not sterile. Handle it as a contaminated load. Any failure means that the load is not sterile.
Aborting a cycle
It is possible to stop the cycle while the autoclave is operating. Press STOP at any stage (except exhaust) of the process to stop the operation.
 If the cycle is aborted, the load is not sterile. A “fail” message will be displayed with an error message explaining the reason for the failure. An alternating buzzer signal will sound to notify the user.
Press the CONFIRM button to confirm the displayed message.
Warning!
The load has not completed the cycle; therefore, it is not sterile. Handle it as a contaminated load.
Custom Programs
Custom programs require validation by the user! Validation of the sterilized cycle is the user’s responsibility.
T-Top 10 offers the user a customized program, adjusted in order to sterilize items that cannot be sterilized in any of the preceding default programs.
To utilize a customized program:
Have your dealer or service technician create a customized program. This can be done by duplicating one of the preinstalled programs.
The new program becomes a customized program with a new name (per customer’s request), a unique icon (a pointer finger) and specific settings are available for modification.
1.) Select from the Home screen, the Custom program.
![]() 2.) The Custom program is displayed below with the modified settings.
2.) The Custom program is displayed below with the modified settings.
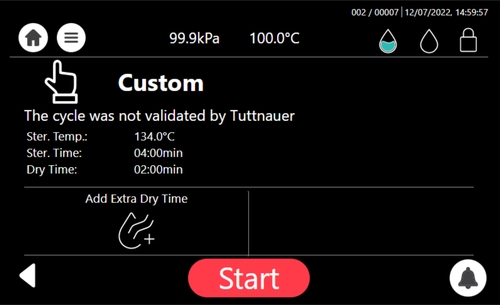 3.) Press START to begin the customized cycle.
Cycles history
The Cycles history menu enables printing a specific cycle.
- On the Quick Option screen, press the Settings icon then browse to Advanced options / Handle cycles / Cycles history
The following screen is displayed with the status of the cycle.
If you select a cycle history from the screen above, a Cycle content screen appears
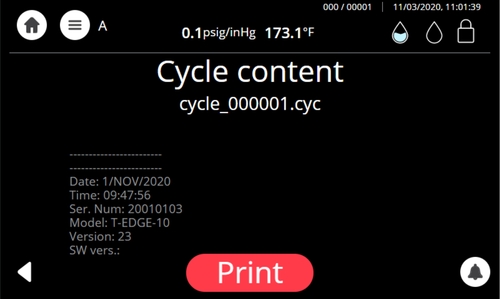 Press PRINT to receive the entire printout of the selected cycle history.
Opening the door and Unloading
- Press CONFIRM to confirm the “Successful” or the “error” message to unlock the door.
- Open the door.
- Use the tray handle or wear heat resistant gloves to remove the load from the autoclave.
- After unloading, visually inspect the load to ascertain that it is dry, and that sterilization indicators have made the required color change.
Checking Waste Water Level
When the waste water level is high, the general alarm symbol will appear. A relevant text alarm will appear in the alarms list. This situation is normal, but the operator cannot run a new cycle before draining the waste water reservoir (see Draining the Reservoirs).
Draining the Reservoirs
Warnings!
- Never reuse waste water.
- Waste water should be brought into the public net in accordance with the local rules or requirements i.e ONLY NON-HAZARDOUS LIQUIDS SHALL BE DISPOSED IN PUBLIC SEWAGE!
This procedure applies to the mineral-free water reservoir (left) and to the waste-water reservoir (on the right).
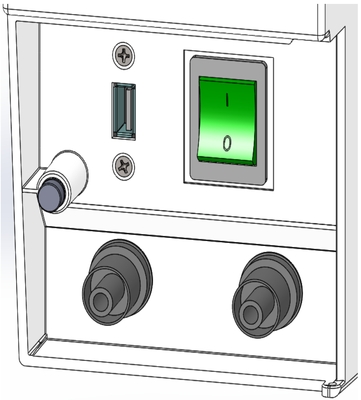 Note: Improper Water level icon appears when the water reservoir needs to be filled or drained. The drain valves are located on the front right side of the autoclave behind the control door .
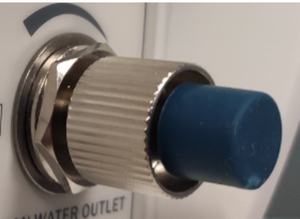
To drain the reservoir:
1.) Remove the blue socket cap.
 2.) Attach one end of the plastic hose (supplied with the autoclave), to the clean water outlet.
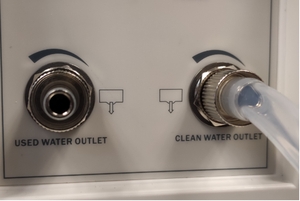 3.) Put the other end of the hose into a drain bucket.
4.) Open the valve by turning it counterclockwise.
5.) When the water reservoir is empty, close the valve by turning it clockwise and remove the hose.Return the socket cap.
Caution! Never reuse waste water.
6.) If the drained reservoir is the clean-water reservoir, fill the reservoir with distilled water until it reaches the full level. (Approximately 3.6 liters).
The autoclave is now ready for use.
Waste water draining
Caution! Waste water should be brought into the public net in accordance with the local rules or requirements i.e ONLY NON-HAZARDOUS LIQUIDS SHALL BE DISPOSED IN PUBLIC SEWAGE!
Connect the autoclave’s drain to the building’s drainage pipe. The drainage shall be of an open type, withstanding temperature of, at least, 140°F.
As always if you have any questions about this process or anything else please feel free to contact us and take advantage of our “FREE TECH SUPPORT.”
We also offer FREE VIRTUAL TECH SUPPORT to “See and Talk” with a “Real Time Live Technician” for any problems you may be in need of help with.
You can also use our “FREE MAINTENANCE PROGRAM”. Take the guesswork and worrying about what unit is due for maintenance and which maintenance cycle it is time for. We will keep track of all your autoclaves and let you know when it’s time for anything.
You can find the Tuttnauer T-Top autoclave on our website here.