
Tuttnauer T-Top Operation Guide
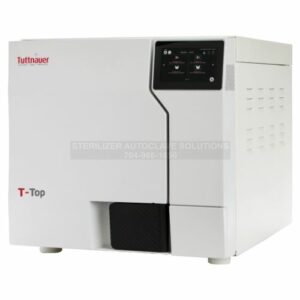 The Tuttnauer T-Top autoclave is Tuttnauer’s newest machine that we have the pleasure to bring to SAS. This 21-liter mechanical marvel was designed for small to medium medical and dental practices. Aiming to maximize workflow through a wealth of exciting modern features. Recently, we’ve written about the Tuttnauer T-Top, going in-depth on it’s features and specs, and created an installation guide using manufacturer’s instructions as well here.
But in this article, we’ll be going in-depth on the operation process for the Tuttnauer T-Top. This Tuttnauer T-Top operation guide comes directly from Tuttnauer. Ensuring that the installation process is done properly to manufacturer specifications.
Operation Guide
Pre-sterilization Cleaning and Disinfection of Instruments and their Loading into the Device
Warnings!
- The instructed Steam Sterilization Program should be verified against the programs available in this autoclave. Verify that you have chosen the appropriate sterilization program.
- When sterilizing materials, make sure that the item can withstand the sterilization temperature.
- Only use the autoclave for products approved for sterilization in an autoclave. Never use the autoclave to sterilize corrosive products or chemicals, such as: acids, bases and phenols, volatile compounds or solutions, such as ethanol, methanol, or chloroform nor radioactive substances.
Consult the Medical Device manufacturer relating adequate and most effective cleaning methods, cleaning agents and disinfection methods.
Disinfection – There are various methods and means for disinfection like soaking in liquid chemical disinfectants or hot water disinfection.
- Check the instructions of the item manufacturer as to the proper procedure for cleaning, disinfecting and sterilizing each item.
- It is recommended that instruments be ultrasonically cleaned using Tuttnauer’s Clean & Simple enzymatic cleaning tablets or other suitable solution.
- Follow the instrument manufacturer’s instructions on the use of products for cleaning and lubricating instrument that have been ultrasonically cleaned.
Packaging- The target in packing medical items is to assure that the contained goods are sterile and maintaining them sterile till opening the package.
There are various methods and techniques used in preparation and packaging of surgical instruments.
- Be sure that instruments of dissimilar metal (stainless steel, carbon steel, etc.) are separated.Carbon steel instruments should be bagged or placed on autoclavable towels and not directly on stainless steel trays (mixing will result in damage to the instruments or trays from the oxidation of these materials).
- Load items within the boundaries of the tray so that they do not touch the chamber walls or fall off when the tray is moved. Items should not be allowed to touch the walls of the Chamber as the hot metal can damage the item.
- Don’t overload the Sterilizer trays (see Specification). Overloading will cause inadequate sterilization & drying.
- Make sure that all instruments remain apart during the sterilization cycle. Surfaces that are hidden because items are covering other items will not be exposed to the steam and will not be sterilized.
- Disassemble or sufficiently loosen multiple-part instruments prior to packaging to permit the sterilizing agent to come into direct contact with all parts of the instrument.
- Verify that packaging methods are in accordance with the good practice approach and the packaging materials used are in agreement with applicable standards.
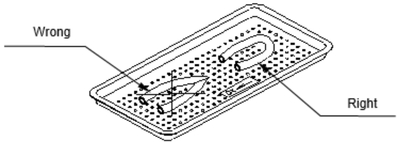
- Tilt on edge items prone to entrap air and moisture, e.g. hollowware, so that only minimal resistance to air removal exist, the passage of steam and condensate will be met.
- Wrapped instruments should be placed in material which will allow steam penetration and promote drying, such as autoclave bag, autoclave paper, or muslin towels.
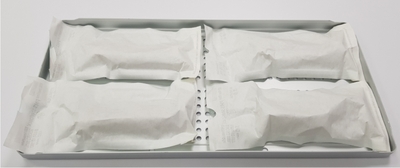
- When loading pouches on the tray, put them with paper side up, nylon side towards the tray (see the figure below)
 Tubing should be rinsed after cleaning. When placed in the tray, make sure that both ends of the tubing are open and there are no sharp bends or twists.
 Cassettes should be placed on the tray rack in place of the trays. They should not be touching each other or the Chamber walls.
 - If spotting is detected on the instruments it is necessary to determine if the spot is dirt or rust. The first step would be to use an ordinary eraser to remove the spot. If there is no pitting under the spot, then the spot is only dirt. Dirt spots on an instrument may be an indication that the autoclave needs to be cleaned or that the instruments were not adequately cleaned or dried prior to sterilization. If removal of the spot reveals pitting, then the spot is most likely rust. Rust spots on an instrument are not uncommon on inexpensive instruments. It may also be an indication that the instruments were rinsed in tap water with a high mineral content. These minerals when exposed to high temperature and steam will accelerate the oxidation of the metal. One suggestion would be to final rinse the instruments in a distilled water bath and pat dry to absorb residual water and minerals.
- If the instruments exhibit a discoloration this can be due to the mixing of carbon steel and stainless steel. When these two metals come into contact with each other electrolysis occurs that breaks down the metal. The best solution is to separately wrap the carbon steel instrument to insulate it from other instruments on the tray and the tray itself.
Operating Instructions
Warnings!
- The autoclave is intended for indoor use only.
- Do not operate the autoclave in the presence of dangerous gases and vapors.
- If applicable: The Emergency Stop Push-Button in cooperative with key lock mounted on the front panel switches OFF the autoclave operation.
- If applicable: When the emergency switch is activated, the key must be used to allow the switch to return to the operating position.
- If applicable: It is strictly forbidden for any person to enter the autoclave’s chamber. If, for any reason (cleaning, maintenance, or if something falls down), it is necessary to enter the chamber, the person must shut the system by actuating the emergency switch and withdrawing the key from the system, keeping the key on him, and shut OFF all utilities (steam, water, compressed air, and electricity), to prevent accidents and injuries. It is also necessary to turn off the air supply.
- Waste water should be brought into the public net in accordance with the local rules or requirements i.e. ONLY NON-HAZARDOUS LIQUIDS SHALL BE DISPOSED IN PUBLIC SEWAGE!
- Never reuse waste water.
- Water droplets and visible signs of moisture on sterile packaging or the tape used to secure it, may compromise the sterility of processed loads, or be indicative of a sterilization process failure. Visually check the outside wrapper for dryness. If there are water droplets or visible moisture on the exterior package or on the tape used to secure it, the pack or instrument tray is considered unacceptable.
- The sterility of the instruments processed in unwrapped cycles cannot be maintained if exposed to non-sterile environment.
- Reset the Atmospheric Pressure prior to operating the autoclave for the first time.
- If applicable: In the beginning of each day, check the water level in the reservoir.
- If applicable: Before filling the reservoir, verify that the autoclave is idle and there is no pressure in the chamber.
- Custom programs require validation by the user!
After the cycle, open the door slowly to allow steam to escape and wait 20 seconds before removing the load. - For manual operating doors: Before opening the door, verify that there is no pressure in the chamber. Open the door slowly to allow steam to escape, and wait 5 minutes before removing the load.
- To avoid severe injuries from hot steam and condensed hot water that may drip out when opening the door, it is strictly forbidden to lean on the autoclave, and to place your hand or any part of your body over or under the door.
- During loading and unloading, use safety gloves and glasses in accordance with local safety regulations and good practice. If applicable: Do not remove the top cover during a running cycle. Hot water / steam may exit!
- If carts are applicable: It is strictly forbidden to load or unload the loading cart if the transfer carriage is not connected by the hooks to the autoclave and the brakes are not applied.
- On closing the autoclave door, make sure that it is properly locked before starting a cycle.
- Don’t place your hand or head, etc. above/beside/below or close to the door while opening it as hot steam is escaping the chamber.
- Do not stand near the back panel of the autoclave while the device is operating as the pressure safety valve may release steam.
- Do not touch hot surfaces, such as the top enclosure and area adjacent to the chamber opening! Hot surfaces are indicated with a label.
Turning on the Device
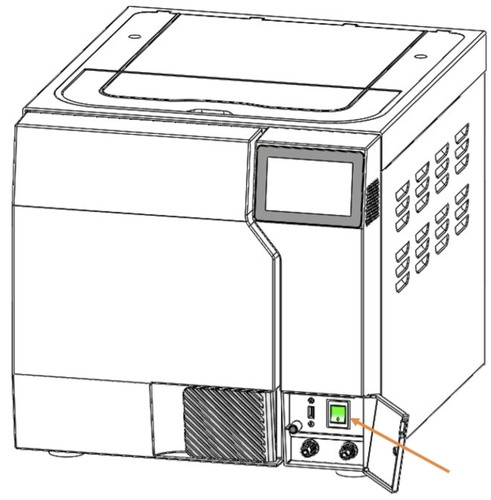
Plug the power cord into the socket on the rear panel of the autoclave (see the rear view) and into the wall outlet.
— Turn on the ON/ OFF Switch mounted on the front panel, behind the control door.
 Filling Water
![]() Cautions!
Cautions!
In the beginning of each day, check the water level in the reservoir.
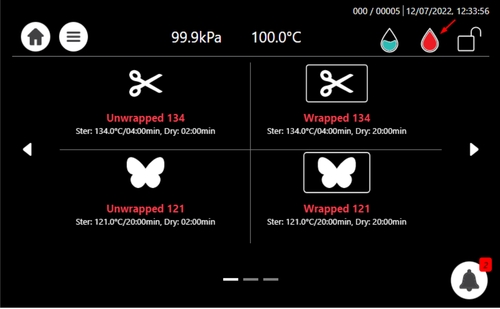
Note: Improper Water level icon appears when the water reservoir needs to be filled.
A general alarm symbol will appear.
Proper Water level icon appears when the water reservoir is properly filled.
The following screen shows that the Waste water tank is full.
 The following screen shows that the Waste water tank is empty.
![]() Caution! Before filling the reservoir, verify that the autoclave is idle and there is no pressure in the chamber.
Caution! Before filling the reservoir, verify that the autoclave is idle and there is no pressure in the chamber.
Filling water in the reservoir
Note: Use only water having the characteristics stated in Water Quality. Using tap water will clog the system and invalidate the manufacturer’s warranty.
To fill water in the reservoir:
Lift up the water reservoir cover (see below).
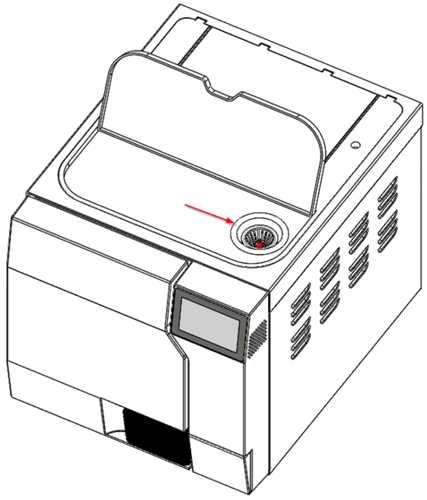 Pour water into the reservoir through the water filter on top of the autoclave unit. Stop filling water as soon as the water level reaches the red plastic handle. In case you fill too much water, it will spill on the counter.
The clean water level indicator will change from a red water droplet symbol to a blue water droplet, as shown below:
![]() Setting Date and Time
Setting Date and Time
Note: The Initial log-in including setting of drying time as well as other initial parameters will be performed only by a qualified technician upon installation.
On the main screen, press the menu symbol to open the Quick Option screen.
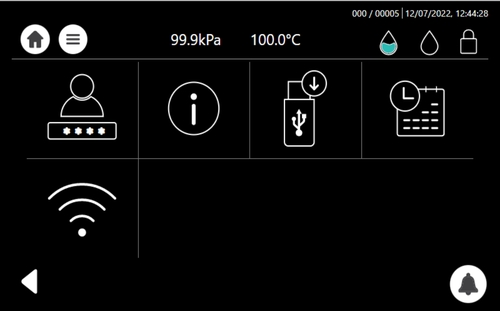 From the Quick Option screen, press the Set Date and Time icon
Note: The only functionality to be performed by the user (on a regular basis) is setting the date and time. Select day, month and year, as depicted:
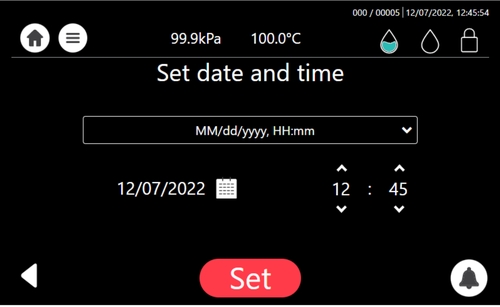 After adjusting the date and time, the system will automatically restart.
As always if you have any questions about this process or anything else please feel free to contact us and take advantage of our “FREE TECH SUPPORT.”
We also offer FREE VIRTUAL TECH SUPPORT to “See and Talk” with a “Real Time Live Technician” for any problems you may be in need of help with.
You can also use our “FREE MAINTENANCE PROGRAM”. Take the guesswork and worrying about what unit is due for maintenance and which maintenance cycle it is time for. We will keep track of all your autoclaves and let you know when it’s time for anything.
You can find the Tuttnauer T-Top autoclave on our website here.