How to replace a Midmark M9 Door Gasket Kit Leave a comment
In this article, we want to show you the steps Midmark gives to replace a Midmark M9 Door Gasket Kit. And if you just want to talk to someone, call our Free Tech Support at 704-966-1650 Option 3.
![]()
Caution: Allow sterilizer to cool completely before installing the Maintenance Kit.
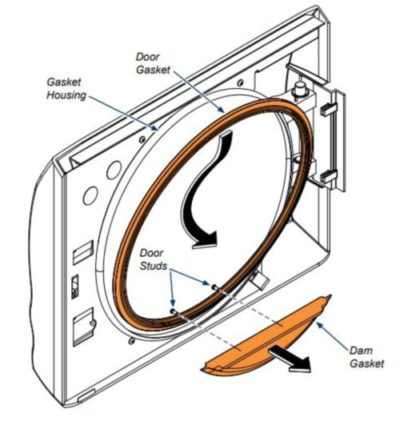
Step 1: Remove Old Door and Dam Gaskets.
A) Remove Dam Gasket by pulling it off the Door Studs.
B) Remove Door Gasket by pulling it out of the Gasket Housing.
C) Clean the Gasket Housing and the face of the chamber.
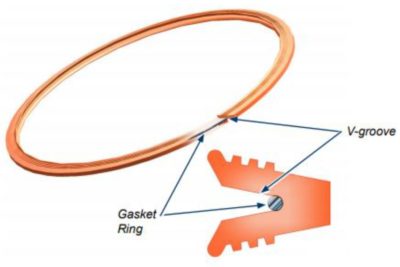
Step 2: Install Gasket Ring into the Door Gasket V-groove.

A) Insert Gasket Ring into the bottom of the Door Gasket V-Groove.
Note: Start at one end and insert Gasket Ring continue up each side and into the other end.
Take a mental note of where the Gasket Ring Weld is located for the next step.
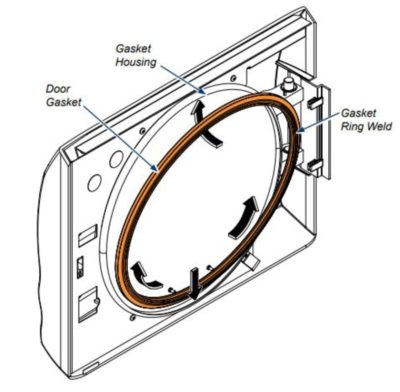
Step 3: Install Door Gasket.

A) Position Door Gasket so Gasket Ring Weld is located in the center of door hinges.
B) Install Door Gasket into the bottom of the Gasket Housing.
C) Install the left and right sides and finish at the top.
D) Make sure Door Gasket fits evenly and flush all the way around Gasket Housing
Equipment Alert: For optimum Door Gasket operation orient Gasket Ring Weld between door hinges (3 o’clock) when looking at inside of door
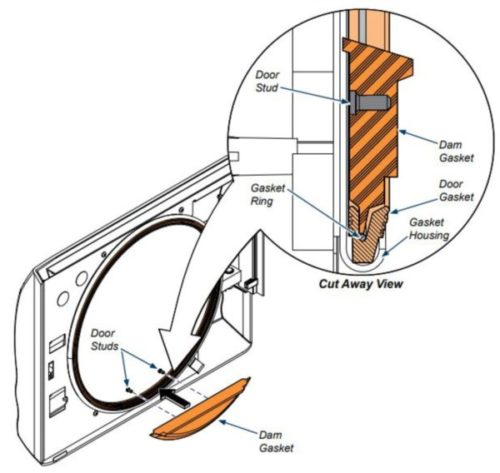
Step 4 : Install Dam Gasket.

A) Align Dam Gasket holes over the Door Studs.
B) Push Dam Gasket on to studs until it lies flat against the door.
C) Tuck bottom edge of Dam Gasket into the center v-groove of Door Gasket.
Get the OEM M9 Door Gasket Kit Here
Free Preventive Maintenance Program
Free Technical Support with this or ANY UNITS and PARTS on our site!
As always if you have any questions about this process or anything else please feel free to contact us and take advantage of our “FREE TECH SUPPORT.”
We also offer FREE VIRTUAL TECH SUPPORT to “See and Talk” with a “Real Time Live Technician” for any problems you may be in need of help with.
You can also use our “FREE MAINTENANCE PROGRAM”. Take the guesswork and worrying about what unit is due for maintenance and which maintenance cycle it is time for. We will keep track of all your autoclaves and let you know when it’s time for anything.


