Midmark M9 “NS” Operation Instructions Leave a comment
In this article, we’re going to show you the manufacturer recommended way to properly operate your Midmark M9 “New Style” Autoclave. We’ll cover things like filling the reservoir, qualification testing, loading the unit and so on.
And if you just want to talk to someone for any questions you may have, call our Free Tech Support at 704-966-1650 Option 3.
Starting the Operation
 WARNING: Do not use this sterilizer for sterilizing volatile substances or for any purpose other than its intended design. Burns and toxic or explosive conditions could result.
Do not force door handle at any time. Chamber pressure may cause door to open with extreme force. If door handle does not move freely, allow unit to cool and depressurize for 40 minutes before opening door. Failure to adhere could result in serious personal injury.
Do not run the sterilizer without the tray plate in place. If the sterilizer malfunctions, immediately unplug sterilizer and call for service; do not attempt to repair the sterilizer yourself. Doing so could result in serious injury.
CAUTION: Programmable cycles 1 and 2 are provided for those applications requiring sterilization parameters different than the preset cycles. These cycles are not FDA cleared for medical use. All material processed in these cycles must be validated by the user to ensure sterility of the processed load.
EQUIPMENT ALERT: For optimal performance, allow the sterilizer to reach room temperature before operating.
Time to Fill the Reservoir
To fill reservoir… 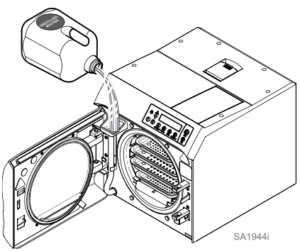
A) Open door to unit.
B) Pour distilled water into fill opening until water level reaches the top of the fill level label on the water level indicator tube.
Equipment Alert
Use distilled water or water that meets the referenced water purity specifications. Failure to comply may result in sterilizer malfunction and/or premature failure due to excessive corrosion.
Qualification Testing
Your sterilizer should be tested after sterilizer installation, malfunctions, relocation, major repairs, being turned off or shut down for more than three days and after sterilization process failure. Qualification testing should be performed prior to placing the sterilizer inservice. If multiple cycle types are used, e.g. “Pouches” and “Packs” each cycle type should be qualified.
Qualification testing should include at least one Biological Indicator (BI) (sometimes referred to as SporeTests) and one Chemical Indicator (CI). The test pack should be placed on the bottom tray near the chamber door and performed with items routinely processed and considered to be the most difficult to sterilize. Additional items should be placed in the chamber along with the Biological Indicator and Chemical Indicator so that chamber is fully loaded (don’t exceed the maximum capacities listed in the tables under “Guidelines for Loading” below).
One test run, for each cycle type tested, with negative results from the BIs and the appropriate readings from all physical monitors and chemical indicators demonstrating complete sterilization, provide verification that the sterilizer has been properly installed (or reinstalled after relocation) or repaired to the manufacturer’s specifications and that it will function effectively in the facility in which it is installed.
All items processed during qualification testing should be quarantined until the results of the biological testing for all three test runs are available.
Guidelines for Loading
All items must be processed in accordance with Centers for Disease Control and Prevention (CDC), “Guidelines for Infection Control in Dental Healthcare Settings” – 2003, MMWR; 52 (no.RR-17) and “Guidelines for Disinfection and Sterilization in Healthcare Facilities” – 2008, which states:
“Items to be sterilized should be arranged to permit free circulation of the sterilizing agent (e.g., steam, chemical vapor, or dry heat); manufacturer’s instructions for loading the sterilizer should be followed.”
 EQUIPMENT ALERT:
Loads must be placed on trays at all times – unless the optional cassette racks are used – otherwise, serious instrument or equipment damage may occur.
Types of Items that can be processed in the M9 / M9D
Before placing any instrument in the M9 / M9D, check with the instrument manufacturer to be sure the
materials are compatible with steam sterilization and to verify the acceptability of sterilization parameters. The M9 / M9D are designed to sterilize the following:
- Metal instruments
- Rubber / plastic devices (ex. suction cannulas, impression trays, etc.)
- Wrapping / bundling materials (ex. CSR wrap, instrument pouches, etc.)
- Cassettes (which fit in the sterilizer trays or the cassette rack accessories)
- High / low speed handpieces
- Surgical instruments (ex. opthalmologic instruments)
EQUIPMENT ALERT:
Do not sterilize items composed of any of the following materials in the M9 / M9D.
- Corrosion sensitive metal (ex. carbon steel, iron, etc.)
- Fragile items susceptible to breaking under pressure / high temperature
- Biomedical waste
- Plastics that may break down or produce residue when exposed to steam / high temperatures.
Examples: Polyethylene, Styrene, Cellulosics, ABS, PVC, Acrylic (PlexiglassTM), PPO (NorylTM), Latex and Neoprene.
Preparing Items for Sterilization
WARNING: Clean and dry instruments thoroughly before placing them into tray. Improper cleaning may result in non-sterile instruments or damage to the unit. Follow instrument manufacturer’s guidelines and CDC recommendations for handling and cleaning instruments prior to sterilization.
Instruments must be thoroughly cleaned to remove all residual matter, such as debris, disinfectant residuals, blood, organic tissue, etc. General cleaning guidelines are listed below but the device manufacturer’s instructions for proper cleaning and preparation of the device for sterilization should always be followed:
- Clean instruments immediately after use to avoid drying of residual matter.
- The use of automated cleaning equipment (e.g. ultrasonic cleaner or washer-disinfector) is recommended over manual cleaning for clinician safety and cleaning effectiveness.
- After cleaning, thoroughly rinse instruments with tap water to remove any loosened debris or residual cleaning fluid. The purity of tap water varies significantly thus, it’s recommended the final rinse be done with water of adequate quality to avoid instrument staining. After rinsing instruments should be inspected for damage, debris, detergent residue and then dried before packaging.
- If the instrument manufacturer’s instructions require lubrication of the instruments after cleaning, wipe off excess lubricant before packing for sterilization or loading into the sterilizer.
Immediate Use Sterilization
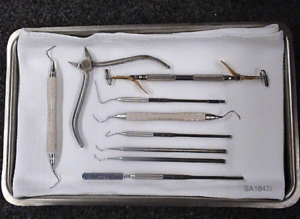
The M9® / M9D® are capable of Immediate Use sterilization – sterilizing unwrapped instruments for immediate use. Place a surgical cotton towel, paper tray liner or CSR wrap folded to fit on the tray bottom before putting unwrapped items in the tray. Arrange unwrapped items on the towel so they do not touch one another. (See photo below)
Please consider the following when choosing whether or not to sterilize your instruments unwrapped:
- The sterility of unwrapped instruments is compromised upon exposure to a non-sterile environment. Follow CDC guidelines for using unwrapped, sterilized instruments.
- Due to the sensitive nature of some types of surgery (including, but not limited to ophthalmological), instruments used in such procedures must be wrapped or pouched in order to reduce their exposure to sterilization process residues. The water reservoir should also be drained and refilled with fresh distilled water on a daily basis when processing instruments for these procedures on a routine basis.
WARNING: Do not overload the chamber! Adequate space is required around items in trays for steam circulation and drying. Failure to allow adequate space will compromise sterilization and drying. Items and packaging should be completely dry when removed from the sterilizer to minimize the potential for recontamination.
General Guidelines
- Use only M9® / M9D® trays in their appropriate sterilizer. Using other trays could restrict air /steam flow to items resulting in inadequate sterilization and drying.
- All items must fit within the tray and not extend over the lip of the sterilizer tray. Instruments must not scrape the chamber walls when sliding the tray into the chamber.
- Jointed items must be sterilized in an open position so all surfaces are exposed to the steam (see photo below).
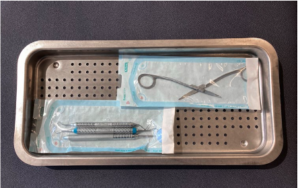
- Handpieces and instruments must be arranged in a single layer on the trays (not piled or stacked), to permit proper steam flow and drying.
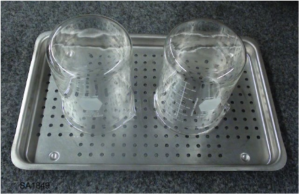
- Glassware or utensils capable of holding water, e.g. bottles, basins, beakers, etc., should be positioned on the tray with the open side down so any water condensate drains from the container (see photo below). When sterilizing glassware check with the manufacturer to make sure it is compatible with steam sterilization.
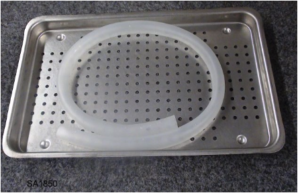
- Rinse tubing with distilled water or water that meets the referenced water purity specifications and do not dry prior to sterilizing. Arrange tubing on the tray so there are no sharp bends and the tubing ends are open and unobstructed (see photo below).
- Follow the device manufacturer’s instructions for disassembly of multi-part instruments prior to packaging / sterilization to assure all parts are adequately exposed to the steam.
- If items are being sterilized and stored for later use they must be packaged, e.g. pouched, wrapped, etc. and completely dry when removed from the sterilizer chamber to avoid potential recontamination.
- Variations in load configuration, size, wrapping materials and the environment may require the operator to increase the default drying time to assure all packaging and instruments are completely dry. See “Cycle Operation” section of this manual for instructions on adjusting drying time.
- When sterilizing a load that contains one or more handpieces, utilize the hand piece cycle, not Pouches or Unwrapped Cycle.
Pouching and Wrapping Items
The M9® and M9D® are capable of sterilizing pouched or wrapped items to preserve sterility after processing.
- When pouching or wrapping items, use only sterilization pouches and wraps that have been cleared by the FDA and labeled for use with the steam sterilization cycle being used. Follow the manufacturer’s instructions for use.
- Instruments made from different materials (stainless steel, carbon steel, plastic, etc.) should not be mixed in the same pouch or wrapped pack to avoid potential instrument damage.
- Pouches, wraps and the included instruments should not touch the chamber wall to allow proper steam circulation and avoid potential instrument damage.
- For proper steam circulation and drying the preferred orientation of pouches is resting on their edge, best accomplished using the Midmark Pouch Rack supplied with the M9® / M9D® sterilizer.
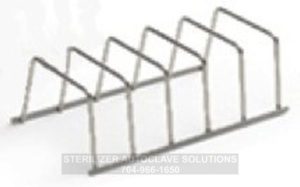 If additional pouch racks are needed order kit P.N. 002-2108-00 (6 slot) or P.N. 002-2108-01 (5 slot). If more than two (2) pouch racks are used in a single load additional dry time may be required.
 - The use of the Pouch Rack requires the removal of some of the sterilizer trays. When using the Pouch Rack load a single pouch per rack slot. When using paper/plastic sterilization pouches the pouches should be oriented in the rack so the plastic side of one pouch faces the paper side of the adjacent pouch.
- Pouches loaded directly in the trays will dry best if loaded with plastic side up.
- Do not layer pouches in the trays. Pouches should be loosely packed with handpieces and instruments single height loaded (not piled or stacked), to permit proper steam flow and penetration to the items.
- If pouches or wrapped packs are labeled using a marking pen the ink should be nontoxic. On paper-plastic pouches only mark on the plastic side of the pouch. On wrapped packs mark the labeling information on the indicator tape or apply a separate label.
- If pouches or wrapped packs are labeled using a marking pen the ink should be nontoxic. On paper-plastic pouches only mark on the plastic side of the pouch. On wrapped packs mark the labeling information on the indicator tape or apply a separate label.
CAUTION: When sterilizing pouches, always use pouch racks on the bottom tray. Do not place pouches flat on the bottom tray.
Shown below are some recommended pouch load configurations for the M9® / M9D® (Photo 5 and 6):
 When using cassettes in the M9® / M9D® follow the cassette manufacturer’s instructions for use.
- Do not wrap items too tightly. Sterilization can be compromised if an item is excessively wrapped and the wrap is more likely to tear if wrapped too tightly.
- Cassettes can be loaded on the trays but they must fit within the boundaries of the tray and they should not touch each other, the tray above, or the chamber wall to allow proper steam circulation. The total instrument load, including the cassettes, should not exceed the limits listed in maximum capacities tables.
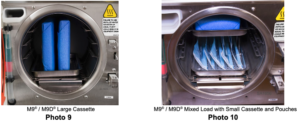
CAUTION: Always use pouch racks on the bottom tray. Stand cassettes in the bottom tray on edge. Do not place cassettes flat on the bottom tray.
Shown below are some recommended cassette load configurations for the M9® / M9D® (Photos 9 and 10):
Textile Loads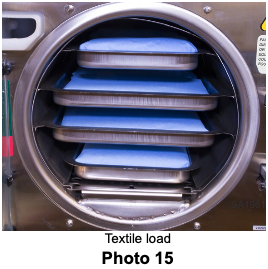
- Clean textiles recommended for steam sterilization can be processed in the Packs cycle. Verify the acceptability of the Packs cycle sterilization parameters with the textile manufacturer to assure the textiles are compatible.
- All textile packs must not exceed the thickness limits specified in the maximum capacity tables below and must fit within the boundaries of the sterilizer trays.
- If multiple packs are placed on a single tray maintain a minimum of 1/4” (6.4 mm) between packs for proper steam circulation and drying. (Photo 15)
EQUIPMENT ALERT: Do not use towels or packaging containing chlorine bleach residue. Failure to comply may cause rusting or discoloration of the chamber / trays and significantly shorten the life of the sterilizer.
Load Size
Successful sterilization is dependent on correct loading of the sterilizer. Do not overload the sterilizer chamber! Adequate space must be maintained around all items placed in the chamber to assure proper steam circulation and adequate drying. The charts below are provided as a reference regarding the maximum loads that can be processed in the sterilizers but maintaining proper spacing between all items processed to assure good steam circulation and drying should be the guiding factor in determining the maximum load that can be processed.

Standard Cycle Parameters
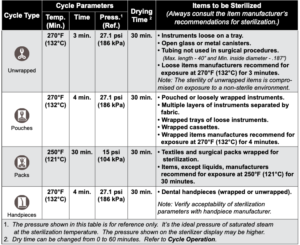
Cycle Operation
EQUIPMENT ALERT: The sterilizer will not operate unless the door is closed and latched properly.
STEP 1: Close the Latch Door
A.) Lift the door handle, then push the door closed.
B.) While pushing in on the door, slide the door handle down to engage the latch.
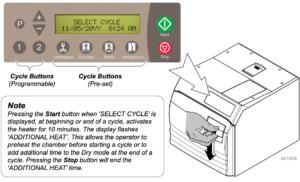
EQUIPMENT ALERT: Using an incorrect sterilization program could result in non-sterile goods and may damage instruments. Consult instrument manufacturer for specific sterilization instructions.
STEP 2:
A) Press the appropriate cycle button on the display panel.
(Refer to “Cycle Parameters” chart for time / temperature specifications).
After the cycle button is pressed, the parameters for that cycle will appear on the display.
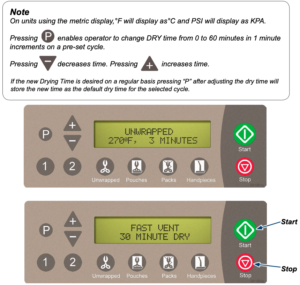
 WARNING: STOP button may be pressed at any time to stop or interrupt a cycle. goods must not be considered sterile if this occurs before the Dry Cycle. Sterilizer will return to SELECT CYCLE mode.
STEP 3: Press ‘Start” to initiate cycle
You will hear a “beep” for two seconds, indicating the cycle has started.
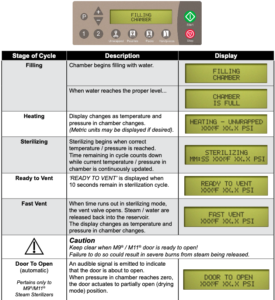
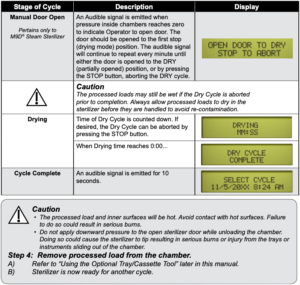
After the ‘Start’ button is pressed, the stage / status of the current cycle will appear on the display. The chart below illustrates the display messages that will appear during each stage of the cycle.
Post-Sterilization Processing
After sterilization is complete, all items must be handled in accordance with accepted and documented standards, such as the Centers for Disease Control and Prevention (CDC) documents, “Guidelines for Infection Control in Dental Healthcare Settings” – 2003, MMWR; 52 (no. RR-17) and “Guidelines for Disinfection and Sterilization in Healthcare Facilities” – 2008, as well as any local requirements that may apply.
Qualified personnel responsible for infection control should prepare a protocol for handling sterilized items. This protocol should be followed by all personnel responsible for handling sterilized items.
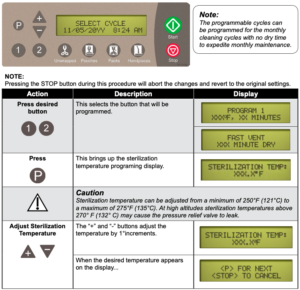
Programable Cycle Buttons
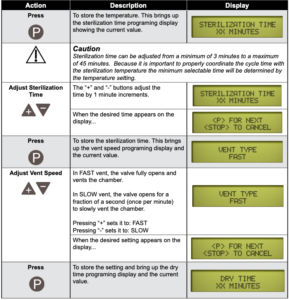
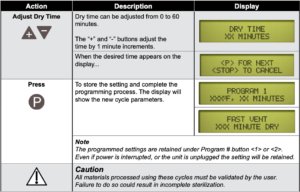
Cycle buttons 1 and 2 can be used for custom applications that are not covered by standard cycle programs. These cycles have not been FDA cleared for medical use. The programmable cycles allow the user to adjust cycle parameters in order to sterilize items that cannot be sterilized in any of the standard pre-programmed cycles. Once a custom program has been stored, it can be used just by pushing the 1 or 2 button. Use the instructions in the chart below to set time / temperature parameters for these buttons. (If you wish to change the settings, these buttons may be reprogrammed at any time).
If you have any questions about this procedure or any other Midmark M9 Tech Issues please contact us and let us help.
As always if you have any questions about this process or anything else please feel free to contact us and take advantage of our “FREE TECH SUPPORT.”
We also offer FREE VIRTUAL TECH SUPPORT to “See and Talk” with a “Real Time Live Technician” for any problems you may be in need of help with.
You can also use our “FREE MAINTENANCE PROGRAM”. Take the guesswork and worrying about what unit is due for maintenance and which maintenance cycle it is time for. We will keep track of all your autoclaves and let you know when it’s time for anything.
The Midmark M9 Autoclave is available here.
