
5th Gen Midmark M11-05X Routine Care Guide
Recently, we wrote about the new Midmark M11-05X steam sterilizer in an article here on our website. We also uploaded an installation/setup guide for the M11-05X on our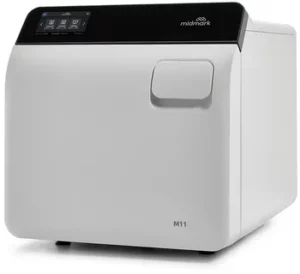 website, along with an operation guide that you can find here. With this autoclave ready to hit the market soon, we’ve got the info you need for when it’s time to get one into your practice. So we’re moving on to the last step in the process, and in this article, we’ll go over the routine care guide for the Midmark M11-05X. Routine care, or preventative maintenance, is a very very important step in the autoclave ownership process, as it can help extend the life of your autoclave and ensure that it’s in proper working condition at all times. These routine care instructions are provided by the manufacturer for proper care of the Midmark M11-05X.
If you have any questions about this or anything else, you can give us a call at 704-966-1650 Option 3 for our Free Tech Support Line.
Routine Care Guide
To ensure proper operation and maximum sterilizer life, carefully follow all instructions for routine care.
One of the most important ways to prevent problems with your sterilizer is to only use distilled water, or water that meets the referenced water purity specifications (see Water Purity Specifications). DO NOT USE TAP WATER. The sterilizer operates with high water temperatures and minerals dissolved in water can form mineral deposits that can prevent valves from opening or closing properly and lead to corrosion in the chamber and tubing.
Routine care reminders will be displayed on the screen at the appropriate intervals to assist the operator.
Note
Following each cleaning, visually inspect to ensure no material remains. Re-clean if necessary.
This screen has three main tabs: Daily, Weekly and Monthly. Each of these tabs will show it’s current status of up to date, due or overdue with the corresponding color bar. Routine care that is due or overdue will have a Run button that steps through the required care.
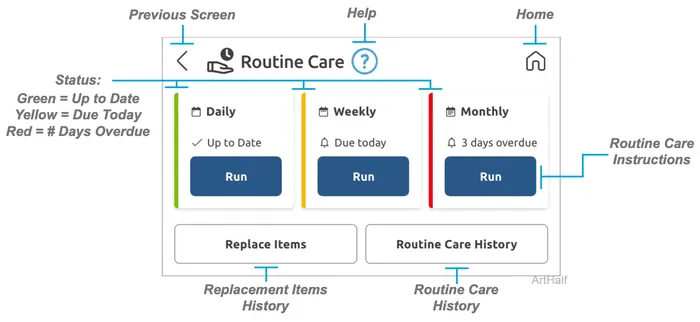 Replace Items – The “Replace Items” button allows users to track consumable parts, which are stored in history and can be exported. There are also installation help screens for the user to follow.
Routine Care History – The “Routine Care History” button allows users to view the daily, weekly, and monthly care event history and export these records.
Daily Care
WARNING
Wait until the sterilizer is cool to the touch before beginning.
Equipment Alert
If you frequently process lubricated instruments, drain and refill the reservoir with distilled water or water that meets water purity specified in the user guide.
Note: If an Auto-Fill system is enabled proceed to the next step after draining the reservoir.
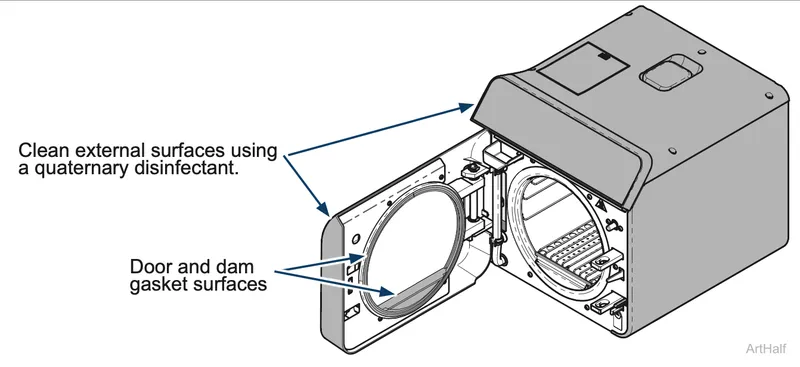
Step 1: Clean and Disinfect External Surfaces
- A) Using a soft cloth, clean external surfaces of the sterilizer with soap and warm water.
- B) Disinfect the external surfaces of the sterilizer with a quaternary disinfectant according to your facility guidelines for clinical contact surfaces.
- C) Follow the instructions provided with the cleaner/disinfectant used regarding rinsing and drying.
Step 2: Inspect and Clean Gaskets
- A) Clean exposed surfaces of the door and dam gaskets with a soft cloth moistened with distilled water.
- B) If necessary, use Speed-Clean and a soft brush.
- C) Inspect door and dam gaskets for damage such as nicks, cuts, shrinkage, or swelling. Replace if damaged.
Mark Completed – The “Mark Completed” button allows users to confirm they have completed the daily care checklist.
View Guided Walkthrough – The “View Guided Walkthrough” button gives users detailed steps and illustrations to guide them through completing the daily care process.
Weekly Care
WARNING
- Wait until the sterilizer is cool to the touch before beginning.
- Handle metal tray components carefully to avoid injury.
- Do not run sterilizer without tray plate in place.
Equipment Alert
- Failure to change water and clean sterilizer may result in malfunction.
- Use only distilled water or water that meets purity specified in this user guide.
- Do not use bleaching agents or any abrasive materials or substances to clean.
- Use care when wiping the inside of the chamber to avoid damage to sterilizer components.
Note
On weeks when performing Monthly Care the Weekly Care is not required.
Step 1: Complete Daily Care
- A) Clean external surfaces and gaskets. See Daily Care for details.
Step 2: Drain Water from Reservoir
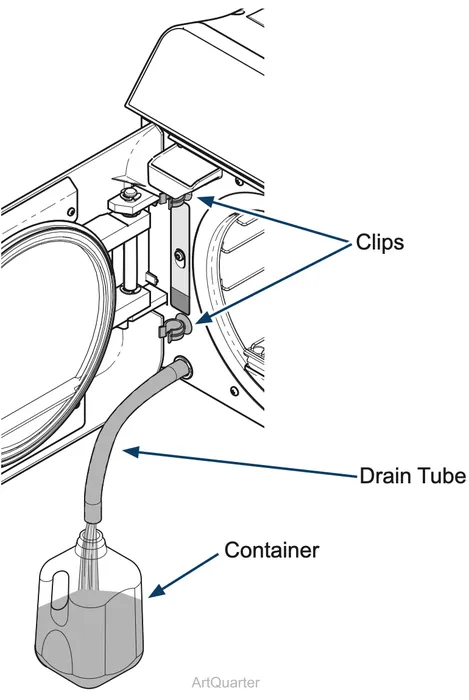
- A) Disconnect the drain tube from the clips. Bend tube downward and drain reservoir into a suitable container.
- B) Re-install drain tube into clips.
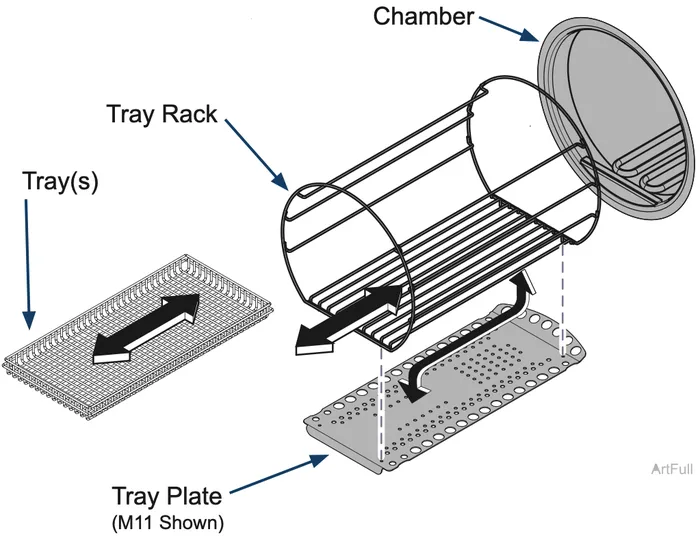
Step 3: Remove + Clean Trays, Tray Rack and Tray Plate from Chamber
- A) Remove trays.
- B) Pull tray rack and tray plate straight out of chamber then separate them.
- C) Wash trays, tray rack, tray plate and inside of chamber with Speed-Clean and rinse with distilled water.
Equipment Alert
When using Speed-Clean to clean surfaces dilute with 20 parts distilled water to one part Speed-Clean.
Step 4: Re-install Trays, Tray Rack and Tray Plate into Chamber
- A) Insert tray rack back onto the tray plate.
- B) Install tray rack/plate with curved end of tray plate tipped upward and toward back of the chamber.
- C) Re-install trays.
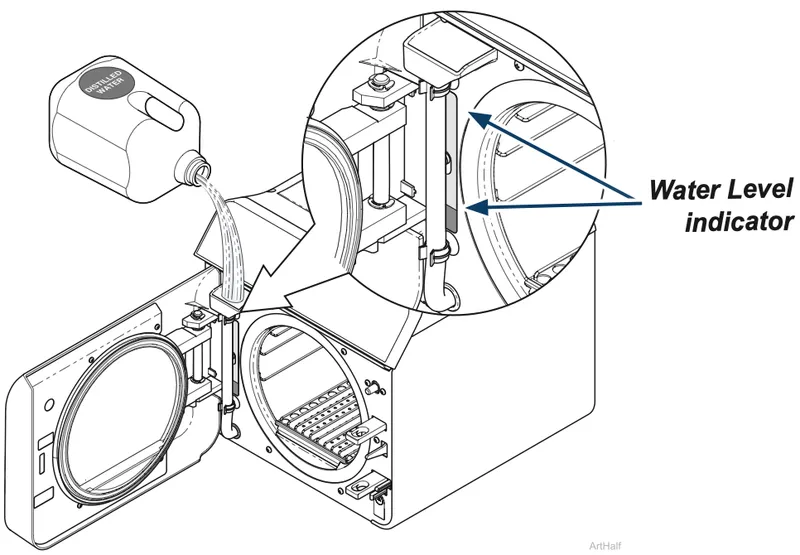
- D) Refill reservoir with water that meets referenced water quality specifications (see Water Purity Specifications).
Mark Completed – The “Mark Completed” button allows users to confirm they have completed the daily care checklist.
View Guided Walkthrough – The “View Guided Walkthrough” button gives users detailed steps and illustrations to guide them through completing the daily care process.
Monthly Care
WARNING
- Wait until the sterilizer is cool to the touch before beginning.
- Handle metal tray components carefully to avoid injury.
- Do not run sterilizer without tray plate in place.
Step 1: Complete Daily Care
- A) Clean external surfaces and gaskets. See Daily Care for details.
Equipment Alert
- Use only distilled water or water that meets purity specified in this user guide. • Use only Speed-Clean to flush the system during the cleaning cycle.
- Do not process instruments during cleaning and rinsing cycles.
Step 2: Replace Water in Reservoir
- A) Disconnect the drain tube from the clips. Bend tube downward and drain reservoir into a suitable container.
- B) Re-install drain tube into clips.
- C) If an Auto-Fill system is enabled proceed to
the next step. Otherwise, manually refill the reservoir with water that meets referenced water quality specifications.
 Step 3: Run Cleaning Cycle
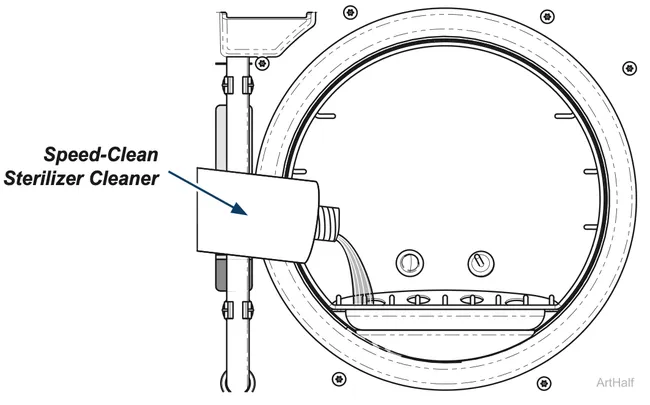
- A) Pour one ounce of Speed-Clean into chamber.
- B) Close the door and start a Cleaning Cycle.
Step 4: Run Rinsing Cycle
- A) Drain reservoir.
- B) If an Auto-Fill system is enabled proceed to the next
step. Otherwise, manually refill the reservoir with water that meets referenced water quality specifications (see Water Purity Specifications). - C) Close the door and start a Rinsing Cycle.
Note
The user interface will remind the user every 6 months that the pressure relief valve test should be performed.
Step 5: Test Pressure Relief Valve
- A) When prompted on the display pull upward firmly on the pressure relief lever for three (3) seconds, then release.
- B) Steam should discharge freely from beneath rear of the unit when lever is pulled.
- C) If the valve does not close completely when lever is released, pull lever again and
release quickly so that it snaps closed. Repeat until valve reseats properly.

Equipment Alert
Contact your local supplier/ technician to order a replacement pressure relief valve if: Excessive force is required to open the pressure relief valve or the valve will not reseat properly.
Step 6: Remove + Wipe Down Trays, Tray Rack, Tray Plate and Chamber
- A) Drain reservoir.
- B) If an Auto-Fill system is enabled proceed to the next step. Otherwise, manually refill the reservoir with water that meets referenced water quality specifications (see Water Purity Specifications).
- C) Remove trays.
- D) Pull tray rack and tray plate straight out of chamber then separate them.
- E) Wipe any residue off trays, tray rack, tray plate, and chamber with a soft cloth and rinse
WARNING
Sterilizer is hot. Wait until the sterilizer is cool to the touch before continuing.
Equipment Alert
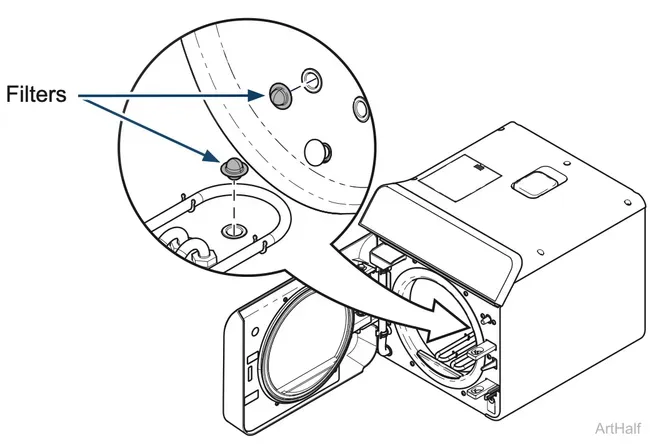
Filters protect sterilizer valves and plumbing. If cycle times become lengthy, filters should be cleaned or replaced.
Step 7: Clean Filters
- A) Remove filters by grasping filter then gently twisting and pulling away from the chamber wall.
- B) Clean filters using Speed-Clean. A small stiff bristled brush or ultrasonic cleaner may be helpful. Rinse with distilled water.
- C) Replace filters if damaged or if debris cannot be removed by cleaning.
- D) To reinstall filter, firmly press inward toward chamber wall while twisting.
Equipment Alert
When using Speed-Clean to clean surfaces dilute with 20 parts distilled water to one part Speed-Clean.
 Step 8: Re-install Trays, Tray Rack and Tray Plate
- A) Insert tray rack back onto the tray plate.
- B) Install tray rack/plate with curved end of tray plate tipped upward and toward back of chamber.
- C) Re-install trays.
Extended Use Care
The M9® and M11® Steam Sterilizers are designed and tested to provide exceptional reliability throughout their service life. However, like all electro-mechanical devices they are subject to wear and degradation
with use. To ensure the integrity, performance and safety of all major components it is the responsibility of the user to have the sterilizer performance / operation verified by a Midmark® Authorized Service Provider
at least every 10 years or 25,000 cycles, which ever comes first. After 10 years or 25,000 cycles of use, an annual inspection by a Midmark Authorized Service Provider is recommended. Software support may not be available after 10 years.
As always if you have any questions about this process or anything else please feel free to contact us and take advantage of our “FREE TECH SUPPORT.”
We also offer FREE VIRTUAL TECH SUPPORT to “See and Talk” with a “Real Time Live Technician” for any problems you may be in need of help with.
You can also use our “FREE MAINTENANCE PROGRAM”. Take the guesswork and worrying about what unit is due for maintenance and which maintenance cycle it is time for. We will keep track of all your autoclaves and let you know when it’s time for anything.
If you want to see our selection of Midmark products, you can find them on our website here.
If you want more news about all things autoclave or infection control, check out our news tab.