
Tuttnauer Clean and Simple Operation Guide
At Sterilizer Autoclave Solutions, we are committed to continually expanding our resources to provide you with the latest and most comprehensive information and products for all your sterilization needs. In keeping up with that promise, in this article, we’ll cover the Tuttnauer Clean and Simple Ultrasonic Cleaner’s Operation Instructions. This guide is designed to walk you through the operation and ownership procedures for your ultrasonic cleaner. You can find a digital and downloadable version of this manual on our website here. We’ve also written about the Tuttnauer Clean and Simple before, which you can find here on our site for more information. If you have any questions about the Clean and Simple, ultrasonic cleaners or anything else, give us a call at 704-966-1650 Option 3 for our Free Tech Support Line.
Operation Guide
Start-Up
Before operating your machine, make sure the drain assembly is properly assembly if necessary.
- Plug line cord into the proper AC outlet. If an adapter plug is use, the grounding wire (green) must be secured to either a water pipe or an adequately grounded electrical outlet.
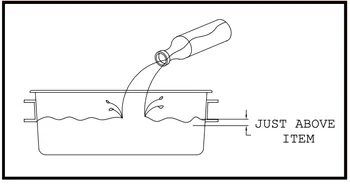
- Pour in the required amount of Cleaning Solution, properly diluted as specified on the container, to a level one inch from the top of the tank. Place the part( s) to be cleaned in your Accessory Basket. Insert the accessory basket containing the parts into your machine. If necessary , add more solution to bring the level to just above the part( s) being cleaned.
- For machine without a timer… Turn the power rocker switch located on the front panel to the “On” position. The switch will not be lit. Cavitation should now be heard and action should be seen in the tank.
- For machines with a timer… To activate your machine, simply plug unit in, add solution and set your timer to the number of minutes desired for ultrasonic cleaning. These self-timing units will automatically shut themselves off at the end of the pre-set time.
- For machines with heat.. On machines equipped with heat, a separate “On-Off” rocker switch is located on the front control panel. This switch allows pre-heating of cleaning solution before the ultrasonic operation. The rocker switch is lit when the heater is in operation and must be switched off when not in use.
The heater element is designed to maintain a temperature of 125° – 150° F (52° – 65° C). When you operate both the ultrasonics and heat simultaneously, with the supplied lid for an extended period of time, the solution temperature will rise above this level. At this point, the termostat will be reactivate as required. During this cycle, the heat indicator light will remain lit. Because of the intense ultrasonic power dissipated in the form of heat, the temperature of the solution may once again rise above the 150° F with the ultrasonics operating. The heat rocker swith must always be manually turned off.
Cleaning Methods – Use of Stainless Steel Basket Accessory
This direct method of cleaning is beneficial due to its simplicity and cleaning effectiveness . In this method, the part(s) to be cleaned are placed in your accessory basket. The basket is then placed directly into the main tank already containing the proper Cleaning Solution.
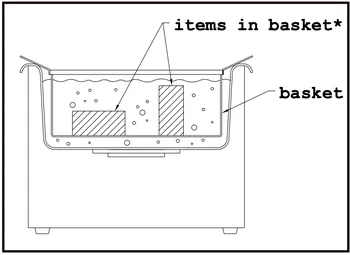
*The item(s) to be cleaned are put directly into an Accessory Basket and placed into the tank.
Cleaning times may vary depending on the amount and types of contamination on the items. We suggest that a 3-5 minute cycle be initiated and more time added if necessary.
Use of Auxillery Pans and/or Glass Breakers
When a cleaning application necessitates a series of different solutions, or when a specialized solution, not to be placed directly into the tank is to be used, the following procedure is recommended.
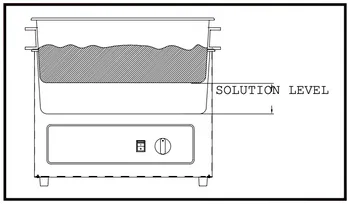
*Fill the stainless steel tank approximately 1/2—2/3 full with a proper solution or carrier bath.
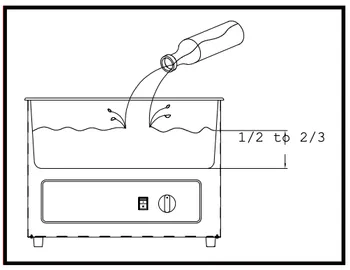
*Fill auxiliary pan or beaker(s) with an appropriate cleaning solution(s) to a level just above the item(s) to be cleaned.
*Place auxiliary pan into main tank, resting it on its handles, making sure that the bottom of the auxiliary pan is below the solution level in the main tank. This insures proper sound wave transference.
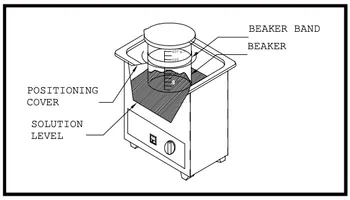
 *If a beaker or beakers are used, place the beaker in a positioning cover using the beaker band to adjust the depth of the suspension so that the beaker bottom is slightly below the surface of the solution in the main tank, but off the bottom.
In the “Indirect Method” the auxiliary pan or beaker functions as a second ultrasonic cleaning machine when properly used.
Basic Operating Do’s and Don’ts
Before using your Ultrasonic Cleaning Machine, please read and understand the following. Failure to follow, may result in personal injury or property damage, and negate the warranty.
Do’s
- Ensure the line cord provided with your Ultrasonic Cleaning System is properly grounded. Maintain the grounding pin on the line.
- Use only proper solutions for compatibility.
- Operate your Ultrasonic Cleaning System with sufficient solution in the tank.
- When using beakers or an auxiliary pan for cleaning, enough solution must be in the tank to act as a coupling agent. The beaker should be suspended just below the solution level, but off the bottom of the tank. Beaker covers should be on at all times.
- To prevent solution loss through evaporation and splashing use the tank cover when the machine is in operation.
- Keep the inside surface of the tank clean and free of sediment.
- Keep ventilating louvers clean and free of obstructions. Good ventilation is required.
- Be sure to unplug the machine before moving it.
- If service is required, contact an authorized Service Technician.
- Make sure you are using the proper voltage for your machine.
- Keep the control panel and area around the machine clean and dry.
Don’ts
- Do not subject your machine to shock impact.
- Do not let the solution level drop below 1 inch (25 mm) from the top of the tank if your machine has a heater. Always operate with sufficient solution in the tank. Allowing the tank to run dry will damage the machine.
- Do not immerse machine in water or any other liquid. To clean the unit: unplug, rinse and wipe dry.
- Do not use gasoline, benzene, acetone or other highly flammable chemicals in your Ultrasonic Cleaning System.
- Do not use acid or blend in your stainless steel tank as pinholes will be created.
- Do not use water alone as the carrier bath. A wetting agent, such as General Purpose Cleaner Concentrate, or Jewelry Cleaning Concentrate, is required for proper transference of ultrasonic energy
- Do not place any objects directly on the bottom of the tank. They may block cavitation, prevent proper cleaning, cause a build-up of heat in the transducers. A Stainless Steel Accessory Basket is recommended.
- Do not operate your machine in extremely dusty areas. Dust build-up may interfere with the machine’s normal operation.
- Avoid placing hands in the machine. Always use accessories.
- Do not operate your Ultrasonic Cleaning Machine when your hands are WET.
- Do not disassemble your machine. This should be done by an authorized service technician.
- Do not operate your machine at extremely high temperatures for extended periods of time.
- Do not use the heater without a non-aqueous base solution for prolonged periods of time.
Helpful Hints
After prolonged use, your beaker(s) will become etched and scratched on the bottom. When this occurs, replace the beaker(s), as this etching will reduce ultrasonic cleaning abilities of your system.
Trouble Shooting If unit fails to start…
- Insure unit is plugged in.
- Insure power switch or timer is on.
- Refer to qualified service personnel.
If unit does not clean adequately…
- Do not overload tank.
- Clean tank, replace with new solution
- Ensure water/cleaning solution ratio is correct.
As always if you have any questions about this process or anything else please feel free to contact us and take advantage of our “FREE TECH SUPPORT.”
We also offer FREE VIRTUAL TECH SUPPORT to “See and Talk” with a “Real Time Live Technician” for any problems you may be in need of help with.
You can also use our “FREE MAINTENANCE PROGRAM”. Take the guesswork and worrying about what unit is due for maintenance and which maintenance cycle it is time for. We will keep track of all your autoclaves and let you know when it’s time for anything.
The Pack of 64 Ultrasonic Cleaning Tablets are available here.
The Pack of 144 Ultrasonic Cleaning Tablets are available here.