
Midmark M11 “Old Style” Installation Guide
Proper installation, operation and maintenance are the most important things to know in terms of autoclave ownership. Improper installation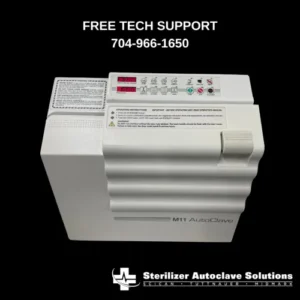 can lead to the machine not functioning properly. Improper operation can lead to complications with sterilization. And neglecting maintenance will ensure that your sterilizer will never work properly again…
But here at Sterilizer Autoclave Solutions, we make it our job to provide you with the proper knowledge to make sure everything goes smoothly. So in this article, we’d like to talk about one of Midmark’s classic offerings, their M11 “Old Style” autoclave. Specifically, this article will go over the installation instructions for the M11 “Old Style”, with instructions provided by the manufacturer, Midmark. That way, your unit is properly installed and won’t show any complications before operation.
If you have any questions about the Midmark M11 “Old Style” autoclave or anything else, please give us a call at 704-966-1650 Option 3 for our Free Tech Support line.
Installation Guide
Location Requirements For Sterilizer
 DANGER
Do not operate this sterilizer in areas where flammable anesthetics are used or stored. An explosion could occur, causing personal injury.
Adherence to the following recommendations for location of the sterilizer will contribute to optimum performance of the unit:
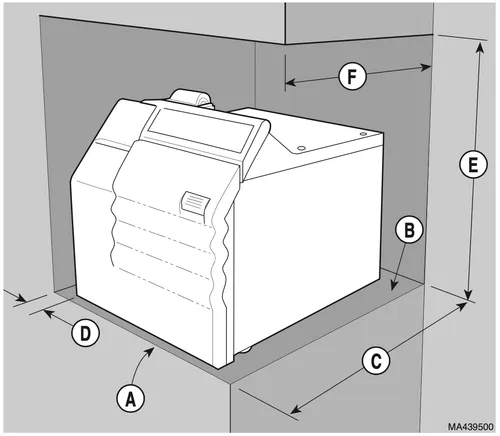
Support Surface (A) – Sterilizer must be placed on a level surface to ensure that the chamber will fill correctly. Improper water level in the chamber could cause a sterilizer malfunction.
Support Surface Material (B) – Formica, stainless steel, or other water and heat resistant material. Heat from bottom of sterilizer could reach 71°C (160° F) on the support surfaces for short periods of time.
Support Surface Depth (C) – Support surface should be approximately 533 mm (21 in) deep. Allow at least 51 mm (2 in) clearance behind the sterilizer for air circulation.
Distance To Side Wall (D) – If the sterilizer is located next to side walls, there should be no less than 51 mm (2 in) clearance between the side of the sterilizer and the wall.
Distance Above Sterilizer (E) – If the sterilizer is to be located beneath wall cabinets or shelves, the underside of the cabinets or shelves should be at least 584 mm (23 in) above the support surface, to provide access to the top inspection cover and to allow for changing the printer paper roll.
Overhang (F) – If the sterilizer is to be located beneath an overhang, the under- side of the overhang should project no further than 381 mm (15 in) over the rear of the sterilizer.
Location On Support Surface – The front of the sterilizer should be located near the front of the support surface so water can be easily drained from the tube into a container.
Neighboring Materials and Equipment – If the sterilizer will be operated in continuous cycles, locate the sterilizer where excessive emission of steam will not damage materials or equipment in the surrounding area.
Re-Location Requirements For Sterilizer
- Disconnect power cord from the electrical outlet and allow sterilizer to cool.
- Drain water from reservoir or take care not to tip the sterilizer, which will allow water to spill from reservoir.
Electrical Requirements
WARNING
Use 220 – 240 VAC, 50/60 HZ alternating current only for 230 VAC models and 90 – 110 VAC, 50/60 HZ alternating current only for 100 VAC models. Failure to do so could result in electrical shock to personnel and will result in damage to sterilizer.
Do not use this sterilizer in an explosive or oxygen-enriched atmosphere. Failure to do so could result in serious personal injury or death.
NOTE – Grounding reliability can only be achieved if this unit is connected to a match- ing three-pronged, grounded, isolated, correctly polarized receptacle.
The electrical rating for the 230 VAC unit is 230 VAC, 50/60 Hz, 10 amps. The electrical rating for the 120 VAC unit is 120 VAC, 60 Hz, 15 amps. The electrical rating for the 100 VAC unit is 100 VAC, 50/60 Hz, 20 amps. The three-pronged grounding plug on the sterilizer power cord must be plugged into a matching three-pronged, grounded, isolated, correctly polarized receptacle. Check the serial number label on the back panel of the sterilizer to verify the voltage rating for the unit.
As always if you have any questions about this process or anything else please feel free to contact us and take advantage of our “FREE TECH SUPPORT.”
We also offer FREE VIRTUAL TECH SUPPORT to “See and Talk” with a “Real Time Live Technician” for any problems you may be in need of help with.
You can also use our “FREE MAINTENANCE PROGRAM”. Take the guesswork and worrying about what unit is due for maintenance and which maintenance cycle it is time for. We will keep track of all your autoclaves and let you know when it’s time for anything.