
Midmark M11 “Old Style” Maintenance Guide
Proper installation, operation and maintenance are the most important things to know in terms of autoclave ownership. Improper installation can lead to the machine not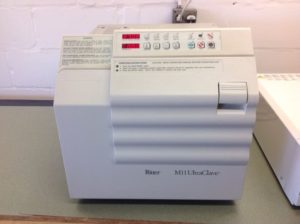 functioning properly. Improper operation can lead to complications with sterilization. And neglecting maintenance will ensure that your sterilizer will never work properly again…
But here at Sterilizer Autoclave Solutions, we make it our job to provide you with the proper knowledge to make sure everything goes smoothly. So in this article, we’d like to talk about one of Midmark’s classic offerings, their M11 “Old Style” autoclave. Specifically, this article will go over the maintenance guide for the M11 “Old Style”, with instructions provided by the manufacturer, Midmark. Proper maintenance of your autoclave periodically will help ensure a proper workflow, as well as limiting the potential issues and hazards you would run into with neglected maintenance.
If you have any questions about the Midmark M11 “Old Style” autoclave or anything else, please give us a call at 704-966-1650 Option 3 for our Free Tech Support line.
Maintenance Guide
Daily
It is the responsibility of the user to establish a periodic maintenance procedure to assure correct operation of the equipment and reliable sterilization of the loads. Contact your local distributor or representative to develop a program for planned maintenance.
1.) Clean External Surfaces – Wipe with a soft dry cloth and wash occasionally with a damp cloth and mild soap or detergent.
WARNING
Make sure that the unit is cool when cleaning the door gasket and any mating surfaces. Failure to do so could result in serious burns to hands.
2.) Clean Sterilizer Door Gasket – Clean door gasket and mating surface with a damp cloth. Examine gasket for possible damage that could prevent a good sealing surface.
Weekly
EQUIPMENT ALERT
Do not use abrasive or bleaching agents in the chamber (i.e. steel wool, scouring powder, bleach, etc.). Also, never use a wire brush. If these materials are used, possible damage to the metal surfaces of the chamber and other components could result.
Clean Chamber and Trays – The sterilizing chamber and instrument trays should be cleaned weekly. First, drain the water from the reservoir. A drain tube is located on the front of the unit for draining. Wash the inside of the chamber and the trays with mild soap or Speed-Clean and distilled or demineralized water. Refill the reservoir with distilled or demineralized water
Monthly
Flush the System – To protect the intricate parts of the unit, the system must be flushed once a month with Speed Clean Sterilizer Cleaner: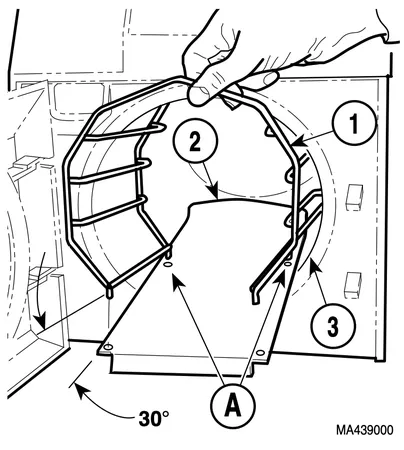
a.) Drain reservoir and fill with clean, distilled water then add one ounce of Speed Clean Sterilizer Cleaner to a cool chamber.
b.) Run one 30 minute cycle (PACKS) at 121°C (250°F). Instruments must not be sterilized while cleaning the sterilizer.
c.) Drain reservoir fill with clean distilled or demineralized water and run one 3 minute cycle (UNWRAPPED) at 132°C (270°F).
d.) Drain reservoir and allow sterilizer to cool to room temperature. Remove the trays, tray rack (1), and the tray plate (2). This is accomplished by grasping the tray rack (1) on both sides in the front and gently pulling outward. The tray rack and tray plate should slide out of the chamber together.
e.) Wipe out the inside of the chamber being careful not to damage the heater element or the temperature and level sensor components. Wipe off the trays, tray rack, and tray plate.
f.) Re-install the tray rack (1) and tray plate (2) in the chamber as follows: Position the two rear posts of tray rack in rack holes (A) of tray plate. Then, hold front end of tray rack at approximately a 30° angle from the tray plate. Then, insert rear end of tray rack and tray plate as an assembly in chamber (3). Push tray rack and tray plate into chamber completely. Re-install the trays.
g.) Refill the reservoir with clean distilled or demineralized water.
Perform Pressure Relief Valve Check – The pressure relief valve must be checked each month by a qualified person to be sure that the relief valve is functioning properly:
a.) Remove the top inspection cover (1).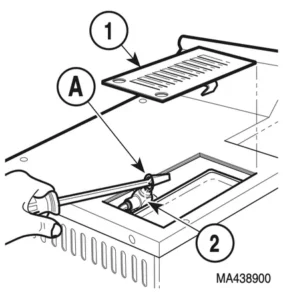
b.) Select the UNWRAPPED cycle and START the cycle.
WARNING
The pressure relief valve will be hot. Do not use bare hands to pull wire ring; use a screwdriver or rod. Failure to do so will result in burns to hands. Also, steam will be vented from under the rear of the sterilizer. To keep from being burned, place a steam barrier (a rolled up towel around the bottom of the sterilizer.
(c) When the “heat up” portion of the cycle is complete and the elapsed time is being counted down on the display panel, pull upward on wire ring (A) of pressure relief valve (2) with a screwdriver for approximately 3 seconds; steam should discharge freely from beneath the rear of the unit.
NOTE
If the pressure relief valve does not close completely when the wire ring is released, pull the wire ring again and release it quickly so the valve snaps back into position. Do this until the valve seats properly.
(d) Release the wire ring of pressure relief valve (2). The steam should vent out of the pressure relief valve until the wire ring is released. When the wire ring is released, the valve should seat, stopping the release of steam.
(e) Press STOP to prevent the unit from overheating.
(f) If excessive force is required to open pressure relief valve (2) or pres- sure relief valve will not reseat properly, the pressure relief valve must be replaced (See Calling For Service later in this manual).
(g) Install top inspection cover (1).
Cleaning Chamber Filter:
(a) Before performing this procedure, make sure that the sterilizer has cooled to room temperature.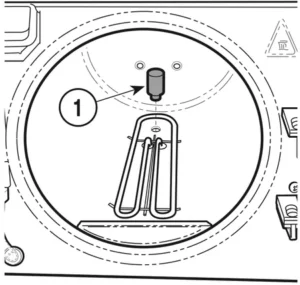
(b) Open the sterilizer door and remove all trays, tray rack, and tray plate from the chamber. Locate the chamber filter (1) on the bottom of the chamber.
NOTE
If the filter cannot be cleaned effectively, the filter must be replaced.
(c) Grasp the filter (1) and gently pull upwards while twisting slightly (a pair of pliers may be used if filter is stuck). The filter may be cleaned with mild soap and distilled or demineralized water. A small stiff bristled brush or ultrasonic cleaner may be helpful to remove foreign objects from the filter surface. Rinse the filter with distilled or demineralized water.
EQUIPMENT ALERT
Do not operate the sterilizer without the filter in place. Doing so could result in the sterilizer malfunctioning.
(d) Replace the filter (1) by inserting the filter into the hole in the chamber bottom and pressing downwards while twisting slightly.
Quarterly
Remove and Clean Door Gasket – the door gasket and dam gasket must be removed and checked and the gasket housing channel must be cleaned as follows: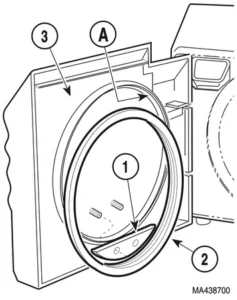
(a) Open sterilizer door. Then, remove dam gasket (1) and door gasket (2) from door (3).
(b) Clean the gaskets (1 and 2) with a mild detergent and inspect the gaskets for cracks, cuts, shrinkage, or swelling. Replace gaskets if necessary.
(c) Clean the gasket housing channel (A) with a solution of mild soap and distilled or demineralized water. A small brush (not wire brush) may be used to aid the cleaning.
(d) Press the door gasket (2) into the channel (A). Then, install dam gasket (1).
(e) Run one cycle to seat the gaskets properly.
As always if you have any questions about this process or anything else please feel free to contact us and take advantage of our “FREE TECH SUPPORT.”
We also offer FREE VIRTUAL TECH SUPPORT to “See and Talk” with a “Real Time Live Technician” for any problems you may be in need of help with.
You can also use our “FREE MAINTENANCE PROGRAM”. Take the guesswork and worrying about what unit is due for maintenance and which maintenance cycle it is time for. We will keep track of all your autoclaves and let you know when it’s time for anything.
The Installation Guide for the Midmark M11 “Old Style” is available on our site to view here. →
You can view the Midmark M11 “Old Style” autoclave on our website here for more info. →