
Tuttnauer BioNova Incubator Instructions for Use Guide
Spore testing is one of the most important steps in the ownership of an autoclave. Spore testing is what allows you to verify the sterility of your autoclave, and a failed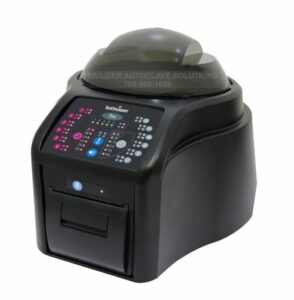 spore test could mean trouble down the line if the issue isn’t taken care of. But to get the best results, you also need the best testing equipment. And with the Tuttnauer BioNova Biological Reader, spore testing has never been simpler or more efficient. We’ve talked about the BioNova Incubator in a previous article here on our site. So in this article, we’d like to go over more information to help you understand the BioNova better: the Instructions for Use Guide.
This BioNova Instructions for Use Guide goes over the instructions for use, provided by the manufacturer, Tuttnauer, for proper operation of your incubator. If you have any questions about the Tuttnauer BioNova Bio Reader or anything else, give us a call at 704-966-1650 Option 3 for our Free Tech Support Line.
Instructions for Use
Start-Up
All equipment is manufactured with the following settings:
- Time zone: UTC +0:00
- Printing language: English
For changing time zone, refer to Time zone change mode section.
For changing printing language, refer to Printing language section.
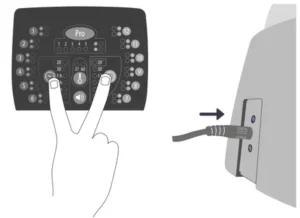
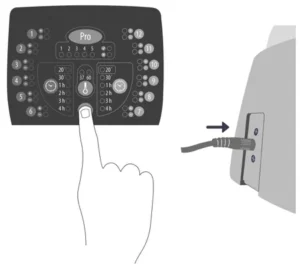
1- Place the auto-reader on a firm surface, free from vibrations, away from sunlight, currents of hot or cold air, chemicals and corrosive or flammable substances. Do not place the equipment in a way that disconnection of the plug from the power supply could be difficult. Leave a gap of at least 10 cm from the wall. Do not move the auto-reader periodically or during its use. Connect the auto-reader to a secure and stable electrical power source.
![]() Do not wet or heat the auto-reader. If liquid is spilled on the auto-reader, disconnect it and dry it immediately. Before turning on, verify that all reading positions are empty.
Do not wet or heat the auto-reader. If liquid is spilled on the auto-reader, disconnect it and dry it immediately. Before turning on, verify that all reading positions are empty.
2- Turn on the machine by connecting the end of the AC power supply to the mains and then connect the other end of the source (plug) on the rear of the unit. The printer’s paper indicator light will turn on, if this light becomes intermittent, this means that the thermal paper must be loaded, or that the printer cover is not tightly closed. Otherwise, the light will remain stationary. The machine will start running the last time and temperature set-up.
3- Synchronize the incubator with local time using the auto-reader’s Traceability software. For this, connect a PC to the USB plug of the auto-reader and start the program. The incubator will be synchronized with the time in the PC. Synchronization can be done as long as there is not an ongoing reading.
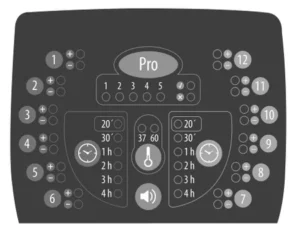
4- The incubator will initiate with the last setup program for temperature and time. To change the incubation temperature, press the temperature button for 3 seconds. Lights corresponding to 60 °C will start blinking, indicating that a temperature program must be selected. For temperature selection, press the temperature button to select 60 ºC. After 4 seconds the temperature modification will be accepted. For 60 ºC, 30 min., 1 or 3 hrs. program can be selected. It’s possible to select different programs for each half or the same for both, depending on the indicator’s final reading characteristics. Check that the time setting is appropriate for the BIs to be incubated in each zone. To change the time program, press the timer button of the correspondent zone as many times as needed to choose the right setting.
5- Wait for temperature of the machine to be stable. Once is stable, the indicator of the desired temperature will remain steady. Do not put any biological indicator in the reading positions until the auto-reader does not confirm temperature stability. The auto-reader will keep the selected incubation program during the reading process. The system does not allow to modify the incubation program once the reading process has begun, unless the reading is finished.
6- Start readings once the blue temperature selection’s light remains stable, this indicates that incubation temperature was reached. Once the selected temperature has been reached and remains stable, after turning on the equipment, a one- time automatic check of the Biological Indicators incubation positions will be carried out. Indicating lights of each well will turn on bringing the result, a green light will show a satisfactory result while a red light will indicate error. When the equipment detects an error in any position, a ticket indicating the day, time and position involved will be printed. To guarantee the reliability of the results, these positions will be deactivated, thus preventing their use. To evidence this, the red light of that position will remain blinking indefinitely, in order to indicate that the position has been disabled. Read BIs instructions for use. Before placing the vials in the auto-reader, press the top to seal the tube. Crush the ampoule (using the ampoule crusher within the box of BIs or the one located within the incubation area of the auto-reader) and make sure that the liquid has completely wet the spore carrier placed at the bottom of the biological indicator plastic tube. Do not remove or change placement of BI once the reading process has begun. If this occurs, results may be invalidated. Use a non-sterilized biological indicator as a positive control every time a processed indica- tor is incubated. For more information refer to the Positive Control section of this user guide.
7- Place the rapid BI in a reading position and wait for the result. Reading will start automatically. Immediately after placing the BI in a position, an alarm will sound indicating that reading has successfully began and the position LED will blink until the result is informed.
NOTE: If the auto-reader does not run automatically, it might indicate that the auto-reader temperature is not steady yet (check the temperature indicating light to remain steady) or that the incubation position is disabled due to an error in the initial autotest.
8- If the incubator detects a positive result, the red light and the audible alarm will turn on. This will indicate that the sterilization process to which the BI was subject, has failed. 30 seconds after removing the IB from the incubation position, the alarm and the red light will turn off automatically and the position will be available to start a new reading. The negative BIs will be informed with a green light in the corresponding position.
This will indicate that the sterilization process to which it was subject has been successful. The green light will remain on for up to 30 seconds after the BI is withdrawn from the reading position. The incubator will inform results within 30 min. (60 ºC),1 h. (60 ºC) or 3 hs. (60 ºC) according to the. program selected. These periods of incubation are the time-limits used by the equipment to inform the fluorescence final readout.
9- Every time a positive result is detected, it will be informed through the printing of the corresponding ticket and with an audible alarm. The alarm can be cancelled by pressing the volume button .
10- To register the tickets, press paper’s traction button, take the paper and press up for the paper to be cut with the serrated edge of the printer.
NOTE: If the paper runs out, printer’s blue light will start blinking (see Replacement of the paper roll in the printer). The incubator will save the last 12 results, for re-printing, follow the Reprinting of the last results instructions.

Thermal Paper Specifications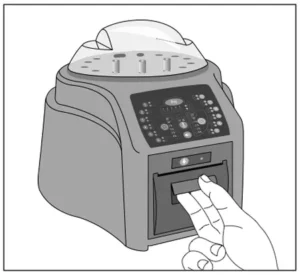
Recommended paper: JUJO AF50KSE3 or similar (order code ICTP).
Paper width : 58 mm
Maximum paper thickness: 60 g/m2
Maximum diameter size: 50 mm
Replacement of the Paper Roll
The printer uses thermal paper rolls.
1. To replace the paper roll, pull the handle of the printer’s door.
2. Open the printer’s cover and remove the spent roll.
3. Place the new paper roll with the outer side up.
4. Close the printer cover by pressing on the sides of the lid.
Reprinting of Results
The auto-reader allows reprinting of the last 12 results by fluorescence readout. To print the results, press the volume button for 5 seconds.
Remaining Incubation Time
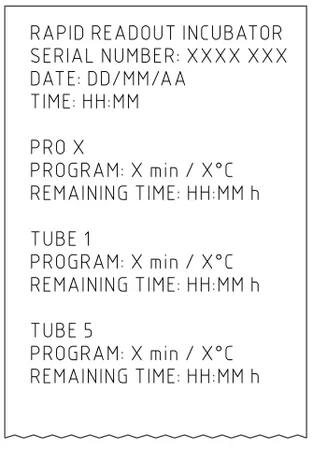
The auto-Reader also allows verifying the remaining incubation time in every reading position. Whenever a reading process is in course, press and hold the temperature button for five seconds, a ticket will then be printed containing the following information: reading position, incubation program and remaining incubation time.
Positive Control
The positive control should belong to the same batch of the processed BI. Use a non-sterilized biological indicator as a positive control every time a processed indicator is incubated. Incubate the processed biological indicator and the indicator used as positive control as long as specified in the instructions. Press the cap to seal the tube and crush the ampoule, make sure the media completely wets the carrier. Write a C (for control) and the date on the label. The positive control can be placed in any well of the auto- reader.
It is a good practice to use a positive control, this helps ensuring:
- Correct temperature is reached
- Viability of spores has not been altered due to improper storage temperature, humidity, or proximity to chemicals.
- Capability of the media to promote rapid growth. Proper functioning of the auto-reader.
Interpretation of Results
Rapid Readout
The indicator used as positive control should show a positive result (red light ). The processed BI results are not valid until the biological indicator used as positive control shows a positive result . A processed BI with a positive result, indicates a failure in the sterilization process. A negative result, (green light ) after 30 min. (60 ºC), 1 h. (60 ºC) or 3 hs. (60ºC) according to the used program, indicates that the sterilization process was effective.
Take action on any positive result inmediately. A positive result indicates a sterilization process failure may have ocurred. Determine the cause of the positive BI following current facility policies and procedures. Always retest the sterilizer and do not use the sterilizer for processing loads until 3 consecutive BI results are negative.
Visual Readout
The Rapid readout system allows the confirmation of results by color change after 48 hours or 7 days incubation analysis (if 7-day readout is made, an humidified environment will be required to avoid media dry out). If the sterilization process was not successful, the growth media contained in the indicator will turn to yellow. If the sterilization process was successful, the media will remain unchanged.
Color change to yellow of the growth media shows a failure in the sterilization process. If after the incubation time (see biological indicators directions for use), no color change is noticed in the processed indicators, then the result is negative (the sterilization process was successful).
The color of the growth media in the BI used as positive control must turn to yellow during the process of incubation for the results to be valid. Record the positive ones and discard them immediately as shown in the biological indicators instructions for use.
Disposal
Dispose Bls after use, according to your healthcare and safety regulations (see BIs instructions for use).
Audible alarm
An audible alarm will sound every time a positive result is detected in the auto-reader. The alarm allows the user to immediately detect a positive result without the need to visually control the equipment. The alarm can be cancelled by pressing the volume button .
Canceling a Reading
When a BI is removed from it’s position during incubation process, an audible alarm will sound to indicate the tube should be returned to the corresponding position.
If the indicator isn’t re-introduced into the reading position after 10 seconds of being withdrawn, the reading will be cancelled and the cancellation will be informed through the printing of a ticket.
Temperature Monitoring
The auto-reader contains an internal temperature control. If the temperature falls outside of the specified range (60±2 ºC), the blue temperature led light will start to twinkle. Temperature can be externally monitored by using a thermometer. The auto‐reader has a special hole for placing the thermometer which is located at the back of the device.
Care and Cleaning
Clean the exterior surface of the auto-reader with a damp cloth moistened with an small amount of detergent. Do not clean interior components. If additional cleaning of the wells is required, contact your distributor or manufacturer.
Always unplug the auto-reader and allow it to cool before cleaning. Do not immerse the unit in liquid.
NOTE: Auto-reader does not need routine maintenance.
Firmware Update
The auto-reader allows updating the firmware periodically (program that controls the device and defines its different features) through the use of a firmware update utility. This software verifies, by using the internet, the latest firmware version available for the auto-reader; downloads it and installs it in a few seconds without the loss of any device data.
Update Procedure
Before starting the process, make sure that the Traceability software is closed. Turn off the incubator for five seconds, then turn it on and follow these steps:
1- Connect the incubator to a PC using a USB cable and make sure to have an internet connection.
2- Open the firmware update utility.
3- Select the device and press Start button to update.
4- Wait until the software indicates that the upgrade process is complete. The auto-reader prints an update confirmation ticket. If it was already up to date, it will print nothing.
NOTE: This process must be repeated every time a new firmware version is available, this will be informed in the website.
Calibration
The equipment calibration procedure is described in the attached software manual (Traceability Software for Automatic Reading and Traceability of Rapid Biological Indicators and Hygiene Monitoring Systems).
Time Zone Change Mode
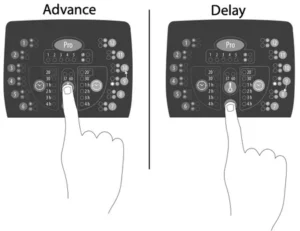
This function allows you to advance or delay the internalauto-reader clock in order to adopt a different time zone.
Enter Time zone change mode
De-energize the auto-reader.

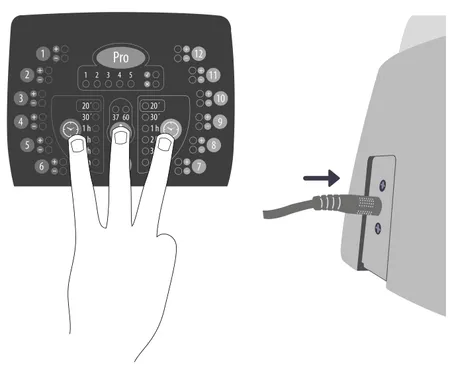
Press and hold both timer buttons simultaneously and energize the equipment. A beep will be emitted to indicate access to Time zone change.
NOTE: when entering Time zone change mode a green light will turn on in one of the incubation/ reading position. This number corresponds to the current auto-reader time.
Time Zone Change
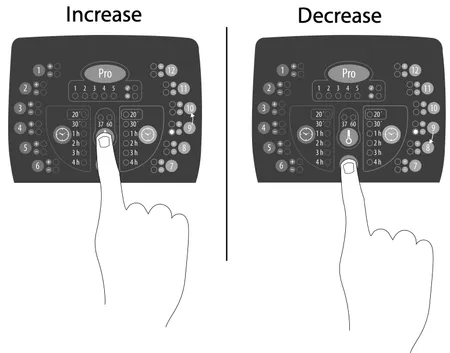
To advance time, press temperature button as many times as hours you need to advance. To delay time press volume button as many times as hours you need to delay.
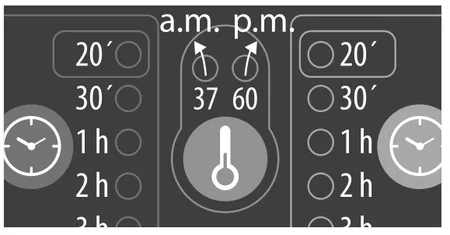
NOTE: 37 °C light indicates a.m. 60 °C light indicates p.m.
 Complete Time Zone Change
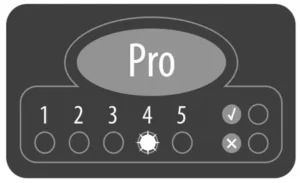
To save changes press and hold PRO button (below) for three seconds. A beep will sound indicating that process has been completed successfully. A ticket with the new set time will be printed

Cancel Time Zone Change
To cancel time zone change process without saving the changes, disconnect power source.
Time Setting Mode
Time setting functionality allows you to establish a specific time regardless of auto-reader current time.
Enter Time Setting Mode
De-energize the auto-reader.
Press and hold both timer buttons and temperature button simultaneously and energize the equipment. A beep will be emitted to indicate access to Time setting mode.
Hours Setting
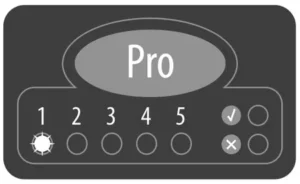
Lights corresponding to 1 to 10 incubation/reading positions indicate the digit value which is set. Lights from 1 to 9 indicate digit value from 1 to 9. Light 10 indicates 0 value.
In time setting mode, light 1 from PRO sector will turn on to indicate ten hour modification and incubation light corresponding to the 10th position will turn on to indicate setting started.
NOTE: 24-hour format.
To change hours and minutes digits, use and temperature and volume buttons. To increase digit value press temperature button; to decrease press volume button.
The blue light number 1 corresponding to PRO sector should be on. If any other light from PRO sector is on, press PRO button as many times as necessary to turn on the blue light number 1. This indicates ten hour setting.
To increase ten hours value, press reduce ten hours value, press temperature button. To reduce ten hours value, press volume button..
NOTE: the possible values for ten hour are 0, 1 and 2.
– Hours setting: Unit hours (hH:mm)
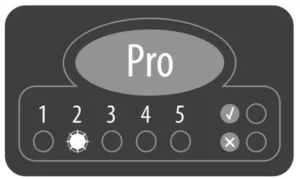
Press PRO button to turn on the blue light number
2. This indicates unit hours setting. If any other light from PRO sector is on, press PRO button as many times as necessary to turn on the blue light number 2.
To increase unit hours value, press temperature button.
To decrease unit hours value, press volume button.
Minutes Setting
– Minutes setting: Ten minutes (hh:Mm)
Press PRO button to turn on the blue light number
3. This indicates ten minutes setting. If any other light from PRO sector is on, press PRO button as many times as necessary to turn on the blue light number 3.

To increase ten minutes value, press temperature button. To decrease ten minutes value, press volume button.
NOTE: possible values for ten minutes are 0, 1, 2, 3, 4 y 5.
– Minutes setting: Unit minutes (hh:mM)
Press PRO button to turn on the blue light number
4. This indicates unit minutes setting. If any other light from Pro sector is on, press PRO button as many times as necessary to turn on the blue light number 4.
To increase unit minutes value, press decrease unit minutes value, press temperature button. To decrease unit minutes value, press volume button.
Finish hours setting
To save changes press and hold PRO button for three seconds. A beep will sound, PRO green light will turn on and a ticket with the new set time will be printed to indicate the procedure has been completed successfully.
NOTE: If the modification has not been done correctly, the auto-reader will emit 3 beeps and the red light from PRO sector will turn on. Repeat the procedure.
Cancel Hours Setting
To cancel hours setting procedure without saving the changes, disconnect power source.
Printing Language Change Mode
This function allows you to change the auto-reader printing language.
NOTE: each language has a code number assigned:
1.) → English
2.) → Spanish
3.) → Portuguese
4.) → Turkish
Enter to Printing Language Change Mode
De-energize the auto-reader.
Press and hold volume button and energize the equipment.
A sound will be emitted to indicate Access to Printing language change mode.
Use temperature and volume buttons to select the position number corresponding to language code.
Finish Printing Language Change
To save changes press and hold PRO button for three seconds. A sound will be emitted indicating that process has been completed successfully. A ticket with the new language will be printed.

As always if you have any questions about this process or anything else please feel free to contact us and take advantage of our “FREE TECH SUPPORT.”
We also offer FREE VIRTUAL TECH SUPPORT to “See and Talk” with a “Real Time Live Technician” for any problems you may be in need of help with.
You can also use our “FREE MAINTENANCE PROGRAM”. Take the guesswork and worrying about what unit is due for maintenance and which maintenance cycle it is time for. We will keep track of all your autoclaves and let you know when it’s time for anything.