

Flight Clave23+ Installation Guide
Proper installation, operation and maintenance are the most important things to know in terms of autoclave ownership. Improper installation can lead to the machine not functioning properly. Improper operation can lead to complications with sterilization. And neglecting maintenance will ensure that your sterilizer will malfunction and cause long term damage.
But here at Sterilizer Autoclave Solutions, we make it our job to provide you with the proper knowledge to make sure everything goes smoothly for every phase of the process. In this article, we’d like to focus on the proper instructions for installation on one autoclave in particular. We’ll be going over the installation instructions for the Flight Clave23+, with instructions provided by the manufacturer. That way, you can ensure that your installation is up to snuff and prevent any issues down the line.
If you have any questions about the Flight Clave23+ autoclave or anything else, please give us a call at 704-966-1650 Option 3 for our Free Tech Support line.
Installation
General Conditions
- Position the device on a solid surface with a minimum weight capacity of 60 kgs.
- The sterilizer should be placed on a level worktable.
- Leave at least 10 cm between the device rear part and the wall. The clearance required to open the door is 40 cm.
- Position the sterilizer at such a height as to make it possible for the operator to check the whole sterilization chamber and carry out the normal cleaning operations.
- The room where the device is installed must be sufficiently ventilated.
- Do not install the device near washing basins, taps, etc. where it is likely to be splashed.
- Do not lean on the door when it is opened.
- Do not place trays, papers, fluid containers or other objects on the sterilizer.
Power Supply Connection
Check the label on the back panel of sterilizer to verify the voltage rating for the unit. Failure to connect the sterilizer to an appropriate power supply could result in damage to the unit and electrical shock to personnel.
Plug the power cord into a properly polarized and grounded receptacle rated for the correct voltage and current. A dedicated circuit that is only used for the sterilizer is recommended.
Never connect the device plug to adapters of any type.
Location Requirements and Dimensions (mm)
To ensure proper air circulation, and to allow access to the reservoir fill port and drain coupling, adhere to the minimum clearance requirements listed below.

Setup
Connect the power cord to an outlet of the appropriate voltage. Open the door to remove all of the inner contents for unpacking. Turn on the main power switch on the right side. After switching on, the machine turns on the LCD and shows the door position, water level, working program, date, time, etc.
**THE DOOR MUST BE OPEN WHEN THE POWER IS TURNED ON TO ALLOW
CALIBRATION OF THE UNIT.**
Fill the distilled water tank
Manual Water Filling
When the level of distilled water reaches a minimum level, the distilled water tank icon will flash and beep three times.
Press the button on the tank lid and fully open the door. Fill the tank carefully with distilled water. If the water level exceeds the maximum level, an alarm will sound, and the distilled water tank icon will blink.
Drain the used water tank

Attach the drain hose on the drain port connector located inside the service door. The left port is the drain port for the waste water tank.
Attention: The capacity of the used water tank is approximately 1.5 liters.
Preparation of Materials for Sterilization
For the most effective sterilization and to preserve instruments, please follow below:
- Clean instruments immediately after use.
- Clean the instruments with an ultrasonic cleaner.
- Residual chemicals left over after the cleaning and disinfecting process may damage and corrode parts of the sterilizer. Always rinse off the instruments using distilled water.
- Follow instrument manufacturer’s guidelines and recommendations for handling and cleaning instruments prior to sterilization.
- Check the manufacturer’s instructions as to proper procedure for sterilizing each item.
- Arrange the samples of different materials on different trays or with at least 3cm of space between them.
- Clean and dry instruments thoroughly before placing them into a tray.
- Always insert a sterilization paper or cloth between the tray and sample to avoid direct contact.
- Arrange the containers (glasses, cups, test-tubes, etc.) on one side or inverted position, avoiding possible water pooling.
- Don’t stack the trays one above the other or put them in direct contact with the walls of the sterilization chamber.
- Always use the instrument tray handle.
- Wrap the samples one by one or, if more tools have to be put in the same bag, verify that these are made of the same material and are not touching one another.
- Don’t use metallic clips, pins or similar items, as this jeopardizes the maintenance of the sterilizer.
- Don’t overload the trays over the stated limit (see appendix 2).
- Load packaged instruments with the paper side up as the steam and moisture inside the pouches can evaporate easier and thus allow for better drying.
Basic Set
Press the back button to access the main menu. From the main menu, select “Basic Set.”
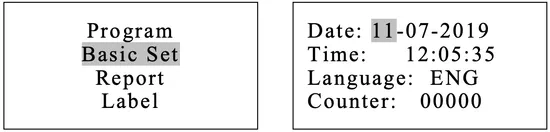
The “Basic Set” menu permits to set the following options:
*Date *Time *Language
Select the “Basic Set” from the main menu by pressing the back button.
Select the item by pressing the back button button. The unit you selected will be highlighted.
Adjust the value by pressing the up and down arrow buttons. Press the back button to select the next item.
Press the Enter button to save and exit.
Abbreviation of language options

Note: The Counter (cycle number) cannot be changed by the operator.
About Device
Select “About device” from the main menu then press the back button.
Press button to exit.

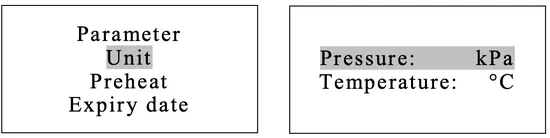
Advance Set
The “Setup” menu allows you to set the following options:
*Parameter *Unit *Preheat *Expiry date (labels)(Optional) *Water quality (sensor) (optional)
and seeing the information of the: *Last error
Select “Setup” from the main menu by pressing the back button.
Input the password one at a time by pressing the up and down arrows and the back button to go next.
Password: 1111

The “Parameter” menu allows you to set the following options:
*Holding time *Dry time
Select “Parameter” from the menu by pressing the back button.
Select the program by pressing the up and down arrows then press the back button.
Select the parameter by pressing the back button. Adjust it by pressing the up and down arrows.
Press the Enter button to save and exit.

Unit
Select “Unit” from the menu by pressing the back button.
Select the parameter by pressing the back button. Adjust it by pressing the up and down arrows .
Press the Enter button to save and exit.
Preheat
When this mode is activated, the chamber and steam generator start to warm until it reaches the minimum temperature to begin a sterilization cycle. This helps to reduce the total cycle time and improve the drying efficiency. The “Preheat” mode will be deactivated after one hour of inactivity.
Select “Preheat” from the menu by pressing the back button.
Adjust it by pressing the up and down arrows.
Press the Enter button to save and exit

Expiry Date (Optional)
To modify the expiration date of the labels, select “Expiry date” from the menu by pressing the back button. Adjust it by pressing the up and down arrows.
Press the Enter button to save and exit.

Water Quality (optional)
If your sterilizer is equipped with a water quality sensor and you want to deactivate it, select “Water quality” from the menu by pressing the back button. Adjust it by pressing the up and down arrows.
Press the Enter button to save and exit.

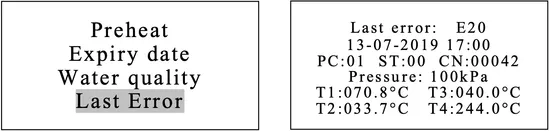
Last Error
In order to help the technical troubleshooting process, the most relevant information corresponding to the last error can be displayed on the screen.
Select “Last error” from the menu by pressing the back button.
Press the Enter button to exit.
As always if you have any questions about this process or anything else please feel free to contact us and take advantage of our “FREE TECH SUPPORT.”
We also offer FREE VIRTUAL TECH SUPPORT to “See and Talk” with a “Real Time Live Technician” for any problems you may be in need of help with.
You can also use our “FREE MAINTENANCE PROGRAM”. Take the guesswork and worrying about what unit is due for maintenance and which maintenance cycle it is time for. We will keep track of all your autoclaves and let you know when it’s time for anything.