
W&H Alegra Handpiece Maintenance Guide (without LED)
The W&H Alegra line of handpieces are lightweight, powerful high-speed instruments that provide a reliable powerhouse to any dental practice. With the hard work and precise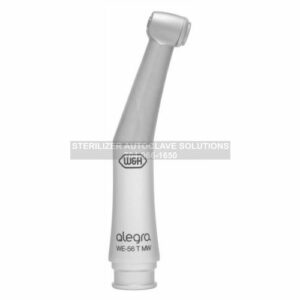 engineering put into each and every one of them, it’s no secret that they offer a unique experience. But to ensure that that experience lives up to itself, like any tool in your medical or dental practice, following the instructions is always paramount. And it starts the second you get it out of the box.
To help guide you into proper use of your Alegra handpieces, in this blog, we’re covering the maintenance guide for your W&H Alegra Handpieces. These instructions will help to ensure maintenance is completed properly and on time. From proper disassembly and cleaning to lubrication and sterilization. These maintenance instructions come directly from the manufacturer, W&H.
This maintenance guide only covers the straight and contra-angle handpieces that DO NOT have an LED light inside of them. This includes the following models:
- Straight handpieces without light: HE-43, HE-43 T, HE-43 XT, HE-43 T SD, HE-43 T MW
- Contra-angle handpieces without light: WE-56, WE-57, WE-66, WE-56 T, WE-56 XT, WE-56 T SD, WE-56 T MW, WE-57 T, WE-57 XT, WE-57 T SD, WE-57 T MW, WE-66 T
If you have any questions about the W&H Alegra handpieces or any other information on our selection of dental instruments, give us a call at 704-966-1650 Option 3 for our Free Tech Support Line.
Hygiene and Maintenance
Follow your local and national laws, directives, standards and guidelines for cleaning, disinfection and sterilization.
> The information on the validated reprocessing procedures serves as an example of an ISO 17664 compliant processing of the medical device.
> Wear protective clothing, safety glasses, face mask and gloves.
> Use only oil-free, filtered compressed air with a maximum operating pressure of 3 bar (43.5 psi) for manual drying.
Cleaning agents and disinfectants
> Read the notes, follow the instructions and heed the warnings provided by the manufacturers of cleaning agents and/or disinfectants.
> Use only detergents which are intended for cleaning and/or disinfecting medical devices made of metal and plastic.
> It is imperative to comply with the concentrations and exposure times specified by the manufacturer of the disinfectant.
> Use disinfectants which have been tested and found effective by, for example: the Verbund für Angewandte
Hygiene e.V. (VAH = Association for Applied Hygiene), the Österreichischen Gesellschaft für Hygiene,
Mikrobiologie und Präventivmedizin (ÖGHMP = Austrian Society for Hygiene, Microbiology and Preventive Medicine), the Food and Drug Administration (FDA) or the U.S. Environmental Protection Agency (EPA).
The user is responsible for validating its process if the specified cleaning agents and disinfectants are not available.
The product lifetime and the medical device’s ability to operate correctly are mainly determined by mechanical stress during use and chemical influences due to processing.
> Send worn or damaged medical devices and/or medical devices with material changes to an authorized W&H service partner.
Processing Cycles
> We recommend a regular service for the W&H medical device after 1,000 processing cycles or one year.
Clean the medical device immediately after every treatment, to flush out liquid (e.g., blood, saliva etc.) and to prevent settling on the internal parts.
> Operate the medical device for at least 10 seconds at idle speed.
> Ensure that all outlets are rinsed out.
> Wipe the entire surface of the medical device with disinfectant.
> Remove the rotary instrument.
> Remove the medical device.
Note that the disinfectant used during pre-treatment is only for personal protection and cannot replace the disinfection step after cleaning.
Manual Cleaning
Do not place the medical device in liquid disinfectant or in an ultrasonic bath.
> Clean the medical device under running tap water (< 35°C / < 95°F).
> Rinse and brush off all internal and external surfaces.
> Move moving parts back and forth several times.
> Remove any liquid residues using compressed air.
> When using the external coolant supply, remove the spray clip and the coolant hose.
Cleaning of the External Coolant Tubes / Spray Clip (accessory)
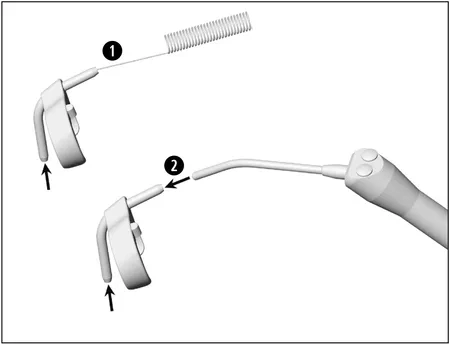
1.) Clean coolant outlets carefully with the nozzle cleaner to remove dirt and deposits.
2.) Blow through the coolant outlets with the air syringe.
> Clean and disinfect the nozzle cleaner in an ultrasonic bath / disinfection bath.
> In the case of blocked coolant outlets or coolant tubes contact an authorized W&H service partner.
Coolant hose (accessory)

1.) Rinse with tap water (< 35°C / <95°F).
2.) Remove any liquid residues using compressed air.
Manual Disinfection
W&H recommends wiping down with disinfectant.
Evidence of the medical device‘s basic suitability for effective manual disinfection was provided by an independent test laboratory using the disinfectants “mikrozid® AF wipes” (Schülke & Mayr GmbH, Norderstedt) and “CaviWipes™” (Metrex).
Automated cleaning and disinfection for WE-56, WE-56 XT, WE-57, WE-57 XT, WE-66, HE-43, HE-43 XT only
W&H recommends automated cleaning and disinfection using a washer-disinfector (WD).
> Read the notes, follow the instructions and heed the warnings provided by the manufacturers of washer‑disinfectors, cleaning agents and/or disinfectants.
Evidence of the medical device’s basic suitability for effective automated disinfection was provided by an independent test laboratory using the “Miele PG 8582 CD” washer‑disinfector (Miele & Cie. KG, Gütersloh) and the “Dr. Weigert neodisher® MediClean forte” cleaning agent (Dr. Weigert GmbH & Co. KG, Hamburg) according to ISO 15883.
> Cleaning at 55°C (131°F) – 5 minutes
> Disinfection at 93°C (200°F) – 5 minutes
Automated Cleaning and Disinfection of the Spray Clip (accessory)
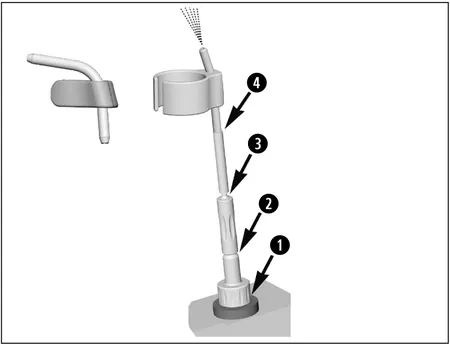
Use the W&H adaptor kit REF 07233500 for the thermo washer disinfector.
1.) Screw the W&H adaptor into the adaptor on the injector rail.
2.) Screw the W&H intermediate adaptor onto the W&H adaptor.
3.) Put the W&H silicone hose over the W&H intermediate adaptor.
4.) Insert the spray clip into the W&H silicone hose.
Drying
> Ensure that the medical device is completely dry internally and externally after cleaning and disinfection.
> Remove liquid residues using compressed air.
Inspection, Maintenance and Testing
> Check the medical device after cleaning and disinfection for damage, visible residual soiling and surface changes.
> Reprocess any medical devices that are still soiled.
> Sterilize the medical device following cleaning, disinfection and lubrication.
Lubrication
> Lubricate the dry medical device immediately after cleaning and/or disinfection.
Recommended lubrication cycles
> Essential after every internal cleaning
> Before each sterilization
or
> After 30 minutes of use or once a day
> chucking system once a week
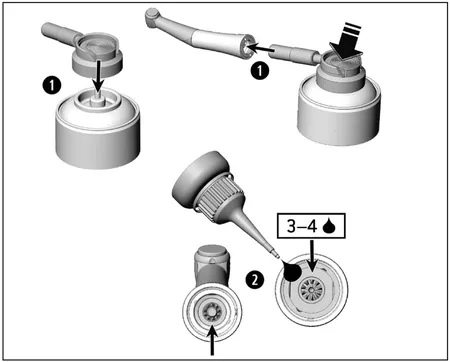
1.) With W&H Service Oil F1, MD-400
(not applicable for StarDental® handpieces)
> Follow the instructions on the oil spray can and on the packaging.
2.) With W&H Service Oil F1, MD-30
> Place 3 to 4 drops into the medical device.
or
With W&H Assistina
Follow the instructions in the Assistina Instructions for use.
> Use the appropriate W&H adaptor (accessory).
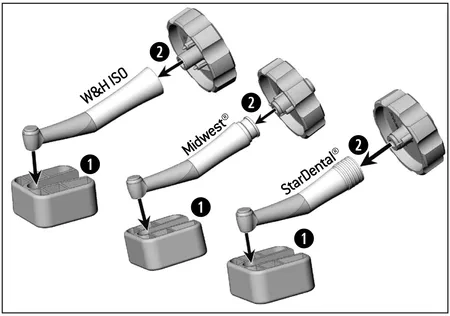
Lubrication of the chucking system – WE-57 / WE-57 T / WE-57 XT / WE-57 T MW / WE-57 T SD

1.) With W&H Service Oil F1, MD-400
> Fit the spray cap REF 02036100 onto the oil spray can.
> Hold the medical device firmly.
> Press the tip of the spray nozzle firmly into the chucking system.
> Spray for approximately 1 second.
2.) With W&H Service Oil F1, MD-30
> Place 3 to 4 drops into the chucking system.
or
With W&H Assistina
> Follow the instructions in the Assistina Instructions for use.
Test after lubrication
> Direct the medical device downwards.
> Operate the medical device so that excess oil can escape.
> Excess oil may result in the medical device overheating.
Packaging
Pack the medical device and the accessories in sterilization packages that meet the following requirements:
> The sterilization package must meet the applicable standards in respect of quality and use and must be suitable for the sterilization method.
> The sterilization package must be large enough for the sterilization goods.
> The filled sterilization package must not be under tension.
Sterilization
W&H recommends sterilization according to EN 13060, EN 285 or ANSI/AAMI ST55.
> Read the notes, follow the instructions and heed the warnings provided by the manufacturers of steam sterilizers.
> The program selected must be suitable for the medical device.
When using the external coolant supply
> Pull off the spray clip and the coolant hose from the medical device before sterilizing.
> Sterilize the spray clip / coolant hose and the medical device.
Recommended Sterilization Procedures
> “Dynamic-air-removal prevacuum cycle” (type B) / “Steam-flush pressure-pulse cycle” (type S)*/** 134⁰C (273⁰F) for at least 3 minutes, 132⁰C (270⁰F) for at least 4 minutes
> “Gravity-displacement cycle” (type N)** 121⁰C (250⁰F) for at least 30 minutes
> Maximum sterilization temperature 135°C (275°F)
Evidence of the medical device’s basic suitability for effective sterilization was provided by an independent test laboratory using the LISA 517 B17L* steam sterilizer (W&H Sterilization S.r.l., Brusaporto (BG)), the Systec VE-150* steam sterilizer (Systec) and the CertoClav MultiControl MC2-S09S273** steam sterilizer (CertoClav GmbH, Traun).
“Dynamic-air-removal prevacuum cycle” (type B): 134°C (273°F) – 3 minutes*, 132°C (270 °F) – 4 minutes*/**
“Steam-flush pressure-pulse cycle” (type S): 134°C (273°F) – 3 minutes*, 132°C (270 °F) – 4 minutes*/**
“Gravity-displacement cycle” (type N): 121°C (250°F) – 30 minutes**
Drying times:
- “Dynamic-air-removal prevacuum cycle” (type B): 132°C (270°F) – 30 minutes**
- “Steam-flush pressure-pulse cycle” (type S): 132°C (270°F) – 30 minutes**
- “Gravity-displacement cycle” (type N): 121°C (250°F) – 30 minutes**
Storage
> Store sterile goods dust-free and dry.
> The shelf life of the sterile goods depends on the storage conditions and type of packaging.
Maintenance
> Do not operate the contra-angle handpiece if it is damaged.
> Replace a damaged contra-angle head immediately.
> Use the tool kit REF 07550301 (accessory).
> Use the key side with the inscription “W&H ISO” or “Midwest®/StarDental®”.
1.) Push the contra-angle head into the clamping system.
2.) Insert the key into the aperture of the sheath.

3.) Unscrew the sheath from the contra-angle head.
4.) Put the new contra-angle head into the clamping system.
5.) Screw the sheath onto the new contra-angle head.
6.) Insert the key into the aperture of the sheath.
7.) Tighten the contra-angle head with the key.
> Perform a test run.
> Repeat the complete hygiene and maintenance process.
As always if you have any questions about this process or anything else please feel free to contact us and take advantage of our “FREE TECH SUPPORT.”
We also offer FREE VIRTUAL TECH SUPPORT to “See and Talk” with a “Real Time Live Technician” for any problems you may be in need of help with.
You can also use our “FREE MAINTENANCE PROGRAM”. Take the guesswork and worrying about what unit is due for maintenance and which maintenance cycle it is time for. We will keep track of all your autoclaves and let you know when it’s time for anything.
You can find more information on the W&H Alegra Handpieces on our site here.