
W&H Alegra Handpiece Operation Guide
The W&H Alegra line of handpieces are lightweight, powerful high-speed instruments that provide a reliable powerhouse to any dental practice. With the hard work and precise engineering put into each and every one of them, it’s no secret that they offer a unique experience. But to ensure that that experience lives up to itself, like any tool in your medical or dental practice, following the instructions is always paramount. And it starts the second you get it out of the box.
To help guide you into proper use of your Alegra handpieces, in this blog, we’re covering the operation guide for your W&H Alegra Handpieces. From the base assembly to the changing of the rotary tools, proper operation is key to keeping your tools in top shape. And all of these operation instructions come directly from W&H. The guide will be separated into the handpieces that do not have LED functions, and those that do have them.
If you have any questions about the W&H Alegra handpieces or any other information on our selection of dental instruments, give us a call at 704-966-1650 Option 3 for our Free Tech Support Line.
Operation Guide
Straight and Contra-Angle Handpieces Without Lights
This section of the operation guide will cover the following W&H Lexa Allegra Handpieces:
Straight handpieces without light:
HE-43, HE-43 T, HE-43 XT, HE-43 T SD, HE-43 T MW
Contra-angle handpieces without light:
WE-56, WE-57, WE-66, WE-56 T, WE-56 XT, WE-56 T SD, WE-56 T MW, WE-57 T, WE-57 XT, WE-57 T SD, WE-57 T MW, WE-66 T
ISO connection / Midwest® connection
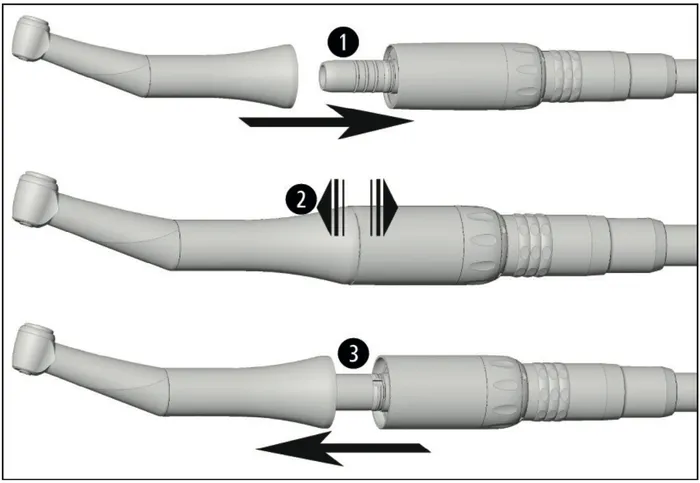
Do not assemble or remove the medical device during operation!
1.) Push the medical device onto the motor.
2.) Verify full engagement
3.) Pull the medical device [or press the locking sheath (Midwest®)] to remove it from the motor.
StarDental Connection
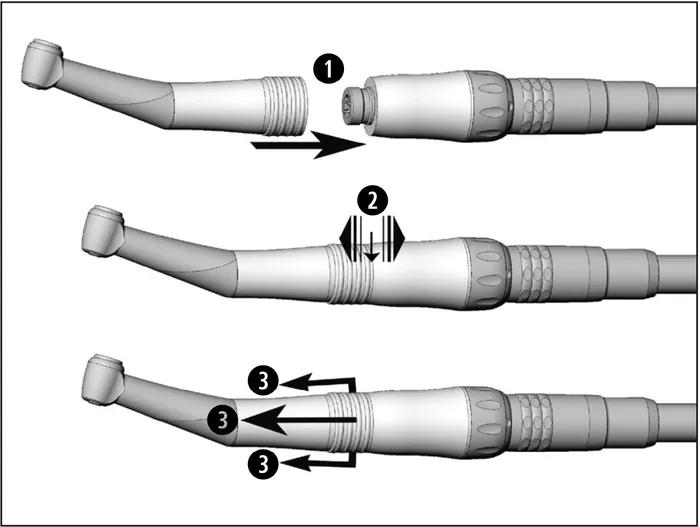
Do not assemble or remove the medical device during operation!
1.) Push the medical device onto the motor.
2.) Verify full engagement
3.) Pull the retention sleeve of the handpiece back to remove the medical device from the motor.
Assembly/Removal of the external coolant supply
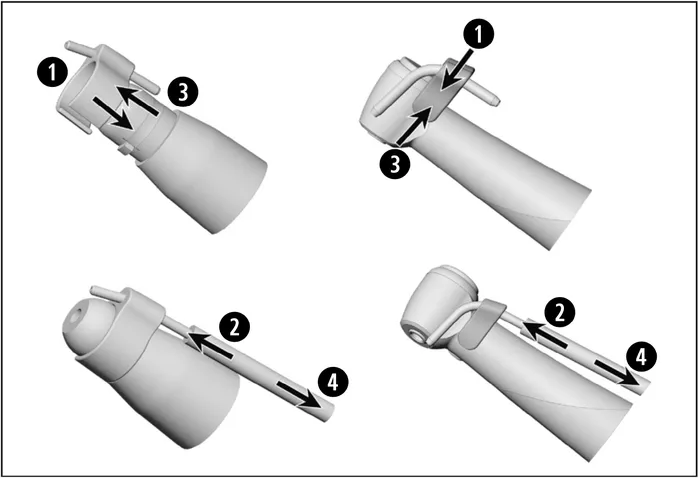
Spray clip / Coolant hose (accessories)
1.) Attach the spray clip.
2.) Insert the coolant hose onto the coolant tube of the spray clip.
or
3.) Remove the spray clip.
4.) Remove the coolant hose.
Rotary Instruments
> Use only rotary instruments which are in perfect condition. Follow the operating instructions of the manufacturer.
> Insert the rotary instrument only when the medical device is stationary.
> Never touch the rotary instrument while it is still rotating.
> Do not activate the chucking system of the medical device during operation. This leads to detachment of the rotary instrument, damage to the chucking system and/or heating up of the medical device. Risk of burning!
To Change Rotary Instruments
 Straight Handpiece
> Handpiece bur
> Instrument shaft diameter 2.35 mm
To open the chucking system: Turn the chuck ring to the left
To close the chucking system: Turn the chuck ring to the right
1.) Open the chucking system.
2.) Insert the rotary instrument until back stop.
3.) Close the chucking system.
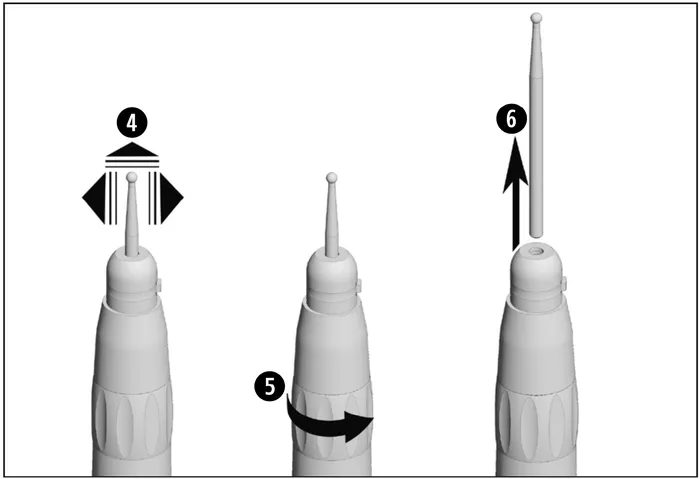
4.) Verify full engagement
or
5.) Open the chucking system.
6.) Remove the rotary instrument.
Close the chucking system
Straight handpiece
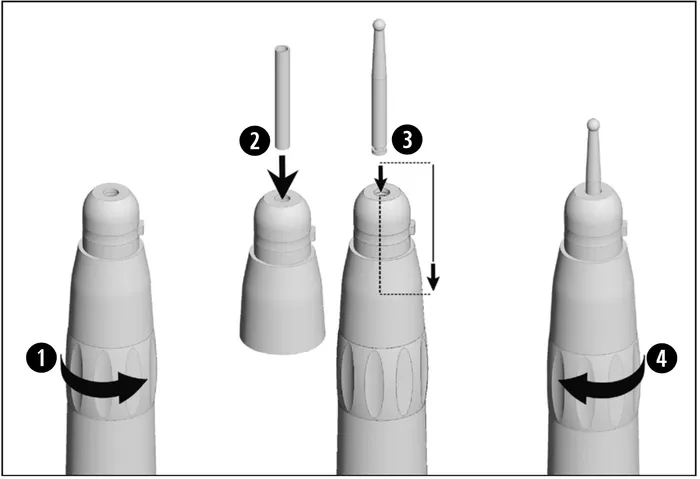 > Contra-angle bur
> Instrument shaft diameter 2.35 mm
To open the chucking system: Turn the chuck ring to the left
To close the chucking system: Turn the chuck ring to the right
1.) Open the chucking system.
2.) Insert the bur extension.
3.) Insert the rotary instrument until back stop.
4.) Close the chucking system.
5.) Verify full engagement
or
6.) Open the chucking system.
7.)Remove the rotary instrument.
8.) Screw the threaded pin into the bur extension.
9.) Pull out the bur extension.
Close the chucking system
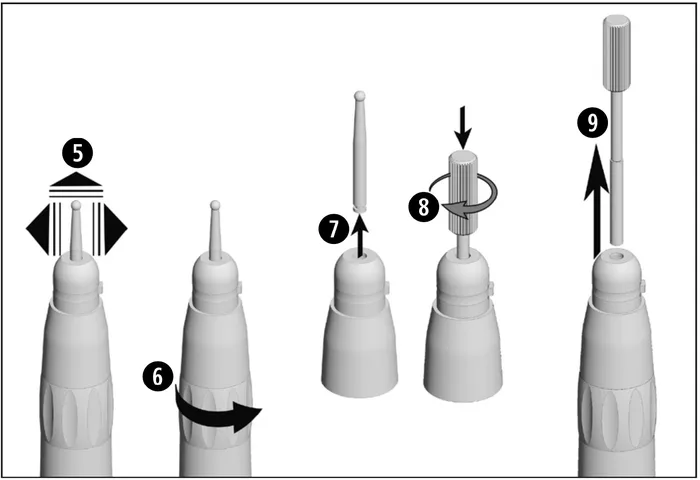
Contra-Angle Handpiece
WE-57 / WE-57 T / WE-57 XT / WE-57 T MW / WE-57 T SD
> Instrument shaft diameter 1.6 mm
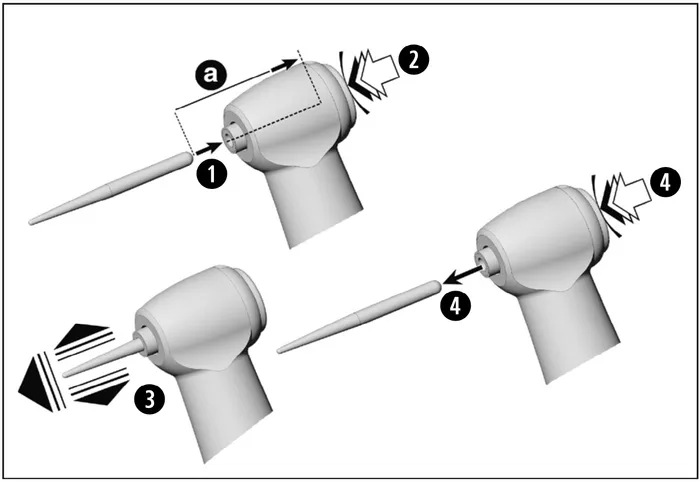
1.) Insert the rotary instrument.
2.) Activate the push-button, at the same time insert the rotary instrument until back stop (a).
3.) Verify full engagement
or
4.) Activate the push-button and remove the rotary instrument.
Contra-angle handpiece
 WE-56 / WE-56 T / WE-56 XT / WE-56 T MW / WE-56 T SD / WE-66 / WE-66 T
> Instrument shaft diameter 2.35 mm
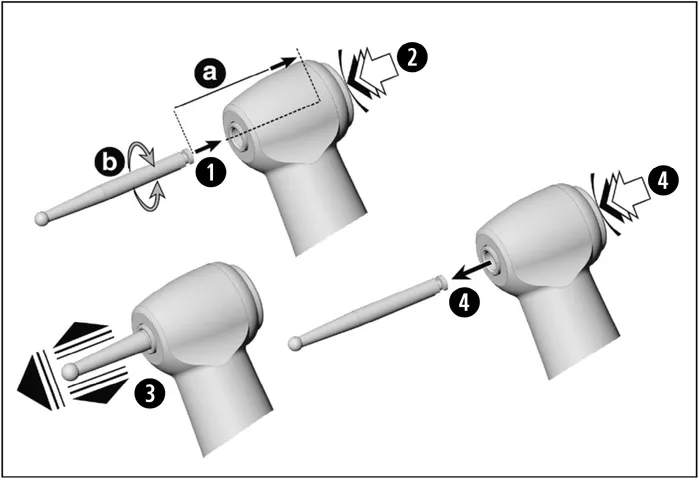
1.) Insert the rotary instrument until back stop (a).
2.) Activate the push-button and turn the rotary instrument until it engages (b).
3.) Verify full engagement
or
4.) Activate the push-button and remove the rotary instrument.
Test run
Do not hold the medical device at eye level.
> Insert the rotary instrument.
> Start the medical device.
In the event of operating malfunctions (e.g., vibrations, unusual noise, overheating, coolant failure or leakage) stop the medical device immediately and contact an authorized W&H service partner.
Contra-Angle Handpieces Without Lights
This section of the operation guide will cover the following W&H Lexa Allegra Handpieces:
Contra-angle handpieces with light:
WE-56 LED G, WE-66 LED G, WE-99 LED G
Assembly/Removal

Do not assemble or remove the medical device during operation!
Push the medical device onto the motor.
Verify full engagement.
Remove the medical device.
Rotary Instruments
> Use only rotary instruments which are in perfect condition. Follow the operating instructions of the manufacturer.
> Insert the rotary instrument only when the medical device is stationary.
> Never touch the rotary instrument while it is still rotating.
> Do not activate the chucking system of the medical device during operation. This leads to detachment of the rotary instrument, damage to the chucking system and/or heating up of the medical device. Risk of burning!
To change rotary instruments
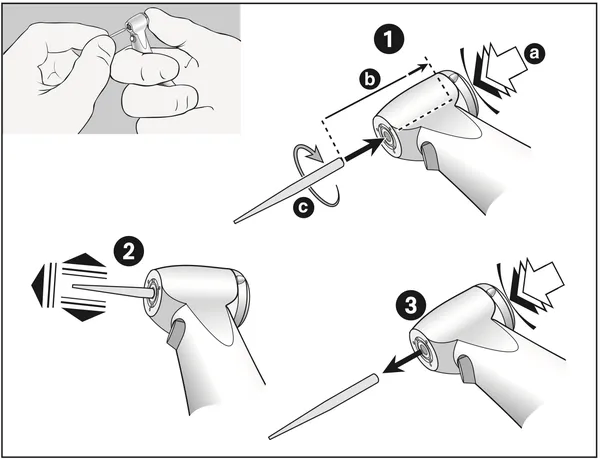
1.) Rotary instrument shank ø 1.6 mm:
Insert rotary instrument.
Activate the push-button (a) and at the same time insert the rotary instrument until it reaches the limit stop (b).
Rotary instrument shank ø 2.35 mm:
Activate the push-button (a) and at the same time insert the rotary instrument and turn it until it snaps into place (c).
2.) Verify full engagement.
3.) Remove the rotary instrument by pushing the push-button.
Test run
Do not hold the medical device at eye level.
> Insert the rotary instrument.
> Operate the medical device.
In the event of operating malfunctions (e.g., vibrations, unusual noise, overheating, coolant failure or leakage) stop the medical device immediately and contact an authorized W&H service partner.
As always if you have any questions about this process or anything else please feel free to contact us and take advantage of our “FREE TECH SUPPORT.”
We also offer FREE VIRTUAL TECH SUPPORT to “See and Talk” with a “Real Time Live Technician” for any problems you may be in need of help with.
You can also use our “FREE MAINTENANCE PROGRAM”. Take the guesswork and worrying about what unit is due for maintenance and which maintenance cycle it is time for. We will keep track of all your autoclaves and let you know when it’s time for anything.
You can find more information on the W&H Alegra Handpieces on our site here.