Ritter M9 Ultraclave – Monthly Maintenance Review 2
This post was originally published on 6-15-18 and updated on 4-22-19-
This is an overview of your Ritter M9 Ultraclave and Ritter M11 Ultraclave monthly maintenance instructions. However, always refer to the appropriate technical documentation for the complete list of instructions, safety alerts and sequence of procedures before conducting any service or maintenance operations. And if you just want to talk to someone, call our Free Tech Support at 704-966-1650 Option 3.
How do I Keep Track of “Monthly”
The easiest and most simple way to keep track of your “Monthly” and other scheduled maintenance periods is to sign up for our FREE PREVENTIVE MAINTENANCE PROGRAM.
We take the guesswork out of “What Needs to be done?” and “When Does it Need to be Done?”! We will let you know any time any of your machines need maintenance. And it’s free even if you are not our customer. Check It Out Here!
However, if you would like to keep track of it yourself then keep an eye on your autoclave.
Every 28 days, Ritter M9 Ultraclave and Ritter M11 Ultraclave will automatically display the “Perform monthly maintenance” message. This is a more thorough cleaning of the unit, and involves multiple steps.
Please see the bottom of this article for the Midmark Monthly Maintenance List.
What are the Steps
First the chamber and plumbing need to be cleaned thoroughly. Second, the filters need to be removed and cleaned. Third, the door and dam gaskets need to be removed and cleaned. And least you should check the operation of the pressure relief valve.
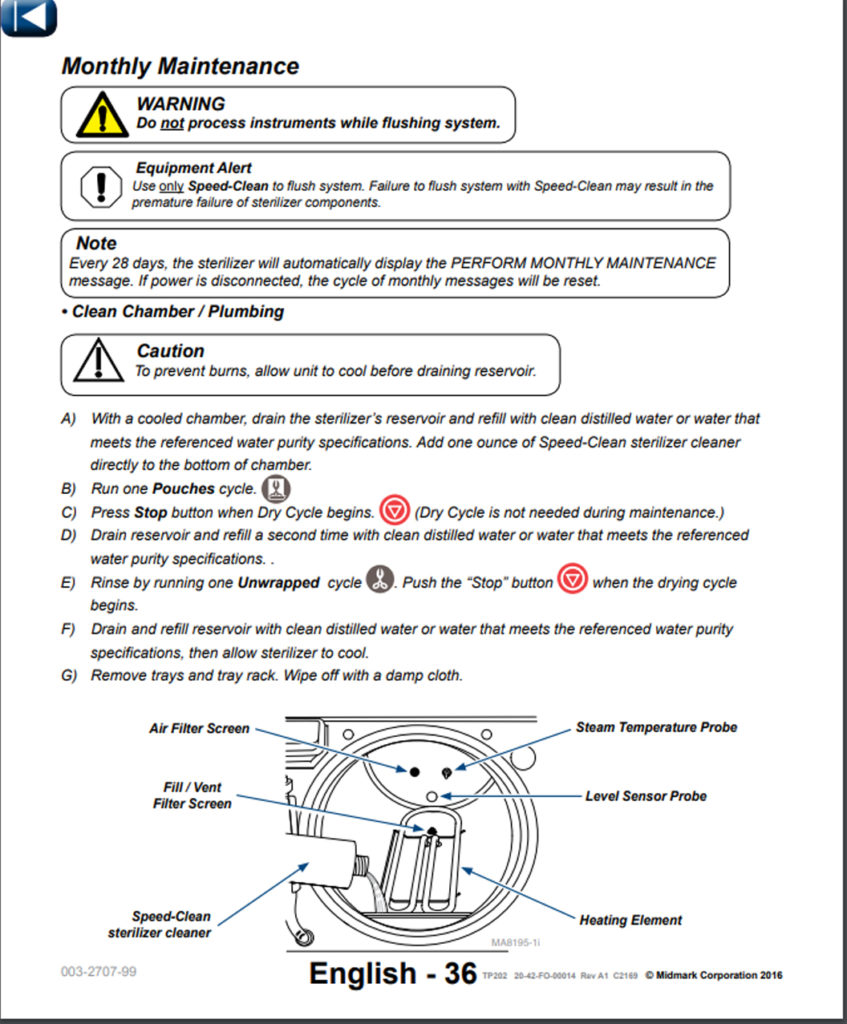
How to Clean the Chamber and Plumbing
The chamber and the plumbing will need to be cleaned in your Ritter M9 Ultraclave and Ritter M11 Ultraclave. With a cool chamber, drain the autoclave’s reservoir and refill with distilled water. Add one ounce of Speed Clean autoclave cleaner directly to the cool chamber and load your instruments for sterilization. Now run one pouch cycle and press the stop button when the drying cycle begins. The drying cycle does not need to run during this maintenance procedure.
You will need to drain the reservoir again on your Ritter M9 Ultraclave and Ritter M11 Ultraclave. After draining the reservoir you refill it a second time with clean, distilled water. Now comes the rinse cycle which is done by running one unwrapped cycle but push the stop button when the drying cycle begins. Once the cycle has completed you will need to drain the reservoir again. After draining the reservoir you refill it a third time with clean, distilled water. Finally you need to give the sterilizer time to cool then you can remove the trays and tray rack. You should always wipe them with a damp cloth.
Cleaning the Filters Properly
It is quite easy to remove and clean filters Ritter M9 Ultraclave and Ritter M11 Ultraclave. Remove filters by pulling upward and twisting slightly. Clean the filters by washing with a mild soap and distilled water solution. Use a small stiff brush, or an ultrasonic cleaner to remove stubborn deposits. After cleaning, rinse the filters with distilled water and set them aside. Wipe the inside of autoclave chamber, being careful not to damage the heating element, steam temperature probe, or water level sensor. Re-insert the filters into the appropriate holes by pushing downward, while twisting slightly. Re-install the tray rack.
What to do with the Door and Dam Gaskets
This step includes removing, cleaning, and inspecting the door and door dam gaskets of your Ritter M9 Ultraclave and Ritter M11 Ultraclave. Start by removing the door dam gasket, door gasket, and then the gasket ring from the unit. Clean gaskets and ring with Speed Clean, distilled water and a soft brush. Inspect the gaskets for damage, shrinking or swelling, and always replace the gaskets if damage is apparent. Now press the door gasket ring into the channel in the door gasket, and place the door gasket back into the door.
How to Test the Pressure Relief Valve Properly
The next part of the required monthly maintenance for your Ritter M9 Ultraclave and Ritter M11 Ultraclave involves verifying proper operation of the pressure relief valve. Start by placing a rolled towel around the bottom of the autoclave to be used as a barrier. This will act as a barrier combatting the high-pressure and high-temperature steam that vents from under the autoclave during this check. Next press the un-wrap cycle, followed by pressing start. Now you need to monitor the display, watching for the pressure to reach 20 PSI.
Watch for your Ritter M9 Ultraclave and Ritter M11 Ultraclave to reach 20 PSI. At that time pull upward firmly on the relief valve lever on top of the autoclave cabin and hold it open for three seconds. Steam should discharge freely from beneath the rear of the unit. Release the lever quickly, and verify that the valve has closed properly by noting that steam has stopped escaping. If the unit is still releasing steam, pull up on the valve lever again and release it quickly, so the valve snaps back into position. Repeat this if necessary, to make sure the valve is seated correctly. Press “Stop” to cancel the cycle, preventing the unit from overheating. Allow the chamber to cool. If excessive force is required to open the valve, or if it will not re-seat properly, contact your Midmark authorized dealer.
After Completing Those Steps
You can now run your normal operations with your autoclave. The “Perform monthly maintenance” message will go away during your next sterilization cycle.
Other Important Points
M9 and M11s are designed and tested to provide exceptional reliability throughout their service life. Ensuring the integrity, performance and safety of all major components is the responsibility of the user. It is important to have the performance and operation of the sterilizer verified by a StatimUSA.com at least once per year or 1,000 cycles, whichever comes first.

More Information on Ritter M-9 UltraClave
StatimUSA.com is your number 1 resource for all things autoclaves, we sell new autoclaves, repair your old autoclave and even purchase your old autoclave back from you. Try us today, you wont regret it! You can reach us at info@statimusa.com or call our FREE TECHNICAL SUPPORT LINE at 704-966-1650.
See the full Midmark Maintenance Manual here: https://statimusa.com/wp-content/uploads/2017/10/Midmark-New-Style-M9-M9D-M11-Operators-Manual.pdf
As always if you have any questions about this process or anything else please feel free to contact us and take advantage of our “FREE TECH SUPPORT.”
We also offer FREE VIRTUAL TECH SUPPORT to “See and Talk” with a “Real Time Live Technician” for any problems you may be in need of help with.
You can also use our “FREE MAINTENANCE PROGRAM”. Take the guesswork and worrying about what unit is due for maintenance and which maintenance cycle it is time for. We will keep track of all your autoclaves and let you know when it’s time for anything.


Good morning. I rented a space to open a practice and it came with an autoclave that I plan to use. I need to have it inspected. The space has been closed for 4 years and I’m not sure how the equipment was cared for. I’m interested in a virtual consultation, if possible, due to time constrictions.
Thank you.
Hello Monica. Yes, a virtual visit is definitely available. Please contact our FREE Tech Support Line at 704-966-1650 ext 2 and a tech will help you right away.