Tuttnauer T-Vet 11E Installation Instructions Leave a comment
In this article, we’re going to show you how to properly install your Tuttnauer T-Vet 11E veterinary autoclave. Following these measurements and using the words of warnings throughout will help you install your T-Vet properly in no time!
And if you just want to talk to someone for any questions you may have, call our Free Tech Support at 704-966-1650 Option 3.

Installation
Lifting and Carrying
CAUTION! Any time the autoclave is to be moved, make sure that the electric cord is disconnected from the power source, and there is no pressure in the chamber.
- Disconnect the power supply cord from the rear of the autoclave.
- Drain any water that may be in the reservoir or chamber.
Note: Lifting straps have been provided with this unit. Lifting straps are for one time use and should be removed and discarded after initial set up.
To avoid injuries, lifting and carrying should be done by two people.
Do not drop the device!
Placing
CAUTION! The sterilizer must be placed on a rigid and leveled surface. The counter top or stand must be able to withstand the load of the device and loaded material.
Note: This unit requires a minimum counter depth of 22″
Note: Make sure while placing the autoclave, to leave space around the machine for ventilation and to give the technician access to service the machine. It is recommended that a minimum 2” (50mm) space be provided. Insufficient space for ventilation may result in an increase of the autoclave’s temperature which may damage the unit.
Electrical
The electrical connection should comply with the devices power requirement. It must also comply with local installation and safety rules and regulations. The voltage supplied to the device must comply with the device label ± 5%.
Note: It is recommended that the device be on a dedicated electrical circuit.
Note: The autoclave must be connected to a properly grounded outlet.
In order to avoid any personal injury due to electrical shock, it is mandatory to have installed an earth leakage relay (GFCI outlet or circuit breaker) in the electrical circuit to which the autoclave is connected. This relay disconnects all electrical power in case of accidental contact with any electrically energized parts of the autoclave.
Setup
Your new Tuttnauer Autoclave was programmed and tested at the factory and requires a minimum of setup.
- Make sure the counter is level and sturdy see.
- Make sure all the feet are on the autoclave and none of them has been lost.
- Position the autoclave on the counter.
- Connect the power cord to the socket on the rear side of the autoclave; then plug it into the supply outlet.
- Turn on the power switch located on the right side of the unit. Set Date and Time will appear on the screen. On initial set up it is important to set the date and time.
- This machine is equipped with an electronic door lock. The door will not open when the power is off or the display screen does not read System Ready.
- When the software has finished loading the door will unlock. Open the door and immediately use the arrow keys on the screen to advance to the Unwrapped Cycle. This will turn off the pre heating mode. Make sure to remove all accessories and plastic material from the chamber.
- Fill the reservoir with steam distilled water
The unit is now ready to run sterilization cycles.
Note: At the time of installation or anytime the unit is relocated the atmospheric pressure parameter will automatically reset. The atmospheric pressure parameter can be manually reset at any time.
Filling the Mineral-Free Water Reservoir
![]() Only fill the reservoir when the autoclave is idle, not running a cycle, use only steam-distilled water.
Only fill the reservoir when the autoclave is idle, not running a cycle, use only steam-distilled water.
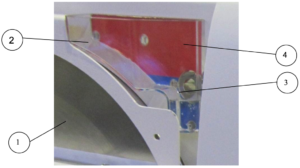
1.) Open the door (1). The autoclave needs to be on for the door to open.
2.) Pour steam distilled water, gently, into the front funnel (2) until it reaches the top of the blue area (3) on the level gauge. If water is filled above the blue area into the red area (4) then use the drain hose to drain off the over fill. It is preferable to use a carafe or small pitcher when filling.
Note: This reservoir is designed with an over flow and filling the reservoir above the safe level as indicated on the Front Fill Funnel will cause excess water to spill out below the machine onto the counter.
CAUTION! Under no circumstance should water be filled higher than the blue area (3) on the level gauge.

If the reservoir is empty, it can be filled quickly by adding water directly through the opening at the top of the reservoir, as follows:
CAUTION! Before filling the reservoir, verify that the autoclave is not running a cycle.
Note: This reservoir is designed with an over flow and filling the reservoir above the safe level as indicated on the Front Fill Funnel will cause excess water to spill out below the machine onto the counter.
4.) Remove the water reservoir cover (6).
5.) Pour steam distilled water into the reservoir through the opening on top of the autoclave until it reaches the base of the safety valve holder (7) or reaches the top of the blue area of the level gauge.
CAUTION! Under no circumstance should water be filled above the safety valve holder.

In case more water is accidentally filled above the blue area, or safety valve decrease the water level by draining the reservoir before starting a cycle.
CAUTION! USE STEAM DISTILLED WATER ONLY. The impurities in water from a well, spring or municipal water supply will create the need for more frequent cleaning and maintenance.
This type of water can damage your instruments, your unit and void your warranty.
If you have any questions about this procedure or any other Tuttnauer T-Vet 11E Tech Issues please contact us and let us help.
As always if you have any questions about this process or anything else please feel free to contact us and take advantage of our “FREE TECH SUPPORT.”
We also offer FREE VIRTUAL TECH SUPPORT to “See and Talk” with a “Real Time Live Technician” for any problems you may be in need of help with.
You can also use our “FREE MAINTENANCE PROGRAM”. Take the guesswork and worrying about what unit is due for maintenance and which maintenance cycle it is time for. We will keep track of all your autoclaves and let you know when it’s time for anything.


