
Tuttnauer T-Vet 11E Operating Instructions Leave a comment
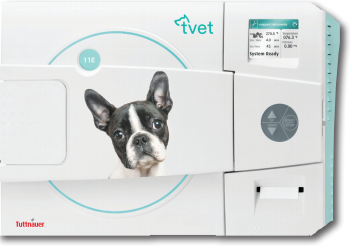
Our Tuttnauer T-Vet 11E Operating Instructions is a guide to help you better understand the operating functions of the autoclave.
And if you just want to talk to someone for any questions you may have, call our Free Tech Support at 704-966-1650 Option 3.
Turning on the Autoclave
Plug the power cord into the back of the autoclave and into the wall outlet.
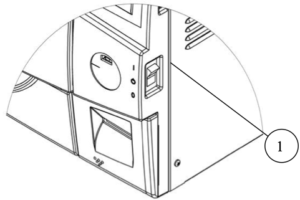
- Turn on the rocker switch mounted on the side of the front panel.
Pre-Heating (EZ11 Plus Only)
This feature keeps the chamber hot between cycles to provide optimal drying results when running the “Wrapped Instrument, Pouches” or “Handpiece” or “Custom A” cycles Pre-heating is active during stand-by unless the autoclave is in screen saver mode. The screen saver mode is set to activate after 90 minutes of inactivity.
Note: Pre-heating activates automatically every time you turn the autoclave on and the “Wrapped Instrument, Pouches”, “Handpiece” or “Custom A” cycles are selected.. Use caution since pre-heating will make the bottom of the chamber hot.
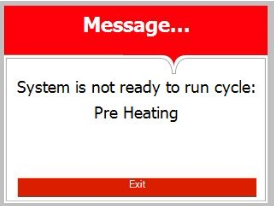
If you press start during pre-heating, the following screen appears:
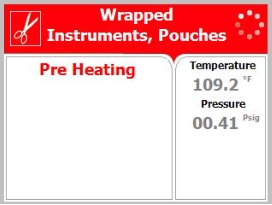
In this case, there is no need to press start again: when the required pre-heat temperature is reached, the process will start automatically.
Pressing start again will result in the following screen:
Opening the Door
This Tuttnauer T-Vet 11E veterinary autoclave is equipped with an electronic door lock. The door will not open when the sterilizer is running a cycle or the power is off or the display screen does not say “System Ready” or if the “Water in the Chamber” icon (see below) is displayed.
![]() Water in the Chamber Icon
Water in the Chamber Icon
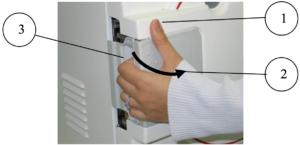
When “System Ready” is displayed on the screen, open the door by following these steps:
- Place your thumb on the plastic door cover (1) and the other fingers in the handle (3).
- Pull the handle (2) until the latch of the door is released.
- Open the door.
With the door open you can now fill the reservoir.
Note: The first time you start the unit it is important to set the date and time.
Adding Additional Drying Time
If the default drying time is not adequate for the load to be sterilized, additional drying time can be added.
Tuttnauer strongly suggests that each user/operator learn how to arrange the load and apply additional drying time. This will ensure that your sterilizer provides efficient drying of the pouched and/or wrapped instruments used in your office.
Tuttnauer affords you the ability to adjust drying times to accommodate various instrument loads. Since no two instrument loads are the same it is important to match the drying time with the load. In addition, proper packaging is important. Like materials should be packaged together. Carbon steel should not be mixed with stainless instruments. Plastic instruments should be separated from metal instruments. Pouched items should be separated on the tray and should only be one layer deep. When using paper/poly bags the paper side should be down. Using a Tuttnauer Pouch Rack will insure good air circulation and more efficient drying.
Loading
1. Loading the Tuttnauer T-Vet 11E properly.
- Be sure that instruments of dissimilar metal (stainless steel, carbon steel, etc.) are separated.
- Observe maximum weight limits.
- When sterilizing wrapped instruments it is recommended that a pouch rack such as the Tuttnauer Pouch Rack be used to ensure proper steam penetration and adequate drying when sterilizing pouched instruments.
- If a pouch rack is not available then the pouches need to be laid out plastic side UP and only one layer deep on each tray.
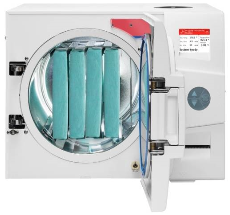
- When sterilizing cassettes in the T-Vet 11E they are loaded vertically (see picture below). To adjust the rack for vertical sterilization of cassettes, remove the trays and gently squeeze the sides of the rack inward and at the same time rotate the rack into a vertical position.
- When sterilizing textiles do not put the textiles on the bottom tray.
 Loading of Heavy and Diverse Loads
When sterilizing heavy loads it is recommended to use a Tuttnauer Pouch Rack. The T-Vet 11E is supplied with 5 wire trays, and can accommodate 2 pouch racks.
1. Ensure that the correct sterilization program is selected.
- Use the UP or DOWN keys to select the program to run.
- The program can only be changed when the door is open
2. If needed additional drying time can be added at this time.
3. Close the door by either:
- Holding the handle in the open position while pushing the door until it comes to the closed position, then releasing the handle.
- Pushing on the door handle and gently pushing the door closed.
When the door is properly closed the open door symbol (see below) is then replaced by the message “System Ready“
 Door Open Symbol
4. Start the cycle be pressing the START/STOP key.
Cycle Description
- The door is now locked
- “Water Filling” is displayed until the correct volume of water has automatically filled the chamber.
- The autoclave starts performing the sequence of operations. The actual measured values of pressure and temperature are displayed continuously and printed (if the optional printer is installed).
- The EZView display shows the current stage of the cycle.
- In any program that has a drying stage scheduled, the dry stage begins after the steam exhaust stage. The autoclave is equipped with an air pump that during the drying stage draws air through a HEPA filter (0.2 μm) and circulates that air through the heated chamber and out the slow exhaust valve to remove moisture and facilitate the drying operation. Drying is performed with the door closed.
- At the end of a successful cycle, the screen shows the Cycle Ended message and the door is automatically unlocked. The slow exhaust valve is opened to prevent formation of a vacuum.
- In the event of a program failure, the exhaust valve is opened to release pressure from the chamber and a fail message is displayed.
- There is a mandatory 1 minute of drying before the door can be opened.
- When the mandatory drying is completed pressing the START/STOP key will clear the error message and unlock the door.
Unloading
When the cycle has ended successfully, the message “Cycle Ended” is displayed and the door is automatically unlocked.
The door can be opened and the load removed.
![]() WARNING! To avoid severe injuries from hot steam when opening the door:
WARNING! To avoid severe injuries from hot steam when opening the door:
- It is strictly forbidden to lean on the autoclave.
- It is strictly forbidden to place your hand or any part of your body over the door.
Use the tray handle or wear heat-resistant gloves to remove the load from the autoclave.
On completion of the cycle, the load shall be visually inspected to ascertain that the load is dry, and that sterilization indicators have made the required color change.
![]() WARNING! The sterility of the instruments processed in unwrapped cycles cannot be maintained if exposed to non-sterile environment.
WARNING! The sterility of the instruments processed in unwrapped cycles cannot be maintained if exposed to non-sterile environment.
If the symbol for “Water in the Chamber” appears on the screen, the door will stay locked. This indicates that there is still water in the chamber or that the water electrode, in the chamber, needs to be cleaned.
![]() CAUTION! Bypassing the automatic door lock and forcing the door open can result in water spilling out of the chamber.
CAUTION! Bypassing the automatic door lock and forcing the door open can result in water spilling out of the chamber.
Stopping the Process Manually
It is possible to stop the program while the autoclave is operating. Pressing the START/STOP key at any stage of the process stops the operation. Any cycle that stops prematurely is considered a failed cycle.
![]() WARNING! If the cycle was aborted before completing the sterilization stage, it will leave the load unsterilized. Handle it as a contaminated load.
WARNING! If the cycle was aborted before completing the sterilization stage, it will leave the load unsterilized. Handle it as a contaminated load.
- If the cycle is manually aborted before completing the sterilization stage, the screen becomes yellow; a caution symbol is displayed with the message “Cycle Failed” and an error message stating the reason for the failure.
- If the cycle is manually aborted after the sterilization stage is completed, the screen will remain white with the message “Cycle Ended” and a second message stating the reason for the failure.
- There is a mandatory 1 minute of drying before the door can be opened.
- When the mandatory drying is completed pressing the START/STOP key cancels the displayed message and unlocks the door so it can be opened.
- If the symbol for “Water in the Chamber” appears on the screen, the door will stay locked. This indicates that there is still water in the chamber or that the water electrode, in the chamber, needs to be cleaned.
![]() CAUTION! Bypassing the automatic door lock and forcing the door open can result in water spilling out of the chamber.
CAUTION! Bypassing the automatic door lock and forcing the door open can result in water spilling out of the chamber.
Stopping the Process Cycle Due to Failure
- The cycle can stop itself if the unit detects a problem.
![]() WARNING! If the cycle was aborted before completing the sterilization stage, it will leave the load unsterilized. Handle it as a contaminated load.
WARNING! If the cycle was aborted before completing the sterilization stage, it will leave the load unsterilized. Handle it as a contaminated load.
- If the cycle is aborted before completing the sterilization stage, the screen becomes yellow; a caution symbol is displayed with, the message “Cycle Failed”, and an error message stating the reason for the failure.
- If the cycle is aborted after the sterilization stage is completed, the screen will remain white with the message “Cycle Ended” and a second message stating the reason for the failure.
- There is a mandatory 1 minute of drying before the door can be opened.
- When the mandatory drying is completed pressing the START/STOP key cancels the displayed message and unlocks the door so it can be opened.
- If the symbol for “Water in the Chamber” appears on the screen, the door will stay locked. This indicates that there is still water in the chamber or that the water electrode, in the chamber, needs to be cleaned.
![]() CAUTION! Bypassing the automatic door lock and forcing the door open can result in water spilling out of the chamber.
CAUTION! Bypassing the automatic door lock and forcing the door open can result in water spilling out of the chamber.
If you have any questions about this procedure or any other Tuttnauer T-Vet 11E Tech Issues please contact us and let us help.
As always if you have any questions about this process or anything else please feel free to contact us and take advantage of our “FREE TECH SUPPORT.”
We also offer FREE VIRTUAL TECH SUPPORT to “See and Talk” with a “Real Time Live Technician” for any problems you may be in need of help with.
You can also use our “FREE MAINTENANCE PROGRAM”. Take the guesswork and worrying about what unit is due for maintenance and which maintenance cycle it is time for. We will keep track of all your autoclaves and let you know when it’s time for anything.