
Flight Clave23+ Maintenance Guide
Proper installation, operation and maintenance are the most important things to know in terms of autoclave ownership. Improper installation can lead to the machine not functioning properly. Improper operation can lead to complications with sterilization. And neglecting maintenance will ensure that your sterilizer will malfunction and cause long term damage.
But here at Sterilizer Autoclave Solutions, we make it our job to provide you with the proper knowledge to make sure everything goes smoothly for every phase of the process. In this article, we’d like to focus on the operation guide for one autoclave in particular. We’ll be going over the maintenance instructions for the Flight Clave23+, with instructions provided by the manufacturer.
If you’d like to read the Installation Guide for the Flight Clave23+, you can find it here. We also have an Operation Guide for the Flight Clave23+ on our site available to read here.
If you have any questions about the Flight Clave23+ autoclave or anything else, please give us a call at 704-966-1650 Option 3 for our Free Tech Support line.
Maintenance
To ensure proper operation and maximum steam sterilizer life, carefully follow all recommendations for periodic maintenance. One of the most important steps you can take to prevent problems with your sterilizer is to use only distilled water.
Frequency Number of cycles Maintenance operation
Daily Clean the external surface.
Drain used water tank.
Clean the door seal.
Weekly 25 Clean the chamber, trays and rack.
Clean distilled water tank (drain tank).
Monthly 100 Clean the filter inside the chamber and in the distilled water tank.
Every 6 months 500 Replace the bacteria filter.
Every year 1,000 Replace door seal, tubing, filters, check valves.
Clean the Distilled Water Tank
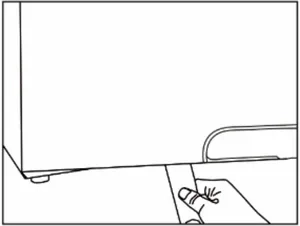
Unplug the power cable, or turn the circuit breaker to the off position at the back of the unit.
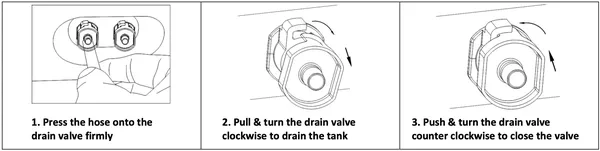
Drain the tank completely using the drain connector at the front of the sterilizer and leave it connected to a tube in an open position.
Clean the internal surface with a soft sponge and a small soft brush for the areas difficult to reach using distilled water.
Remove the filter and clean it with a small soft brush and mild soap, rinse it with distilled water, and put it back in to the position.
Replacement of the Bacteria Filter
The bacteria filter is at the back of the sterilizer. Unscrew the filter by hand by turning the filter counter- clockwise.
Replace the bacteria filter with a new one. Screw the new filter by turning the filter clockwise.
Note: Do not operate sterilizer without filters in place.
Clean Chamber, Door Seal Ring, Trays and Tray Rack
Remove the trays and tray rack from the chamber. Clean the trays, rack and the inside of the chamber with mild soap.
Rinse the trays, rack and inside of the chamber with a smooth cloth and distilled water.
Examine door seal for possible damage. Clean door seal and mating surfaces with a damp cloth.
Note: Do not use bleaching agents or any abrasive materials or substances in the chamber. Failure to comply may cause damage to the chamber and/or other components.
![]() Caution: To prevent burns, let the unit cool before cleaning gaskets and touching the surface.
Caution: To prevent burns, let the unit cool before cleaning gaskets and touching the surface.
Door Adjustment
Under normal circumstances, the chamber door does not require adjustments.
However, if the seal fails (resulting in steam leaking from the front of the chamber), you may need to adjust the door tension.
Open the door.
Insert the spanner tool in the gap beneath the plastic cover. Use the spanner to grip the adjusting nut. Turn the nut counter clockwise as the figure below. This will tighten the sealing plate.
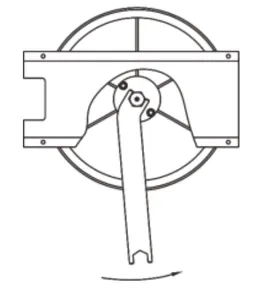
Turn the nut until the sealing plate is tight. If the door knob is too tight, you may also turn the nut clockwise to loosen it.
Caution: Never adjust the chamber door while the door is closed.
Replacement of the door seal ring
Open the chamber door. Remove the door seal ring carefully by hand.
Clean the door seal ring carefully with a smooth cloth with distilled water.
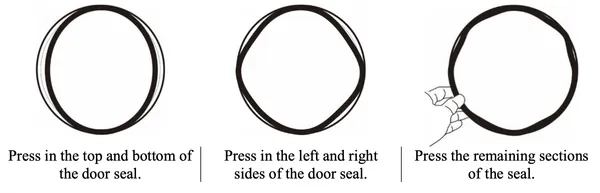
Moisten the new seal with distilled water.
Insert the new seal and tap in sequence as follows:
Caution: Please ensure the chamber and the door are cold prior to replacing the seal ring.
The Drain Valves
As always if you have any questions about this process or anything else please feel free to contact us and take advantage of our “FREE TECH SUPPORT.”
We also offer FREE VIRTUAL TECH SUPPORT to “See and Talk” with a “Real Time Live Technician” for any problems you may be in need of help with.
You can also use our “FREE MAINTENANCE PROGRAM”. Take the guesswork and worrying about what unit is due for maintenance and which maintenance cycle it is time for. We will keep track of all your autoclaves and let you know when it’s time for anything.