
Enbio Pro Operation Guide
Proper installation, operation and maintenance are the most important things to know in terms of autoclave ownership. Improper installation can lead to the machine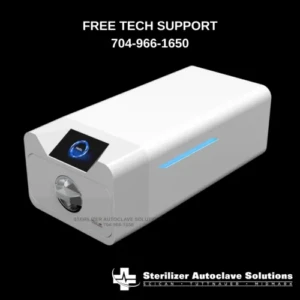 not functioning properly. Improper operation can lead to complications with sterilization. And neglecting maintenance will ensure that your sterilizer will malfunction and cause long term damage.
That’s why at Sterilizer Autoclave Solutions, we make it our job to provide you with the proper knowledge to make sure everything goes smoothly for every phase of the process. In this article, we’d like to focus on the operation guide for one autoclave in particular. We’ll be going over the operation instructions for the Enbio Pro, with instructions provided by the manufacturer. With proper operation, you can ensure that your sterilization cycles are completed to standard, and your autoclave doesn’t run into issues along the way.
If you’d like to read the Installation Guide for the Enbio Pro, you can find it here.
If you have any questions about the Enbio Pro or anything else, please give us a call at 704-966-1650 Option 3 for our Free Tech Support line.
Preparation and loading of instruments
The devices are suitable for sterilization of loads for which steam sterilization is stipulated. The instruments must be sterilized only if they are clean and dry. Therefore they must be washed and disinfected before being loaded onto the tray in accordance with applicable regulations. Residues of used chemicals or other solid particles may render the sterilization process impossible or even damage the device. In addition, sterilization of instruments that have not been previously cleaned and disinfected is a biological hazard and can lead to damage (both to the instruments and to the sterilizer). For instruments that must be lubricated, use steam sterilization lubricants. Excess lubricant must also always be removed.
The 134 ° C FAST program is intended only for sterilization of unwrapped instruments (see “1.5 Enbio S Sterilization Parameters” and / or “1.6 Enbio PRO Sterilization Parameters”).
After sterilization with 134°C FAST the instruments are moist – it is recommended to leave the drawer open for a few minutes to evaporate excess moisture.
After sterilization of unpackaged loads, they are intended for immediate use.
Preparation of packages
It is recommended to use sterilization packaging that meets the requirements of EN ISO 11607-1: 2020 and EN 868-2: 2017. Appropriate packaging should: ensure good penetration of the sterilizing agent into the inside of the package, provide resistance to damage during the sterilization process, ensure tight and durable sealing of contents and safe removal for use, provide a barrier to microorganisms and unwanted substances and contaminants,
Use disposable sterilization sleeves (intended for steam sterilization) as recommended by their manufacturer sleeves should only be filled to about 3/4 full to allow for proper sealing and minimize the risk of damage to the package a distance of at least 30 mm should be maintained between the seals and the sterilized load. 30 mm the sharp edges of the load should be protected to avoid damaging the packaging the packaging material must not be placed too loosely or be tightly stretched so as not to affect pressure variations during sterilization a label with information about the contents of the package, the code of the packer, date of sterilization and use-by date as well as parameters of the sterilization process should be placed on the package
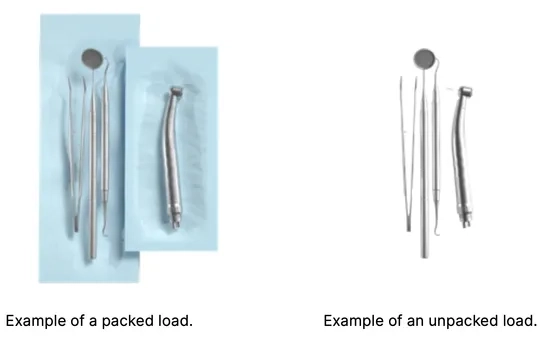
Arranging packages on the sterilizer tray (sterilization of packed items) packets on the tray should be placed so that the paper side touches the paper side, because penetration of the sterilizing agent and air exchange can only take place through the paper the packages should be placed on the tray in such a way as to eliminate the contact of the package with the door seal and the phase of the sterilization chamber – failure to comply with this rule may cause the chamber to become unsealed and the sterilization cycle incorrectly carried out the edges of the packs must not protrude beyond the sterilizer tray, as this would cause the chamber to leak and the sterilization cycle to fail if the sterilizer chamber is heavily loaded, the first packs must face the foil side towards the bottom of the tray (this ensures faster and more efficient drying of the packs).
Arranging tools on the sterilizer tray (sterilization of loads without packaging) in the case of sterilization without packages – the instruments must be placed in such a way that they do not have direct contact with each other, no element of them falls into the openings of the tray, and does not rest against the edge of the tray or protrude beyond its outline
Failure to follow the above recommendations may cause permanent and irreversible damage to the sterilization chamber phase, which will result in the lack of tightness of the sterilizer and loss of warranty
Do not exceed the maximum load weight: 500 g for Enbio S devices and 800 g for Enbio PRO devices. In order to verify the correctness of the performed sterilization, it is recommended to place a sterilization chemical indicator in the chamber for each process, which discoloration during properly conducted sterilization.
Operating the Device
First run
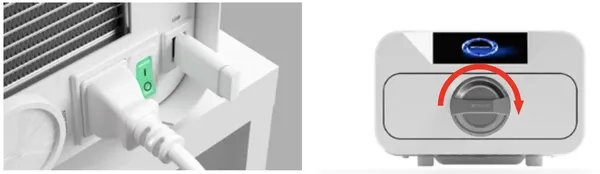
Turn on the device using the main switch located on the rear panel of the device. Make sure that the supply and wastewater hoses are connected correctly, and that there is water in the supply tank and the wastewater tank is empty. Place the load on the tray, slide the drawer in and lock it, i.e. turn the knob clockwise. The sterilizer provides audible information about changes and the completion of the process.
Program Selection
Depending on the type of load to be sterilized, the user must select the appropriate program – in accordance with the instructions of the sterilizer manufacturer (see sections: “1.4 Intended use of the device”, “1.5 Enbio S sterilization parameters” and “1.6 Enbio PRO sterilization parameters”) and the load manufacturer’s recommendations.
Carrying out sterilization processes in the ENBIO S / ENBIO PRO device does not affect the biocompatibility of the materials.
All device components that come into direct contact with the sterilized load do not cause toxicity, sensitization or irritation.
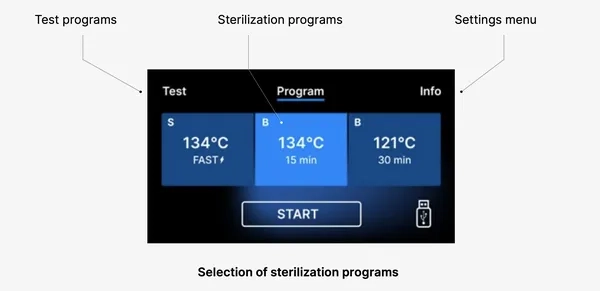
After switching on the device, the start screen appears on the display. To go to the next screen, press the screen once with your finger (anywhere).
This screen only appears on first run, before the first process is performed.

Each time the device is switched on again, the welcome screen appears in the display. To go to the next screen, press the screen once with your finger (anywhere).

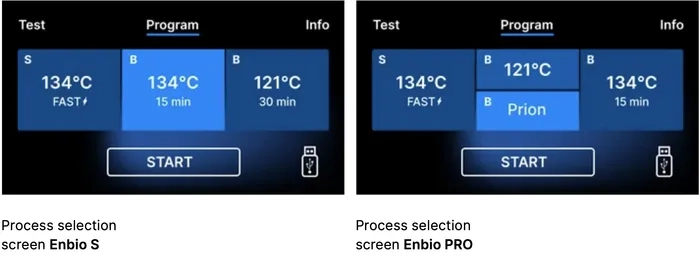
On the next screen, we can go to sterilization, test the device or open the information menu. The following sterilization programs can be selected from the main menu: 121 ° C, 134 ° C, 134 ° C FAST and 134 ° C PRION (Enbio PRO only)
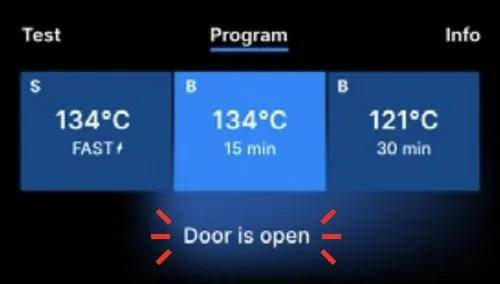
When the chamber is opened, the DOOR OPEN symbol flashes.
When the chamber is closed by turning the locking knob clockwise, the START symbol appears on the display, which informs that the chamber is properly closed.
Now we can select the program by pressing the appropriate symbol of the temperature in which we want to sterilize 121 ° C, 134 ° C, 134 ° C FAST or 134 ° C PRION, which will highlight the selected program. The selected program is started by pressing the START symbol.
If the USB memory is not inserted in the device, the USB disk symbol is not displayed in the lower right corner of the screen.
![]()
A message appears that USB memory is missing.
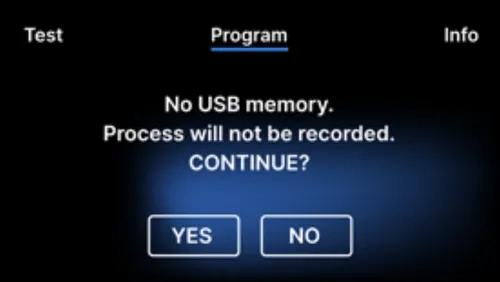
The program data will not be saved. We can continue working without saving data to the USB memory stick by pressing the YES box, or abort the work by selecting the NO box to place the stick in the port and start the program steps from the beginning.
It is recommended to use a USB drive with each of the processes. The data stored on it will allow you to print reports from selected processes.
If work continues or the START field has been selected, a symbolic pressure diagram of the entire process is displayed on the screen with the current program progress highlighted against a background and information on the next process steps in the upper left corner of the screen. During the program run, the screen displays the temperature of the selected sterilization program or the current temperature in the process chamber in the lower left corner, the current pressure in the chamber in the lower right corner, and the time remaining until the end of the process in the upper right corner of the screen. This is an estimated time, which may be increased due to the weight and type of the load.
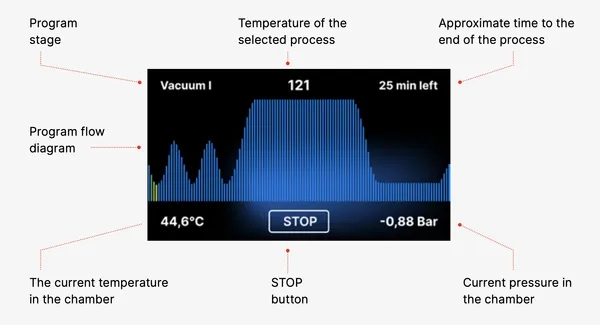
During the course of the program, in place of the START field, the STOP field is displayed, which allows the user to stop the process at any time. In the upper left corner of the screen, the names of the individual stages of the program are displayed consecutively, e.g. chamber lock, heating of the working chamber

If the process was successful, the display alternately shows information screens about the end of the process and the sterility of the load and about the possibility of opening the chamber of the device. By pressing the FINISH field, we go to the welcome screen.
WARNING! After the process, the chamber, tray and load are hot. Be especially careful and use protective gloves to remove the load or wait until it cools down. In the 134C FAST program, instruments are hot and wet after sterilization.
Test Programs
The devices are equipped with special test programs to verify the correct operation of the sterilizer.
(Table)
By pressing the Test field you go to the test programs menu. From this level, we can choose between the
Vacuum test and Helix / B&D test programs. We select the appropriate program by pressing the required field on the display.
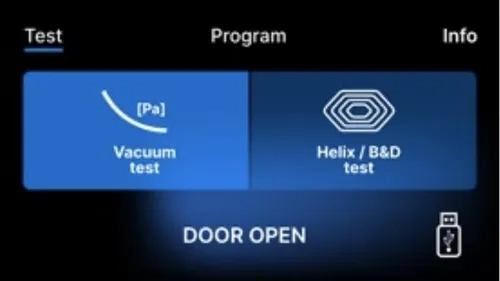
When the device working chamber is closed, the word DOOR OPEN changes to START and by pressing this field the selected test program is started.

If a USB flash drive has not been inserted into the unit, the USB symbol is not displayed in the lower right corner of the screen and a message indicating no USB flash drive is displayed. The test program data will not be saved. We can continue without writing data to the USB flash drive by pressing the YES box or abort by selecting the NO box to place the USB flash drive in the port and start the program from the beginning.
Vacuum Test
The vacuum test should only be performed on a cold device before starting work. During the test, the device verifies:
- vacuum pump capacity.
- tightness of the pneumatic system.
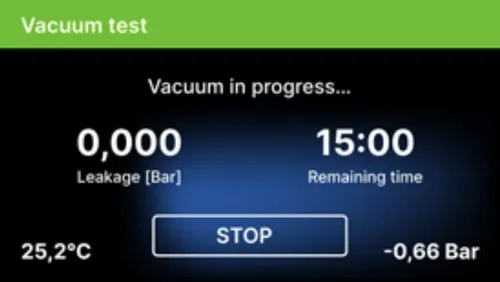
After selecting a vacuum test program and starting it with the button, the vacuum test program run screen is displayed, with Information about loss of pressure in the working chamber and the duration of the test.
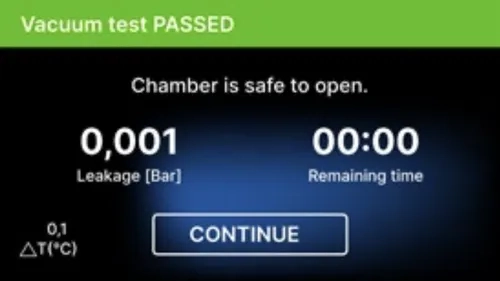 [Vacuum test PASSED]
When the test program ran successfully.
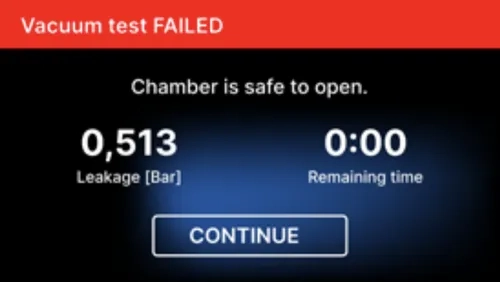
[Vacuum test FAILED]
When the test program did not run successfully.
After pressing the CONTINUE field, the welcome screen is displayed.
During the vacuum test the sterilizer chamber must be completely dry and cold. If not, the vacuum test may not be reliable even if the sterilizer is fully operational. When the test is complete a message indicating the result will appear on the display. If the result is negative check, clean or replace the seal, clean the front edge of the chamber and repeat the test. If the Vacuum test fails again, contact the supplier or manufacturer.
Bowie & Dick Test
The Bowie & Dick test, also known as the steam penetration test, simulates a small, highly porous load. To perform the test it is necessary to have a special test packet and placed inside the chamber. The package is not an accessory of the device, the user should purchase it on his own. This test evaluates the device’s performance in sterilizing loads of porous objects:
- Pre-vacuum performance and steam penetration.
- Temperature and pressure of saturated steam reached for a certain period of time.
How to run the test:
- The test must be carried out with an empty chamber in accordance with EN 13060.
- Place the Bowie-Dick test package in the chamber in the center of the tray.

After selecting the Helix / B & D test program and starting it with the START button, the program sequence screen is displayed.
Information about the process parameters is displayed.
The Helix / B & D test program can be stopped at any time by pressing the STOP field, which is associated with incorrect termination of the test.
When the test program is complete, alternating screens are displayed:
- [READY] Test complete / [READY] Chamber is safe to open.
- The process chamber of the sterilizer can be safely opened.

After opening the process chamber, the welcome screen is displayed.
The control test should be removed.
WARNING! The package will be hot.
To correctly interpret the test, refer to the instructions provided by the test manufacturer.
Open the package and remove the indicator chemical from the center of the package.

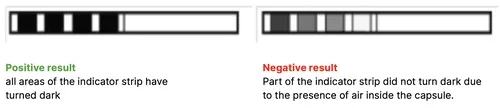
Positive result – The chemical indicator turned a uniform dark color over the entire surface.
Negative result – A bright field remained in the middle of the test because of the remaining air inside the tested device.
Any color change, uneven coloring of the test, indicates the presence of air during the test cycle due to a malfunction of the sterilizer. If the test result is abnormal, check the expiration date of the test pack and repeat the test.
Helix test
The Helix test corresponds to the sterilization of instruments with A-holes in accordance with EN 13060. It consists of a 1500 mm long tube open on one side and a closed test capsule on the other side. The indicator strip is inside the test capsule.

This test is used to evaluate the efficiency of the device in the sterilization of hollow and porous loads, in particular:
- Pre-vacuum performance and speed and uniformity of steam penetration.
- Saturated steam temperatures and pressures reached for a certain period of time.
How to run the test:
The test must be carried out with an empty chamber in accordance with EN 13060
Follow the test manufacturer’s guidelines
Place the test in the center of the tray in the chamber.
At the end of the cycle, open the sterilizer and remove the test.
WARNING! The test kit will be hot.
To correctly interpret the test, refer to the instructions provided by the test manufacturer. Open the capsule and remove the test strip.
Insufficient color change of the indicator strip fields indicates the presence of air during the test cycle due to a malfunction of the sterilizer. If the test result is incorrect, check the use-by date of the test pack, additionally check that the tubing is not clogged and obstructed, and repeat the test.
Information menu
The info menu is accessible by pressing the Info. button.
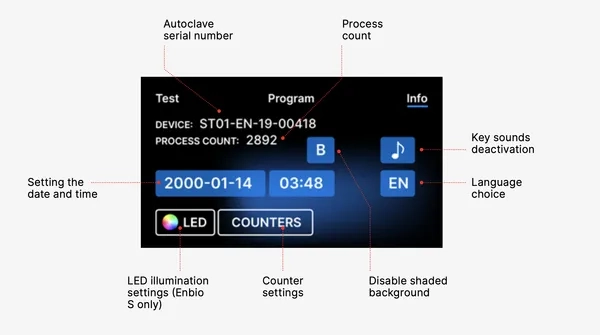
This level displays information about the unit type, serial number, number of processes performed and available USB memory space for saving process data, as well as the COUNTERS service menu – process counters for filter changes. It is also possible to change the date and time. To set the date or time touch the digits on the display. When a certain field is selected, it starts flashing and the arrows for changing the value up or down are displayed. This is how to set the date and time correctly. Pressing the number again confirms it and you can move on to changing the settings of the next parameter. In the same way, you can select the language by clicking on its abbreviation.
The button labeled B turns off and on the blue backlight in the depth of the screen.
Clicking the LED button launches the backlight control menu on the sides of the device.
Clicking a button button turns off the button sounds.
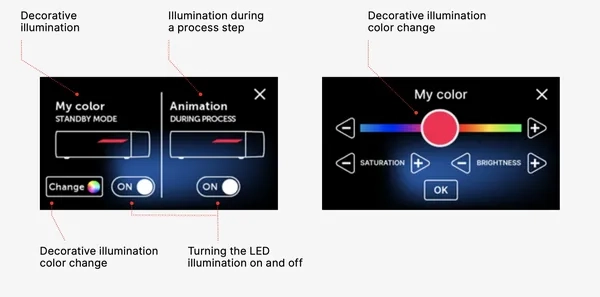
 LED lighting
LED lighting has two modes:
- Free mode, where the user (by moving the sliders) freely sets the colors, intensity and brightness of the light to their preference.
- Continuous mode that indicates the stages of the entire sterilization process with colors LED lighting is only available in ENBIO S.
Counters
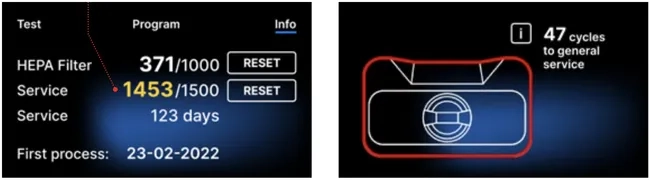
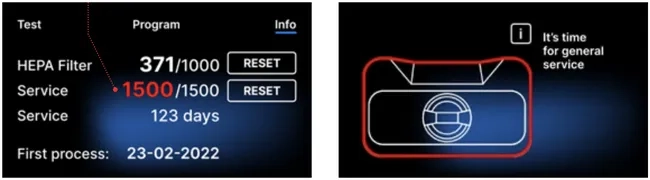
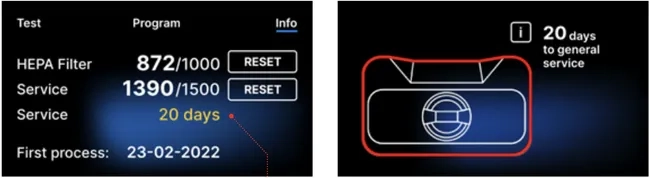
Enbio S and Enbio PRO sterilizers record the number of processes performed. This lets you know when you need to replace consumable parts and when a service inspection is due. ENBIO sterilizers count down to the required overhaul 12 months or 1500 processes from the time the first process was performed, whichever occurs first.
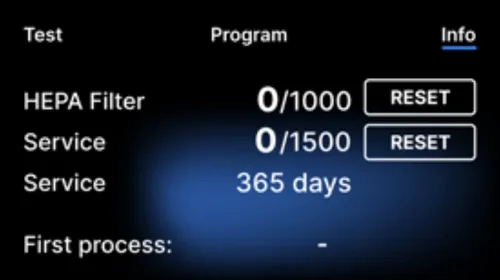
Counter section with the counters reset to zero. The number of processes performed is on the left, while on the right is the number at which the component should be replaced or a service inspection should be performed. After replacing the filter, the user can reset the values by pressing the RESET button. The value for the service check can only be reset by an authorized service technician.

If the process count exceeds 1450, the device will inform the operator or user of this via a warning screen and display this value on the counter screen:
If the process number in exceeds 1500, the device informs the operator or user to perform a mandatory periodical service.
20 days before the service due date, the device will inform the operator or user of this via a warning screen and display this value on the counter screen:
After 12 months of the first process, the device will inform the operator or user about the necessity to perform the service.
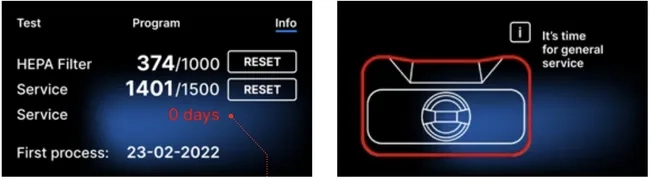
The counter can only be reset by Enbio or an authorized external service by selecting the RESET button on the counter screen and entering a unique service code.

Displaying the counter values in yellow or red does not block the operation of the unit. However, exceeding the required replacement time may have a significant impact on the operation of the unit and the sterility of the load. For replacement of individual components, please contact the manufacturer or supplier.
Restart
The restart of the process is forced when the user stops the process by pressing the STOP field, in the case of a power outage or an error during the process, for example lack of supply water.
If the STOP field is selected, the following messages are displayed alternately:
- the user has stopped the process
- equalizing the pressure in the working chamber
- process is incorrect, which means that the load is not sterile.
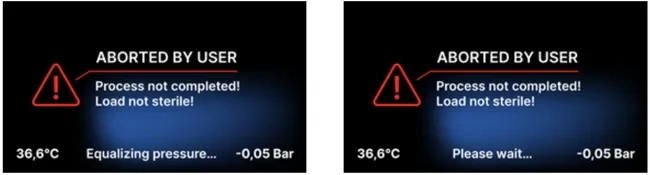
When the pressure in the working chamber is equalized, the following messages appear alternately on the display. Now you can open the device freely. After opening the chamber, the screen appears.
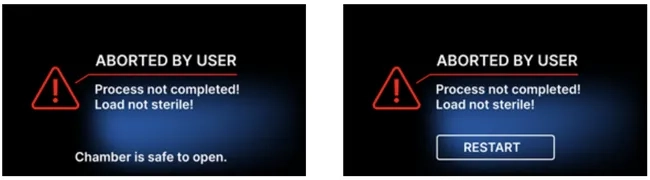
By selecting the field, we can return to the welcome screen. In the event of an error, we must additionally enter the 4-digit security code 0000. Entering this code is tantamount to the operator’s declaration that he is aware that the sterilization process has not been carried out properly and that the batch is non-sterile.

If an incorrect code is entered, a message will appear on the display.

Enter the code again. The arrow enables erasing incorrectly entered digits. After entering the correct code, a welcome screen will appear on the display of the device.
As always if you have any questions about this process or anything else please feel free to contact us and take advantage of our “FREE TECH SUPPORT.”
We also offer FREE VIRTUAL TECH SUPPORT to “See and Talk” with a “Real Time Live Technician” for any problems you may be in need of help with.
You can also use our “FREE MAINTENANCE PROGRAM”. Take the guesswork and worrying about what unit is due for maintenance and which maintenance cycle it is time for. We will keep track of all your autoclaves and let you know when it’s time for anything.