
Enbio Pro Installation Guide
Proper installation, operation and maintenance are the most important things to know in terms of autoclave ownership. Improper installation can lead to the machine not functioning properly. Improper operation can lead to complications with sterilization. And neglecting maintenance will ensure that your sterilizer will malfunction and cause long term damage.
But here at Sterilizer Autoclave Solutions, we make it our job to provide you with the proper knowledge to make sure everything goes smoothly for every phase of the process. We’ve written about the Enbio Pro, which you can find on our site here. But in this article, we’d like to focus on the proper instructions for installation on one autoclave in particular. We’ll be going over the installation instructions for the Enbio Pro with instructions provided by the manufacturer. That way, you can ensure that your installation is up to snuff and prevent any issues down the line.
If you have any questions about the Enbio Pro autoclave or anything else, please give us a call at 704-966-1650 Option 3 for our Free Tech Support line.
Installation and Preparation for Operation
Please read these operating instructions carefully before using the ENBIO S or ENBIO PRO.
During operation, observe the guidelines in these instructions as well as the applicable local health and safety rules. The ENBIO S and ENBIO PRO units are designed for self-assembly by the user and do not require specialized installation on site. The user is responsible for proper installation of the unit on site in accordance with these instructions.
HEPA Filter Installation
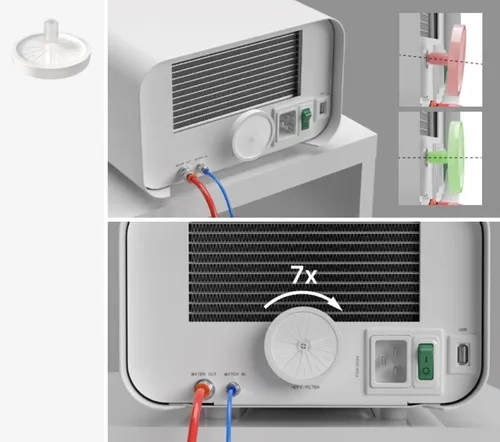
To protect the component during transport, a HEPA filter is not installed in the device. It was placed inside the chamber, on a tray. Take it out of the chamber, take it out of the bag and by yourself, carefully screw it into the slot provided for this purpose (see fig.). The filter should be screwed in by hand (approx. 7 turns) until resistance is felt – further screwing in will damage the filter and immobilize the sterilizer.
Feed Water Quality
It is unacceptable to use any liquids, solutions, chemicals, additives to the feed water – the device may be powered only with demineralized or distilled water of appropriate quality.
No chemicals or additives must be added to the sterilization water, even if they are specifically intended for use in steam generators, steam production or for use as additives in sterilization, disinfection, cleaning or corrosion protection.
The use of incorrect quality water or solutions other than water reduces the effectiveness of sterilization and leads to damage to the device and loss of warranty.
The total mineral content of the sterilization water must be less than 10 ppm or, in the case of conductivity measurement, it must be less than 15 μS/cm – therefore tap water cannot be used as feed water for the device.
The table below shows recommended water hardness and conductivity parameters for Enbio S and Enbio PRO sterilizers.
Permissible parameters of water used for sterilization
- hardness <0.02 mmol / l
- conductivity (at 20 ° C) <15 μS / cm
- pH – from 5 to 7.5
- chemical additives – none
![]() The use of water with an impurity content in excess of the above levels will damage the device and will void the warranty.
The use of water with an impurity content in excess of the above levels will damage the device and will void the warranty.
![]() The water in the supply tank should be replaced at least every three months (due to increased conductivity due to prolonged contact with air). If the tank is dirty, also change it to a new one. The tank should be closed with the attached stopper so that water does not deteriorate its chemical composition as a result of contact with air.
The water in the supply tank should be replaced at least every three months (due to increased conductivity due to prolonged contact with air). If the tank is dirty, also change it to a new one. The tank should be closed with the attached stopper so that water does not deteriorate its chemical composition as a result of contact with air.
![]() The guarantee granted by the manufacturer becomes void if the autoclave has been used with water of a quality inconsistent with the recommended.
The guarantee granted by the manufacturer becomes void if the autoclave has been used with water of a quality inconsistent with the recommended.
![]() If the autoclave is operated in a water recycling system using the Enbio Magic Filter,the filter must be replaced with a new one every 6 months or less when the resin has completely discolored to an amber color. As long as the blue color is visible, the resin hasstill water-purifying properties, i.e. water hardness <0.02 mmol / l and conductivity <15 μS / cm. In order to ensure the correct parameters of the water supplying the device, it is recommended to check the water tank at least quarterly. In the event of contamination, the tank should be emptied, cleaned and filled with new demineralized water. Failure to comply with these obligations may disrupt the sterilization process and will void the warranty on the sterilizer.
If the autoclave is operated in a water recycling system using the Enbio Magic Filter,the filter must be replaced with a new one every 6 months or less when the resin has completely discolored to an amber color. As long as the blue color is visible, the resin hasstill water-purifying properties, i.e. water hardness <0.02 mmol / l and conductivity <15 μS / cm. In order to ensure the correct parameters of the water supplying the device, it is recommended to check the water tank at least quarterly. In the event of contamination, the tank should be emptied, cleaned and filled with new demineralized water. Failure to comply with these obligations may disrupt the sterilization process and will void the warranty on the sterilizer.
Water Connection with Feed and Wastewater Tank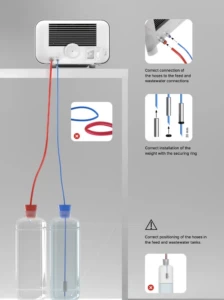
To connect the Enbio autoclave, you need 2 water tanks (feed and waste) of identical capacity, or a feed water tank and drainage access to the sewage system.
Connecting the WATER IN Feed Water
Connect the blue connection hose to the blue feedwater connection, which is marked on the rear panel of the WATER IN device. The tubing should be inserted into the connector, to the depth of the black line (placed on the tubing).
The other end of the blue tube should be immersed in the tank with the feed water. The device is equipped with a water suction pump, so it is not necessary to place the water tank above or on the same level as the device.
To secure and immobilize the water supply hose to the machine, use the plug supplied with the hose and insert the plug into the opening of the water supply tank. An unsecured tubing may jump out of the water and cause sterilization errors.
To prevent the hose from coiling in the water tank, install the included weight with a rubber ring at 2 cm from the end of the hose (fig.)
The minimum water load in the tank is 300 ml.
Remember and check that the blue tube is always immersed in the water.
Check the water level in the tank on a regular basis, depending on the frequency of the processes
Correct connection of the hoses to the feed and wastewater connections 20 mm
Correct installation of the weight with the securing ring
WATER OUT Wastewater Connection
Connect the red wastewater hose to the orange wastewater connector that is marked on the rear panel of the WATER OUT device. The tubing should be inserted into the connector, to the depth of the black line (placed on the tubing).
Wastewater should be discharged directly to the water and sewage system or to a special wastewater tank. If a tank is used, the other end of the red tube should be placed in the wastewater tank. To secure and immobilize the water drain hose from the machine, use the plug provided with the hose and insert the plug into the opening of the wastewater tank. The unsecured tubing may jump out of the tank and flood the room.
Make sure that the red tube is never immersed in water, otherwise the water will not drain properly, causing sterilization errors.
The wastewater tank or drainage outlet must always be located below the unit.
When using wastewater tanks, we recommend that you use tanks with the same capacity as the feed water tank. Their simultaneous replacement will protect against the possibility of wastewater overflow.
The water level in the tank should be checked on a regular basis, depending on the frequency of the processes.
Connection with Water Recycling (Enbio Magic Filter)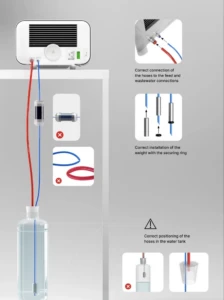
Enbio Magic Filter is a filter for recycling water used in the sterilizer. The ion-exchange resin contained in Enbio Magic Filter allows you to purify wastewater to the level of deionized water in accordance with the requirements of EN 13060 – that is, water which is recommended and approved for use with Enbio autoclaves. You only need 1 water tank to use Enbio autoclave with filter.
Connection of Feed Water WATER IN with Enbio Magic Filter
Connect the shorter part of the blue Enbio Magic Filter connection hose to the blue water supply connection, which is marked on the rear panel of the WATER IN device. The tubing should be inserted into the connector, to the depth of the black line (placed on the tubing).
Submerge the longer part of the blue Enbio Magic Filter hose into the feed water tank. The unit is equipped with a water intake pump, so there is no need to place the water tank above or at the same level as the unit
To ensure proper operation, Enbio Magic Filter must always be placed in a vertical position
To prevent the hose from coiling in the water tank, install the included weight with a rubber ring at 2 cm from the end of the hose (right.)
To secure and immobilize the water supply hose to the machine, use the plug supplied with the Enbio Magic Filter and insert the plug into the opening of the water tank. An unsecured tubing may jump out of the water and cause sterilization errors.
The minimum water load in the tank is 300 ml.
Remember and check that the blue tube is always immersed in the water.
Check the water level in the tank on a regular basis, depending on the frequency of the processes.
Correct connection of the hoses to the feed and wastewater connections.
Correct installation of the weight with the securing ring.
WATER OUT Wastewater Connection with Enbio Magic Filter
Connect the red wastewater hose to the orange wastewater connector that is marked on the rear panel of the WATER OUT device. The tubing should be inserted into the connector, to the depth of the black line (placed on the tubing).
Wastewater should be drained into a water tank. To secure and immobilize the water drain hose from the unit, use the plug supplied with Enbio Magic Filter and insert the plug into the opening of the water tank. The unsecured tubing may jump out of the tank and flood the room.
Make sure that the red tube is never immersed in water, otherwise the water will not drain properly, causing sterilization errors.
The water tank must always be located below the unit.
Setting Up the Device
- The unit should be placed on a flat, level surface. Do not use the unit if it is at an angle.
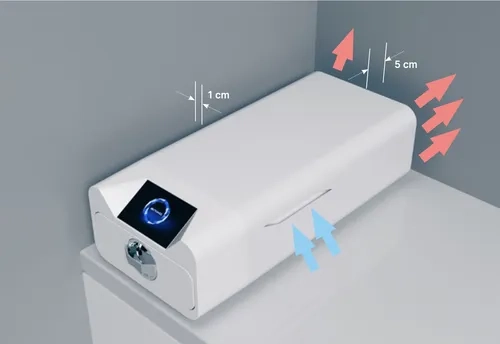
- Only demineralized or distilled water should be used in the devices. The use of incorrectly specified water reduces the sterilization efficiency and leads to loss of warranty due to damage to the device. Leave a space of 5 cm at the rear of the appliance and at least 1 cm at the sides of the appliance from walls or other elements for proper ventilation and fresh air access.
- The unit should be located to provide easy access to the main switch located on the rear panel of the unit.
- Do not place the unit near a sink with water or other places where the unit could be flooded – danger of short circuit.
- The device should be installed in a well-ventilated room, far from heat sources and rooms where mixtures of gases or liquids or other dangerous factors may arise.
The following conditions must be ensured for safe and efficient operation of the device:
- ambient temperature from + 5 ° C to + 25 ° C,
- relative humidity from 0 to 90%,
- storage temperature from -20 ° C to + 60 ° C,
- 0 to 90% relative humidity.
Connecting the Device to the Power Supply
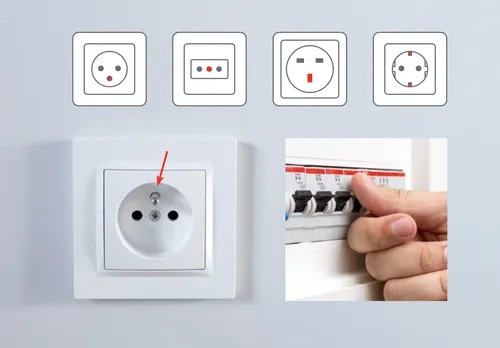
Connect the appliance only to power sources that are grounded and equipped with residual current protection, and that have the same voltage rating as the appliance.
It is unacceptable to use extension cords to connect the device to the power source.
Connecting the device to an incorrect power source may damage it and void the warranty.
As always if you have any questions about this process or anything else please feel free to contact us and take advantage of our “FREE TECH SUPPORT.”
We also offer FREE VIRTUAL TECH SUPPORT to “See and Talk” with a “Real Time Live Technician” for any problems you may be in need of help with.
You can also use our “FREE MAINTENANCE PROGRAM”. Take the guesswork and worrying about what unit is due for maintenance and which maintenance cycle it is time for. We will keep track of all your autoclaves and let you know when it’s time for anything.