
Tuttnauer EZ11Plus Maintenance Instructions Leave a comment
In this article, we’ll go over the maintenance process of the Tuttnauer EZ11Plus. And if you have any questions or just want to talk to someone, call our Free Tech Support at 704-966-1650 Option 3.
Preventive and Scheduled Maintenance 
The maintenance operations described in this chapter need to be followed as indicated to keep the device in good working condition. This maintenance schedule is the responsibility of the equipment owner and not covered under the warranty.
The majority of instructions that follow can easily be carried out by the operating personnel and do not require a service technician.
Should the need arise or the instructions in this section indicate, technical assistance or a service technician can be requested by either calling your dealer or Tuttnauer USA.
Daily
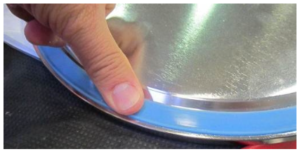
- Clean the EZ11Plus Door Gasket and outside rim of the chamber with a mild detergent, water and a soft cloth or sponge. The gasket should be clean and smooth. Be sure to clean the inside and outside of the gasket flap.
Weekly by the operator
- Once per week or after 20 cycles, clean and descale the chamber, copper tubes and the reservoir using Chamber Brite. Follow these instructions:
Cleaning Table Top Autoclaves with Chamber Brite
CHAMBER BRITE is a cleaning and descaling agent designed specifically for the cleaning and removal of water deposits, oxides and other sediments that are found in steam sterilizers. The material is a combination of acidic salts and additional cleaning materials.
Cleaning is an important part of maintaining your sterilizer.
Cleaning the autoclave chamber is a very simple, but important procedure to keep your sterilizer operating properly.
If the autoclave is not cleaned regularly, dirt and debris will build up and clog the tubing and valves.
This dirt can also be transmitted to the instruments during sterilization. In addition, a layer of dirt on the stainless steel chamber traps moisture against the metal and will lead to the chamber becoming porous and failing.
Cleaning Procedure
Items you will need to have on hand:
Chamber Brite
- For EZ11Plus models use one packet of CHAMBER BRITE.
Soft cloth or sponge
Drain hose (to drain water reservoir)
Pail (to drain reservoir water into)
Gloves
Nonabrasive stainless steel cleaner (for trays and tray rack)
Steam distilled water
![]() Important!
Important!
Please remember:
NEVER use bleach, steel wool, a steel brush or anything abrasive to scrub or clean the chamber, trays and tray holder.
Do NOT sterilize instruments during the chamber cleaning process.
Before using Chamber Brite, the autoclave chamber MUST be cold. If the chamber is hot, Chamber Brite will react and give off an odor.
All steps in this procedure must be completed without interruption.
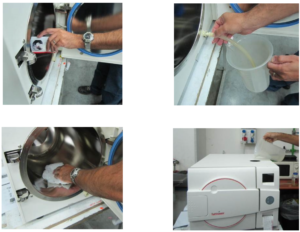
- When the autoclave chamber is cold, remove instruments trays and the tray holder from the autoclave. Starting with a hot chamber can result in burning of the Chamber Brite and the release of a strong odor.
- Open the door and spread the contents of one packet of Chamber Brite in a straight even line along the bottom of the chamber, from back to front. Do not leave a pile of Chamber Brite in one spot.
- Select the Chamber Brite Cleaning program, Close the door and start the cycle.
- At the end of the cycle open the door and drain the water from the reservoir.
- Fill the reservoir with steam distilled water or mineral free water only.
- Repeat the Chamber Brite cleaning cycle, BUT without using the Chamber Brite powder. This will remove any residue from the internal plumbing.
- At the end of the second cycle open the door and drain the water from the reservoir.
- Wipe the interior of the chamber with a damp cloth or sponge to remove any residue. Clean the water sensor in the rear of the chamber with a damp cloth or sponge. Cleaning the dirt off the sides of the sensor is more important than the tip.
- Fill the reservoir with steam distilled water or mineral free water only.
- The autoclave is now ready to use.
![]() IMPORTANT: DO NOT sterilize instruments during the cleaning process!!! CAUTION!
IMPORTANT: DO NOT sterilize instruments during the cleaning process!!! CAUTION!
Keep out of reach of children. Contains mildly acidic ingredients. Avoid contact with the skin, eyes or clothing. Wash hands well after touching the powder, in the case of eye contact flush with continuous running water for at least 15 minutes. If irritation persists get medical attention. If large quantities of this material are swallowed, call a physician immediately. Do not induce vomiting unless directed to do so by medical personnel. Never give anything by mouth to an unconscious person. If victim is conscious give water to drink.
Note: If cleaning the chamber with Chamber Brite is not possible then at a minimum follow these two steps.
- Once per week, drain the reservoir and fill with steam distilled water or mineral free water only.
- Clean the water sensor in the rear of the chamber with a damp cloth or sponge. Cleaning the dirt off the sides of the sensor is more important than the tip.
- Clean the tray holder and trays with a non-abrasive stainless steel cleaner and water, using a cloth or sponge. You may use diluted Chamber Brite solution as cleaning agent. To prepare this solution, pour one packet of Chamber Brite into 32 ounces of warm mineral-free water. Rinse the tray holder and trays immediately after cleaning with clean water to avoid staining the metal. Wipe dry with a cloth or paper towel.
![]() CAUTION! Do not use steel wool, steel brushes, bleach or any cleaning agent containing bleach or anything abrasive to clean the chamber, tray holder or trays. Doing so will damage the chamber and trays!
CAUTION! Do not use steel wool, steel brushes, bleach or any cleaning agent containing bleach or anything abrasive to clean the chamber, tray holder or trays. Doing so will damage the chamber and trays!
- Put 1-2 drops of oil, such as 3 IN ONE Oil, on the door pins and any moving parts of the door locking mechanism (See the figure below).
- Clean the outer parts of the autoclave with a soft cloth.
Periodically
- Once a month, check the safety valve.
- Once per month clean the water outlet strainer. Cleaning frequency may be reduced according to experience.
- Check the door gasket every 12 months, for cracks or damage and replace it if there is a tear or leakage.
- Replace the EZ11Plus HEPA Filter every 6 months or after 1000 cycles (whichever is the shorter period).
The following operations should be done by an authorized Tuttnauer service technician.
Once a year
- Check the continuity of the grounding connections.
- Perform validation of the autoclave as needed.
- Check the precise operation of the earth leakage relay (GFCI).
- Check that the autoclave is on a sturdy counter top and all the autoclave feet are present and properly adjusted.
- Check the safety elements; safety valve, cut-off thermostat and door locking mechanisms are functioning properly.
- Check the overall operation of the autoclave.
- Check the water reservoir, piping, plastic parts and electric wires are clean and in good condition.
- Check and tighten the piping joints to avoid leakage.
- Check and tighten all connections in the control box, heaters and valves and instrumentation.
- Check for dust build up on the fan or in the electronic box.
Once in 5 years
- Check the door and door locking mechanism for excessive wear.
- Perform safety tests: pressure vessel, efficiency, electrical, according to local rules or regulations.
Draining the Reservoir
![]() CAUTION! Before starting, make sure there is no pressure in the autoclave.
CAUTION! Before starting, make sure there is no pressure in the autoclave.
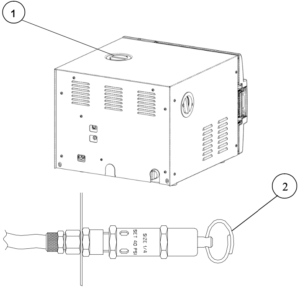
The EZ11Plus Drain Valve is located on the front right side of the autoclave after the door is opened (1). The function of the drain valve is to drain the water reservoir.
- Open the door
- Turn off the main power switch
- To drain the reservoir, use item (5) with the plastic hose (6) attached to it (supplied with the autoclave).
- Insert part (5) into valve (3) and press it in until you hear a click. The drain valve opens immediately, drain into a bucket.
- When the water reservoir is empty, press part (4), in an upward direction. Item (5) will be released and pop out approx. 3mm and the drain valve will be closed. Remove item (5) with the plastic tube.
- When you are ready, fill the reservoir with steam distilled water until it reaches the full level.
- Turn on the main power switch.
The autoclave is now ready for use.

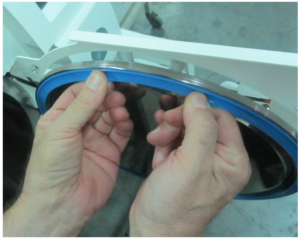
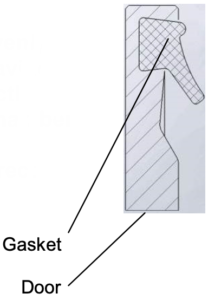
Replacing the Door Gasket
![]() To avoid injuries replace the gasket while the autoclave and autoclave door are cold.
To avoid injuries replace the gasket while the autoclave and autoclave door are cold.
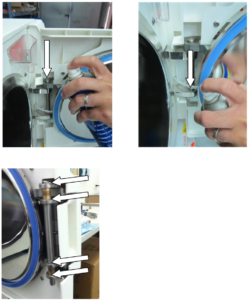
Pull the EZ11Plus Door Gasket from the door groove and install the new gasket referring to the directions below.
1.) Pull off the gasket from the groove.
2.) Clean the groove of any remnants of the old gasket (use a plastic scraper and plain water as needed).
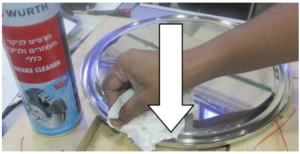
3.) Line the inside of both sides/walls of the gasket groove with a small amount of silicon lubricant. This can be sprayed in or brushed in depending on the type lubricant you use. Make sure to fully coat the inside of the groove.
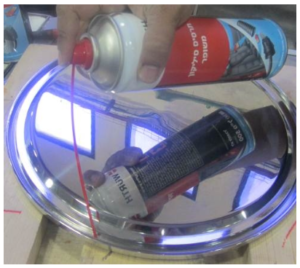
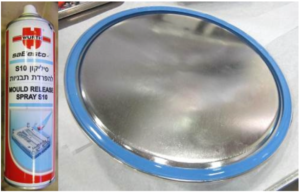
Note: It is necessary to use a silicone based lubricant such as Würth Silicone Lubricant or Dow Corning 111, when installing the door gasket.
![]() CAUTION! If insufficient lubricant is applied – replacing the gasket will be difficult. If excess lubricant is applied, the gasket will ‘spring’ out of the groove.
CAUTION! If insufficient lubricant is applied – replacing the gasket will be difficult. If excess lubricant is applied, the gasket will ‘spring’ out of the groove.
Place the gasket inside the groove and press it in with a finger or a tool using one continuous movement all the way around the groove.
![]() CAUTION!
CAUTION!
Make sure the gasket sits evenly without waves, humps, or cavities. If the door gasket is not perfectly smooth it will not seal the chamber properly
This drawing shows the correct direction of the gasket.
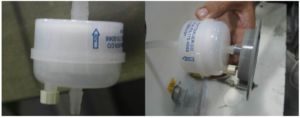
Checking the Safety Valve
(Located in the water reservoir)
In order to prevent the EZ11Plus Safety Valve from becoming blocked, it is necessary to open the valve under pressure. This will allow the steam to escape clearing the seat of the valve. Once per month, perform the following procedure:
- Operate the sterilization cycle according to the manual, but with no instruments.
- Allow a pressure of approximately 29 Psig (300KPA) to build up in the chamber.
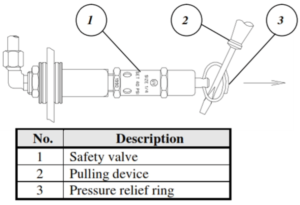
- Remove water reservoir cover (1).v
![]() CAUTION! The next step will expose you to hot steam. To avoid being burned by hot steam, keep all body parts away from the steam flow.
CAUTION! The next step will expose you to hot steam. To avoid being burned by hot steam, keep all body parts away from the steam flow.
- Pull the ring of the safety valve using a tool, i.e. screwdriver, hook etc. and open the safety valve ring for 2 seconds, and then release it. Be careful not to burn your hands.
- After 2-3 seconds the safety valve should close automatically.
- Press the START/STOP key to abort the cycle, and allow the steam to exhaust from chamber.
- Wait until the pressure goes down to zero, only then can the door be opened.
- If the safety valve closes properly the procedure was successful.
- If the safety valve does not close or leaks steam or water when it does close the safety valve needs to be replaced. This will require an authorized service technician.
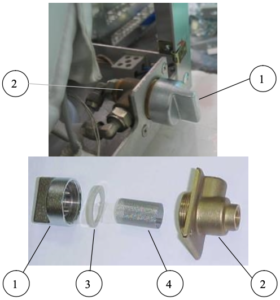
Cleaning the Water Outlet Strainer
![]() CAUTION! Before proceeding, Make sure that the electric cord is disconnected and there is no pressure or water in the chamber.
CAUTION! Before proceeding, Make sure that the electric cord is disconnected and there is no pressure or water in the chamber.
![]() WARNINGS!
WARNINGS!
1. The strainer’s cover can be HOT
Do not touch the strainer’s cap during and shortly after having run a cycle. The outlet strainer is in direct contact with the chambers exhaust line and can be very hot. Touching the hot strainer’s cap may cause severe injuries.
2. If this maintenance operation must be performed while strainer cap is hot, use heat resistant gloves to avoid injuries.
- Unscrew the water outlet strainer cap (1) from the strainer housing (2).
- Take out the gasket (3) and the strainer element (4).
- Rinse with water and clean the strainer, with a brush if necessary.
- Reinstall the gasket strainer element into the cap.
- Make sure the gasket is seated properly.
- Reinstall and tighten the strainer cap.
Note: Tighten the cap by hand, until tight.
Description
Cat. No.
1-4 Outlet strainer complete FIL175-0053
3 Teflon gasket 4 mm GAS082-0008
4 Strainer element FIL175-0046
Water Sensor Cleaning
It is required that the water sensor be cleaned at least once per week. Cleaning the sensor will ensure that the water level in the chamber is properly reported to the microprocessor all during the cycle.
The water sensor is located in the rear of the chamber, on the bottom right side. It is easily cleaned using a damp cloth or sponge; you may use a mild soapy solution if you like. It is important to wipe the sides of the sensor as well as the tip, to remove any dirt or debris that may have built up.

Replacing the HEPA Air Filter
![]() CAUTION! Before proceeding, make sure that the electric cord is disconnected and there is no pressure in the autoclave.
CAUTION! Before proceeding, make sure that the electric cord is disconnected and there is no pressure in the autoclave.
To facilitate drying the instruments with the door of the chamber closed, the EZ9Plus and EZ11Plus are equipped with an air pump and HEPA filter (0.2μm). During the drying stage the pump draws air through the HEPA filter and circulates that air through the heated chamber. This is designed to remove moisture from the wrapped instruments. A bacteriological HEPA filter is used to ensure that only highly filtered air is allowed into the sterile chamber.
Note: It is recommended to replace the HEPA filter every 6 months or after 1000 cycles (whichever is the shorter period). Surrounding conditions can make it necessary to replace the filter after a shorter interval of time.
The HEPA filter is located on the left side of the autoclave, this is to allow easy access for replacing it.
To replace the filter proceed as follows:
- Pull out the filter cover. The filter cover is held in place by plastic tabs. Rotate the cover until the tabs release, the cover will come off and the filter will come out.
- Disconnect the filter from the flexible tube.
- The filter and cover are pressed together. Place two fingers between the filter and the cover and while supporting the cover pull the filter and cover apart.
- Insert a new filter into the filter cover by pressing it into the filter seat. Make sure that the arrow on the filter body, which indicates the direction of air flow, points away from the filter cover.
- Reconnect the flexible tube.
- Replace the filter and cover by inserting and rotating it 1⁄4 of a turn.
Note: Make sure that you don’t bend the flexible tubing, in a way that will restrict the flow of air, when reinstalling the filter and reattaching the cover to the machine.
Emergency Door Opening
If there is no power to the autoclave and the door is closed the lock will be engaged. If you need to open the door, follow this procedure:
![]() Warning! Before opening the door, make sure that the autoclave is cold and there is no pressure in the chamber!
Warning! Before opening the door, make sure that the autoclave is cold and there is no pressure in the chamber!
Relieve Pressure from Inside the Chamber
Since the autoclave is not equipped with an analog pressure gauge, and the display is off (no electrical power), it is recommended to wait approximately two hours since the shutdown to verify that the pressure and temperature have decreased to ambient conditions.If it is necessary to open the door immediately, then follow these instructions to relieve the chamber pressure by opening the safety valve. The safety valve is located in the mineral-free water reservoir.
- Turn off the power switch and unplug the unit.
- Remove water reservoir cover.
- Pull the ring (3) of the safety valve using a tool, i.e. screwdriver, hook etc. (2). Pull the safety valve ring until steam ceases to escape from the safety valve. Be careful not to burn your hands.
![]() Warning! After relieving any residual pressure use caution when opening the door as left over water may spill out.
Warning! After relieving any residual pressure use caution when opening the door as left over water may spill out.
![]() Caution! This option is for emergency cases only! Before opening the door, always make sure that there is no pressure in the chamber and the electric cord is disconnected (See above).
Caution! This option is for emergency cases only! Before opening the door, always make sure that there is no pressure in the chamber and the electric cord is disconnected (See above).
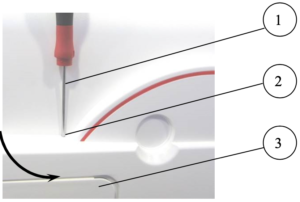
- Insert a 2 mm (0.08″) pin (1) into the hole (2) located above the door opening handle (3).
- Press the pin downwards and, simultaneously open the door by pulling the door handle (3) in the direction of the arrow (4).
- When the door handle starts to open remove the pin and finish opening the handle.
![]() Caution! If there is water in the chamber it will spill out when the door is open.
Caution! If there is water in the chamber it will spill out when the door is open.
As always if you have any questions about this process or anything else please feel free to contact us and take advantage of our “FREE TECH SUPPORT.”
We also offer FREE VIRTUAL TECH SUPPORT to “See and Talk” with a “Real Time Live Technician” for any problems you may be in need of help with.
You can also use our “FREE MAINTENANCE PROGRAM”. Take the guesswork and worrying about what unit is due for maintenance and which maintenance cycle it is time for. We will keep track of all your autoclaves and let you know when it’s time for anything.
EZ11Plus Door Gasket is Available Here.
EZ11 Plus HEPA Filter is Available Here.
EZ11Plus Drain Valve is Available Here.
EZ11Plus Safety Valve is Available Here.