
SciCan Bravo G4 Startup and Operation Guide
In this article, we’re going to use the official guide to help you in starting up and operating your new SciCan Bravo G4 unit! This setup guide is exact to the resources provided. But if you have any further questions or prefer to speak to a technician live, call our Free Tech Support at 704-966-1650 Option 3.
The time required to start the sterilizer is approximately 30 seconds.
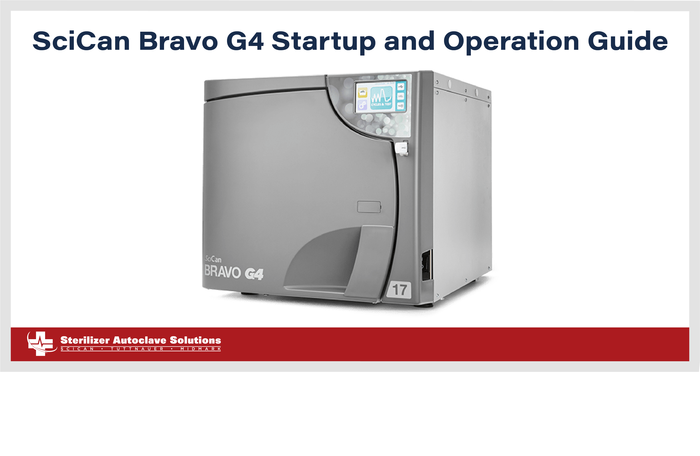
Starting
Once the sterilizer has been correctly installed, turn it on with the main switch on the right-hand side of the machine.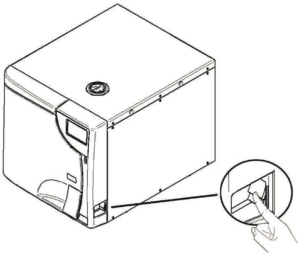
![]()
Do not turn on the sterilizer if USB key is inserted. The unit scans for new software updates anytime a USB key is inserted and the machine is turned on. Only insert the USB key when you need to download cycle reports and when performing software updates
Step 1 – Language Setting
 When the device is first turned on, the display shows the selection of LANGUAGE, DATE and TIME settings.
- Select the field with the arrows and confirm using ENTER.
- Use the arrow buttons to adjust the values.
- Confirm using ENTER and adjust the other fields.
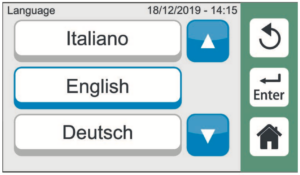
Step 2 – DATE Setting

Step 3 – TIME Setting
Step 4 – PREHEATING Settings
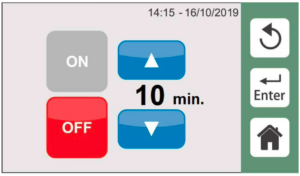
Once LANGUAGE, DATE and TIME have been set, the PREHEATING screen appears. See section PREHEATING in chapter SETTINGS in the User Manual to set the relevant parameters. The user can set the preheating time up to 720 minutes (12 hours).
If the device is already connected to Ethernet and IP address already acquired, the First Start Up procedure will proceed to Step 8.
Step 5 – Wifi networks research
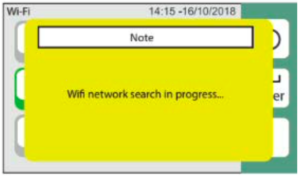
The device automatically searches for WiFi networks (max. 60 s).
If the device has an Ethernet connection but IP address not acquired, refer to Step 9 to complete the setup steps for connecting the device to Ethernet.
Step 6 – WiFi networks selection
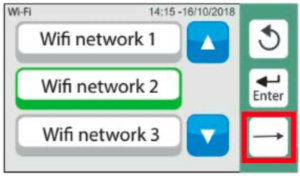
Select and confirm.
If connecting the unit to WiFi at a later date, use the SKIP button to move to the next startup step.
Step 7 – WiFi networks access
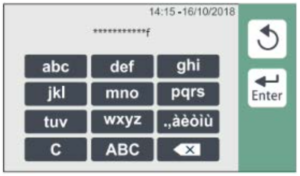
Insert the WiFi network access password and press ENTER to confirm.
Step 8 – CLOUD connection
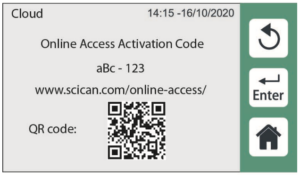 Then the cloud connection page is displayed. Refer to G4 Cloud paragraph (12.5 in the User Manual).
Press “home” to complete the first start procedure.
G4 Cloud Online Access Activation screen (if not previously setup) can be displayed at any time by clicking on the Cloud icon.
Step 9- ETHERNET connection
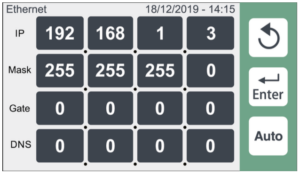
Manually enter the network parameters when the device is connected to Ethernet and IP address is not automatically acquired.
BRAVO G4’s WiFi-enabled G4 technology allows connection and access to cycle data from any computer or smart device with browser capabilities, allowing staff to focus on the most important thing in a dental practice, the patients. Maintenance reminders, instructions and software updates keep your BRAVO G4 in good working order. Should your unit experience an error, G4 technology can connect your unit to specialized technicians who can provide remote support that can minimize unnecessary downtime.
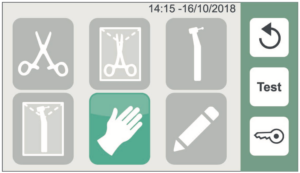
MAIN MENU
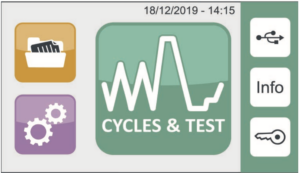
At the end of the starting procedure the main menu is displayed on the side.
The sterilizer waits for the program selection
FILLING DEMINERALIZED / DISTILLED WATER
Only use demineralized / distilled water having the following characteristics to supply the sterilizer.
Description Values in the Water Supply Values Inside Residual
DRY CONDENSATE < 10 mg/L < 1 mg/L
SILICONE OXIDE SiO2 <1mg/L < 0.1 mg/L
IRON <0.2mg/Ll < 0.1 mg/L
CADMIUM < 0.005 mg/L < 0.005 mg/L
LEAD < 0.05 mg/L < 0.05 mg/L
HEAVY METAL RESIDUES (iron, cadmium and lead excluded) < 0.1 mg/L < 0.1 mg/L
CHLORIDES < 2 mg/L < 0.1 mg/L
PHOSPHATES < 0.5 mg/L < 0.1 mg/L
CONDUCTIVITY AT 20° C / 68° F < 15 μS/cm < 3 μS/cm
pH VALUE 5-7 5-7
ASPECT colourless, transparent, without sediment colourless, transparent, without sediment
HARDNESS < 0.02 mmol/L < 0.02 mmol/L
MANUAL FILLING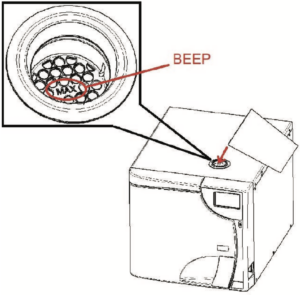
When filling the sterilizer for the first time (installation) and later, when the LCD screen displays the Water Low level warning, fill the reservoir until you hear the audible beep and the LCD displays the message the MAX Water level has been reached.
Remove the cap from the top cover. Pour in water taking care not to exceed the maximum level indicated inside the tank (MAX.). Put the cap back in the top cover.
Pay attention not to spill water on the machine; if water is spilled, promptly dry.
![]()
The tank must be filled before the cycle starts or after its completion. Do not open the tank doors during the cycle execution in order to prevent hot water leaks.
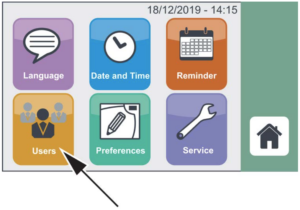
CONFIGURATION
The sterilizers offer a wide range of customizable options. The user can thus configure the device according to their own needs, adapting the performance based on, for example, the type of activity carried out, the type of material to be sterilized and the frequency of use.
The CONFIGURATION menu offers the user a wide possibility to customize various device functions, by means of a user-friendly interface.
Use the configuration program whenever necessary. A correct customization of the device provides the best performance.
SETTINGS
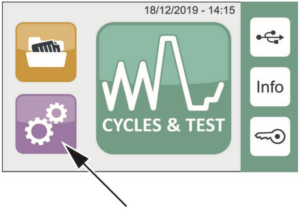
To enter the configuration program, select the icon shown on the side.
LANGUAGE
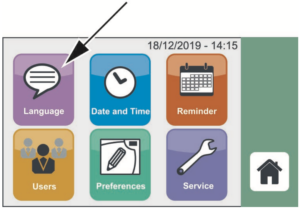
Select the LANGUAGE option.
Select the desired language by scrolling the list using the arrows and confirm by pressing ENTER.
DATE AND TIME
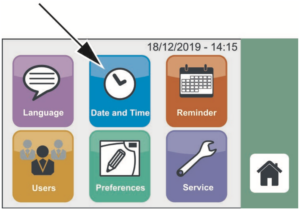
Select DATE AND TIME option.
Select the field to be modified using the arrows and confirm by pressing ENTER.
Select the field to be modified using the arrows and confirm by pressing ENTER.
REMINDER
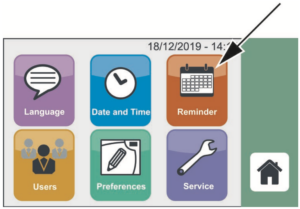
This function allows the user to set a specific interval for the display of a message recalling the execution of the relative test.
Select the REMINDER option.
Select if and when the Test reminders (Vacuum – B&D – Vacuum + B&D) should be enabled, using the available options.
Once the fields have been set, confirm by pressing ENTER.
Reminders activate at 8 a.m. of the selected day or upon switching ON the unit (if it occurs after 8 a.m.).
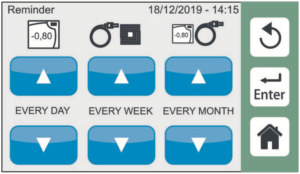
The user can choose between:
› Starting the test
› Postponing the test(the reminder appears again the next day)
› Ignoring the test (the reminder appears again at the next interval)
USERS
The users list can be edited with 30 users max. Press USERS button to enter the menu.
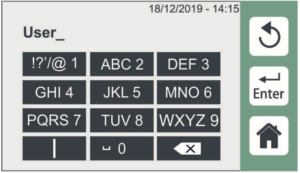
When using the device for the first time create the ADMIN user (identified by *) following the steps outlined below.
Fill in the fields inserting ADMIN user name and PIN. Press ENTER to confirm.
The first user entered is given administrator rights. If the user enters the pin incorrectly 3 times, it is necessary to use the unlocking procedure described in APPENDIX – USER PIN RESET.
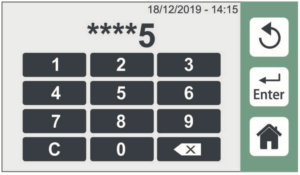
After you have entered the PIN, you can access the reserved administrator menu.
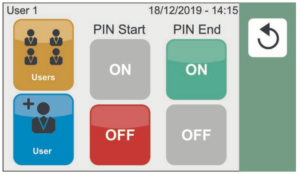
The ADMIN user can decide whether the sterilizer will ask for the generic user PIN at the cycle start (PIN Start) and/or at the end of the cycle (PIN End).
It is possible to activate either one of the two options or both.
By activating “PIN Start” the system requests the user to enter the PIN when the sterilization cycle starts.
By activating “PIN End” the system requires the user to enter the PIN at the end of the cycle before unlocking the door.
If PIN request is set at cycle start, press START to select the user and the relevant PIN.
Once the PIN is confirmed, the cycle starts automatically.
To create a new user, press the “+ User” button. Fill in the fields inserting user name and PIN. Press ENTER to confirm.
USERS LIST
Press USERS button to enter the menu.
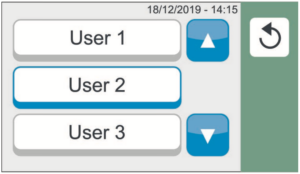
Select the desired user.
You will access the screen containing the data of the selected user.
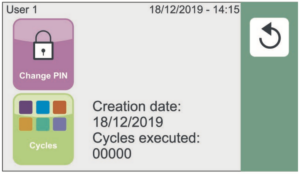
Once entered, a generic user can see only a summary of their data, or change their PIN (see entering PIN – the following is requested in sequence: current PIN, new PIN, new PIN confirmation).
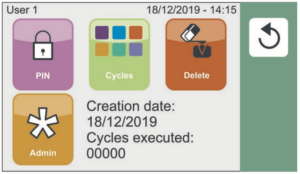
The ADMIN can instead:
- Give a generic user administration rights.
- Delete the user (a pop-up will be displayed to confirm the deletion).
- View Info on users.
Select the cycles that the selected user is enabled to perform by pressing the related icons.
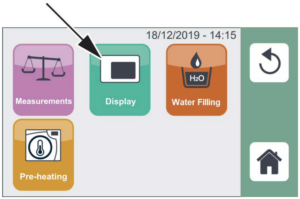
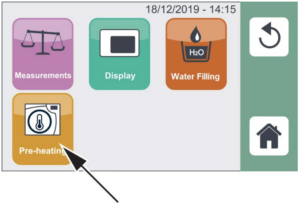
PREFERENCES
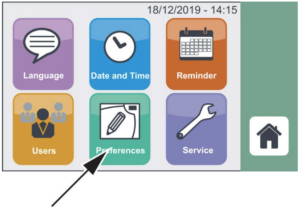
Press PREFERENCES button to enter the menu and set:
- Units of Measurement › Display
- Water Filling
- Preheating
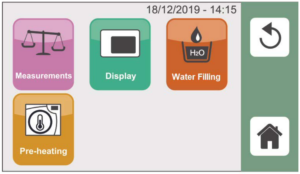
UNITS OF MEASUREMENTS
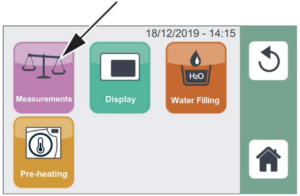
Press the MEASUREMENTS icon to set the desired units of measurement (temperature, pressure), the time (12 or 24 hours) and the date format using the cursors shown in the figure.
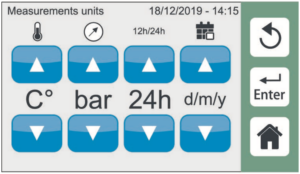
Press ENTER to confirm the settings.
DISPLAY
Press the DISPLAY icon to select the screen settings. The two cursors respectively adjust:
- Screen Saver activation time-out
- Screen brightness
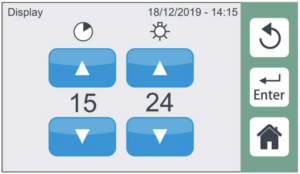
Press ENTER to confirm the settings.
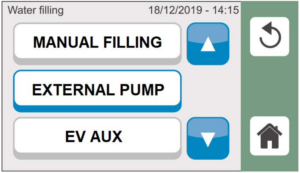
WATER FILLING
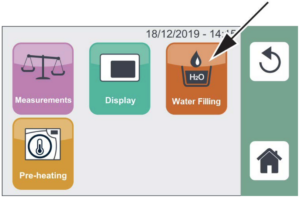
Press the WATER FILLING icon to choose the type of water filling.
Available options include:
- Manual filling
- External pump, automatic filling kit › H2O AUX EV kit (AUXSV)
The device should be turned on when connecting the water system. The unit’s factory default fill setting is set
to manual. When you plug one of the external automatic water filling devices into the rear port, the LCD will automatically display the water filling option screen so you can select the appropriate device.
If connecting the filling system when the sterilizer is off, access the menu via the configuration program and manually select the correct option.
This menu can also be used to temporarily deactivate the automatic filling system (filters exhausted, fault, etc.) and go to manual tank filling, keeping the automatic filling system connected.
PREHEATING
Select the PREHEAT icon to activate PREHEATING in the sterilization chamber.
The preheating max temperature settings are: 50°C/122°F with door open
100°C/212°F with door closed
Keep the door closed, while not running the sterilization cycle, in order to ensure the preheating achieves the max temperature level.
The user can set preheating time up to 720 minutes (12 hours)
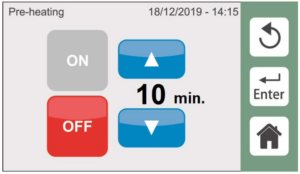
Select ON to activate PREHEATING.
Confirm by pressing ENTER.
The arrows allow setting the maximum operating time, after which the warming is disabled.
The preheating menu is displayed when the sterilizer is started for the first time, after selecting the language and date/time options.
The preheating is active (on) by factory default.
SERVICE
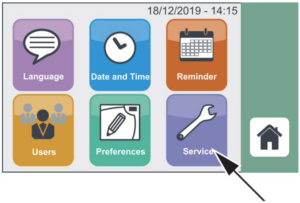
This menu is intended for the Technical Service department.
It can be used only by an authorized technician.
As always if you have any questions about this process or anything else please feel free to contact us and take advantage of our “FREE TECH SUPPORT.”
We also offer FREE VIRTUAL TECH SUPPORT to “See and Talk” with a “Real Time Live Technician” for any problems you may be in need of help with.
You can also use our “FREE MAINTENANCE PROGRAM”. Take the guesswork and worrying about what unit is due for maintenance and which maintenance cycle it is time for. We will keep track of all your autoclaves and let you know when it’s time for anything.
The SciCan Bravo G4 17L unit is available for purchase here.
The SciCan Bravo G4 21L unit is available for purchase here.