

Sterisil AC+ Autoclave System Maintenance Instructions Leave a comment
Int his article, we’ll go over the maintenance instructions for the Sterisil AC+ Autoclave System. And if you just want to talk to someone, call our Free Tech Support at 704-966-1650 Option 3.
ANNUAL KIT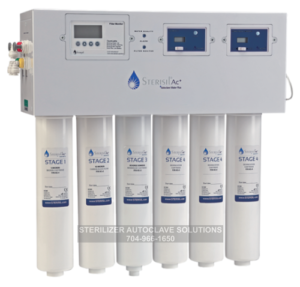
Stages 1, 2, 3, and the UV Light’s lifespan are chronological and are replaced annually from the date of installation. Their lifespan is tracked via the Filter Monitor on the far left side of the system. When properly programmed, the Filter Monitor tracks the remaining months of the cartridges and UV Light life.
STAGE 4 CARTRIDGES
Stage 4 Cartridge readings are based on the quality of water coming off them. Water quality readings can be found on the far right monitor. When the reading on the Water Quality Monitor degrades to 10ppm on D1, the audible alarm will sound, and the “Autoclave Water Quality” indicator lights on the front of the system and at the white Autoclave Faucet Disc, will illuminate red. At this point, the leading (left-most) Stage 4 will need to be changed.
LOG READINGS (METHODOLOGY)
Because much of the system health is based on rates of reduction, it is important to log and monitor water quality readings. Notating the water quality readings for the Source, RO, D1, and D2 will expedite a solution if the need arises to contact Sterisil® customer service.
FILTER MONITOR (FAR LEFT)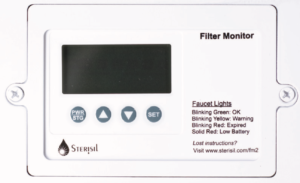
The Filter Monitor, when properly programmed, tracks the remaining lifespan in months for stages 1, 2, 3, the UV Light. Month counts will always descend from a 12 month starting point. When the month count reaches 0, an audible alarm will sound and the word “change” will appear in the upper portion of the Filter Monitor. At this point, Cartridges 1-3 and the UV Light will need to be changed.
When the batteries in the Filter Monitor are ready to be changed, the system will beep intermittently, and a battery icon will appear in the upper center of the Monitor display.
RO WATER QUALITY MONITOR (CENTER) 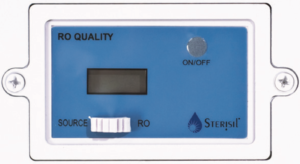
The RO Monitor gives both source and RO water quality readings. To get the source water quality, ensure the Monitor is on with the white switch in the left hand position. To get the RO reading, ensure the Monitor is on with the white switch in the right hand position. To attain the most accurate reading, run the water for 30 seconds prior to taking the reading.
DI WATER QUALITY MONITOR (FAR RIGHT) 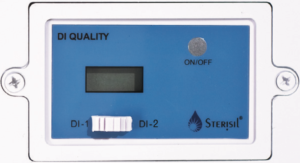
The DI Quality Monitor gives water quality readings for all Stage 4 Cartridges. DI-1 refers to the leading (left-most) Stage 4 Cartridge. To get the water quality reading for DI-1, ensure the Monitor is on with the white switch to the left. DI-2 refers to the secondary (right-most) Stage 4 Cartridge. To get the water quality reading for DI-2, ensure the Monitor
is on with the switch to the right.
STEP BY STEP FILTER REPLACEMENT INSTRUCTIONS
Thanks to internal valving, cartridge change outs are simple and easy. It is not necessary to shut off the source water from the supply tee. Water flow is automatically shut off when a cartridge is removed. Please have a towel nearby for excess water in cartridges.
IMPORTANT: After installing the new cartridges and UV light, please read the Monitor Reset Instructions to properly reset the Filter Monitor.
- Before removing a cartridge, place a large “X” on the cartridge to be replaced to avoid any confusion when the new cartridge is introduced.
- If you are changing the Stage 3 Cartridge, it will be necessary to remove Stage 1 and close the
Reserve Storage Tank before replacing. To fully unscrew the Stage 3, remove the stem elbow from the bottom of the cartridge. Simply push in on the collet and pull out on the stem elbow to remove. You will reinstall the stem elbow by pressing the fitting into the collet once the new Stage 3 Cartridge is in place. - To remove a cartridge, rotate counter clockwise until the cartridge is free of the valve head. A small amount of water may escape during this process. Don’t panic, this is normal.
- Before placing a new cartridge in the system, write the installation date in the space provided on the label. Remove the yellow cap from the top of the cartridge, and rotate the cartridge clockwise into the valve head to secure it. Ensure cartridge is fully screwed in.
- Reprogram the Filter Monitor. Reference Reset Monitor Instructions located at www.sterisil.com.
- The final step when changing cartridges is to run water for 60 seconds. For change outs on Stages
1-4, close the Reserve Tank and run the autoclave water. - Open all tanks to finish.
- Cartridges can either be discarded in the trash or returned to Sterisil® for recycling. For more
information on our recycling program visit sterisil.com/recycle.
REPLACING THE UV LIGHT
- Unplug the bulb from the unit. Do not look at the light when on. The ultraviolet light can cause eye damage.
- Use a flat head screw driver to pry out the white/clear piece and remove light.
- Insert the new bulb until it clicks into place.
IMPORTANT: Do not touch the bulb. Grease from hands can cause damage to the lamp.
As always if you have any questions about this process or anything else please feel free to contact us and take advantage of our “FREE TECH SUPPORT.”
We also offer FREE VIRTUAL TECH SUPPORT to “See and Talk” with a “Real Time Live Technician” for any problems you may be in need of help with.
You can also use our “FREE MAINTENANCE PROGRAM”. Take the guesswork and worrying about what unit is due for maintenance and which maintenance cycle it is time for. We will keep track of all your autoclaves and let you know when it’s time for anything.
Sterisil AC+ Autoclave System Installation Instructions Available Here