
CPAC RH-Pro9 Operation Guide
Here at Sterilizer Autoclave Solutions, we always continue to highlight the core elements of the ownership process: installation, operation and maintenance. Which is why we have a large library of resources and guides for anyone to access to help them through these processes.
In this article, we’d like to focus on a guide for one autoclave in particular. A High-Velocity Hot Air sterilizer from CPAC, their RH-Pro9. HVHA sterilizers are much different than your typical steam sterilization, and because of that, they sometimes fall to the wayside. But the RH-Pro9 helped CPAC to bring the HVHA into the modern autoclave market. Here, we’re going to look at the operation guide for the CPAC RH-Pro9, to ensure proper day-to-day use of the sterilizer with instructions from the manufacturer.
If you have any questions about the CPAC RH-Pro9, autoclaves or anything else, give us a call at 704-966-1650 Option 3 for our Free Tech Support Line. Our technicians will help you with any questions you have about your ultrasonic cleaners.
Materials Compatibility, Preparation, Loading, and Processing
Instrument and Materials Compatibility Operation at 375°F – For a high-velocity hot air (HVHA™) sterilizer operating at 375°F (191°C), most of today’s instruments and their components are constructed of materials that are not subject to damage at this elevated temperature. Standard hand pieces, pliers, and cutters are typically composed of 440-C stainless steel or other high-temperature resistant metals (including solders) and high-temperature materials such as fluoropolymers, polyamideimides (Torlon), Viton, phenolics, polyimides, and silicones.
Operation at Low-Temperatures– Selection of operational temperature can be based on an instrument manufacturer’s maximum temperature recommendation. Devices that have been traditionally made of or contain a temperature resistant plastic compatible only with autoclave temperatures, such as Polypropylene (PP), should be compatible with 280°F and 300°F operational temperatures.
Operation for N95 Mask Decontamination– The operational temperature setting for the N95 Decontamination cycle is set for 180°F and for most N95 masks should be thermally compatible with the materials used for mask construction, most specifically the polyester filtration materials, elastic bands, nose cushioning, and adhesives.
WARNING – INSTRUMENT PROTECTION Before sterilizing instruments in the RH-Pro9/RH-Pro11, check with the instrument manufacturer to ensure material compatibility with the process temperature selected. Always use instrument pouches and wrap compatible with that temperature.
Cleaning Instruments
All instruments are to be cleaned, rinsed, and dried thoroughly according to manufacturer’s instructions. Excess water will vaporize at the sterilizer’s elevated temperatures and potentially interfere with the sterilization process. ▪ All instruments, including those that have been placed in a holding, ultrasonic, or cold chemical disinfectant solution, must be thoroughly rinsed in water (preferably distilled or de-ionized water to minimize instrument staining or spotting) and thoroughly dried before sterilization
Any instrument that has been alcohol rinsed must be thoroughly dried before placement in the sterilizer. Any instrument subjected with any other chemical solvent must have that solvent removed before instrument placement into the sterilizer. Failure to remove alcohol of any other chemical solvent may cause flammable or explosive incident, causing instrument/ sterilizer damage, or injury to the operator. ▪ Failure to thoroughly remove extraneous agents prior to sterilization could lead to surface staining of instruments.
Loading Instrument Trays
Heated air flow is an extremely important component of heat conduction and instrument sterilization. Placement of pouched instruments and unwrapped instruments should be in a loading configuration that does not impinge on airflow to an instrument or to pouched instruments.
Pouches or sterile wrap must be compatible with the higher temperatures used in the RH-Pro9/RH-Pro11 (up to 380°F; 193°C) and must be cleared by the FDA for use in a dry heat environment. It is recommended that the pouches and wrap offered by CPAC Equipment, Inc. be used for assurance of quality.
Use instrument trays provided with the RH-Pro9/RH-Pro11 that have been designed to provide required hot airflow from all directions to unwrapped and wrapped/pouched instruments.
Wrapped pouched instruments are to be placed flat within the tray, but instruments must not be stacked or have any overlap to provide the airflow necessary for sterilization. ▪ Instruments or pouches must fit within the tray.
Trays must be fully inserted into the sterilization chamber to assure full airflow to instruments.
Operation of the RH-Pro9/RH-Pro11
Before Running Your First Sterilization Cycle
- Before starting the sterilizer, open the door and visually inspect the heating chamber. Clean and wipe as needed with mild soap and a damp cloth or any non-abrasive cleaner. Unit can be externally disinfected with the disinfectant of your choice.
- ▪ Check for obstructions to cooling air supply on back panel (maintained distance from wall) and clean exterior air exhaust filter if required.
- ▪ Check seal around door to ensure it is clean and free of obstructions.
- ▪ Close sterilizer door and turn handle counterclockwise into fully closed position.
Perform “Start-of-Day” Sterilizer Preheating Procedures”
▪ Check to ensure “Time and Day” are accurate and re-set if necessary. This is to ensure cycle documentation is properly timestamped when stored for later retrieval. Press any active MENU button which leads to the “Select Item” screen. “Set Time and Date” is the first listing. Select and follow screen instructions.
IMPORTANT NOTE BEFORE RUNNING FIRST STERILIZATION CYCLE OF THE DAY CHECK TO ENSURE THAT THE “TIME AND DAY” SETTINGS ARE ACCURATE TO ENSURE THAT STORED CYCLE DOCUMENTATION IS PROPERLY TIME-STAMPED.
“Start-of-Day” Sterilizer Preheating Procedures
At the start of the day the RH-Pro9/RH-Pro11 will require time to pre-heat the internal metal and insular components that serve as a heat sink to the heated air of the system. “Start-of-Day” sterilizer heating process includes the heating of the chamber to cycle temperature and holding that temperature for 10 minutes. Close the door, ensuring the handle is in the fully closed (vertical) position. The On/Standby button will show an illuminated blue LED when electric power is present, and the sterilizer is in its “standby” mode. With the door closed and handle in full vertical position, press the On/Standby button to activate the sterilizer. The blue LED in the On/Standby button will go dark after being pressed.
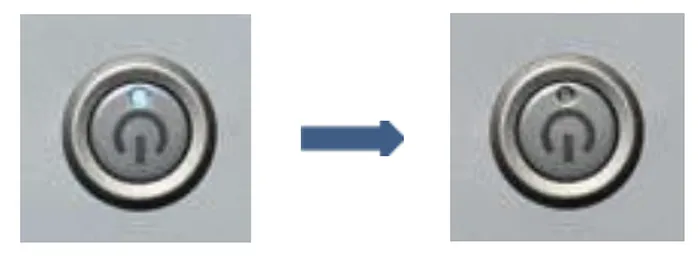
Allowing about 15-20 seconds after pressing the On/Standby button will result in the following screen sequence:

Select the Operating Temperature Cycle desired for the first sterilization cycle of the day. Pressing the desired cycle will lead to the following sequence for the “Cold Start” or “Start-of-Day” sterilizer chamber heating process:
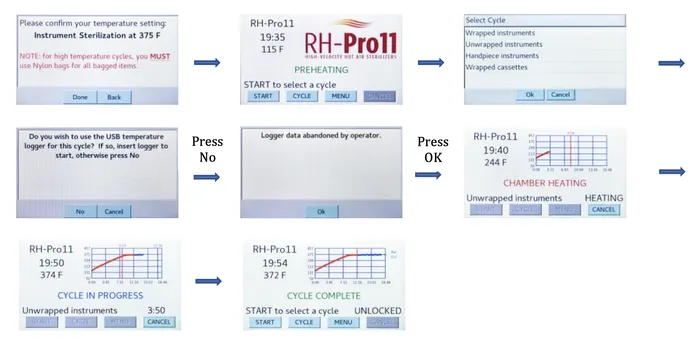
The RH-Pro9/RH-Pro11 is now ready for instrument sterilization. The complete process takes approximately 22-24 minutes from a cold start depending on cycle temperature selected.
Selection of Desired Temperature Cycles
The RH-Pro9/RH-Pro11 offer three Operating Temperature Cycles: High-Temperature (375°F), Low-Temperature (280°F, 300°F, and 320°F), and N95 Mask Decontamination (176°F). Another Operating Temperature Cycle can be selected by pressing any active “CYCLE” button. “CYCLE” will reboot the sterilizer to the main “Select Operating Temperature Cycle” screen as sequenced:

It is important to note when selecting a lower operating temperature than the previous cycle utilized that the residual chamber temperature may still be over the operating temperature limit for the lower temperature cycle. If this occurs, the following screen appears:
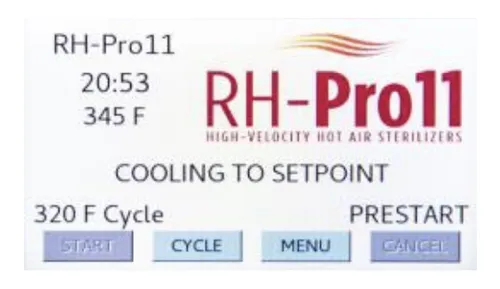
To remedy this condition, open the chamber door to expedite chamber cooling.
Use of the Time-Temperature Logger
The CIR™ Thermo-sensor may be used for Low-Temperature cycle validation documentation or for routine use as a replacement of a chemical indicator/integrator to corroborate the proper time-temperature conditions at the site of an instrument. Initiation of the CIR logger function begins with pressing the “START” button on “PREHEATING”, “READY”, or “CYCLE COMPLETE” screen. Resulting screen sequence is as follows:
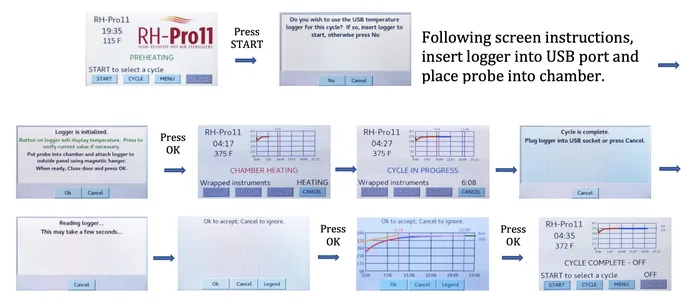
Cycle data from both the CIR Thermo-sensor and the sterilizer’s internal thermocouple recorded into the sterilizer’s computer for later downloading onto a flash drive. It should be noted that insertion of an incompatible time-temperature logger in the USB port will result in the following error message screen:
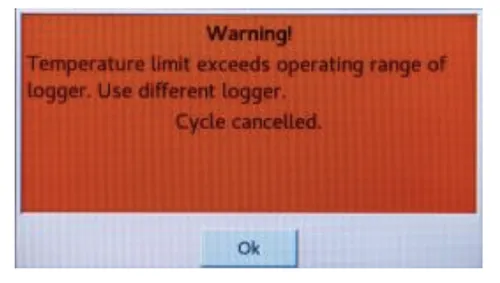
IMPORTANT NOTE – NEVER PLACE THE LOGGER INTO THE STERILIZER CHAMBER. ONLY THE THERMOCOUPLE PROBE AND ITS ASSOCIATED LOGGER CONNECTION WIRE ARE COMPATIBLE FOR THESE INSTRUMENT AND MASK PROCESSING TEMPERATURES.
High Temperature Cycle Operation
High-Velocity Hot Air Sterilization Principles
The RH-Pro9/RH-Pro11 sterilizer utilizes dry, rapidly flowing air to sterilize instruments. This process is both a heat conduction and heat convection process and requires that all instruments be directly subjected to the hot, high velocity moving air. In the RH-Pro9/RHPro11sterilizer, airflow moves constantly through the instrument tray from the left to right of the sterilizer chamber.
- Airflow can be restricted by the misplacement of instruments and packaging, which may interfere with the performance of the sterilizer.The four sterilization cycles offered are each unique in their capacity, loading limitations, and restrictions.
- Adherence to these limitations and restrictions is required for assuring performance specifications.
- As with any sterilization technology, it is imperative that all instruments be clean, dry, and free of any organic or chemical residues.
- Only those instruments and pouches that have been demonstrated to be compatible with a temperature of 380°F (193°C) can be sterilized in the RH-Pro9/RH-Pro11 sterilizer.
Pre-set Sterilization Cycles
The RH-Pro9/RH-Pro11sterilizer is equipped with four pre-programmed sterilization cycles, each representing the time required to achieve a 6-Log reduction of bacterial spores plus a Sterility Assurance Level (SAL) of 6 Logs for:
- Unwrapped Instruments
- Unwrapped Handpieces
- Wrapped Instruments
- Wrapped Cassettes
Note: The conditions presented below for Unwrapped Solid Instruments, Unwrapped Handpieces, Wrapped Instruments (including Handpieces), and Wrapped Cassettes have been derived from thermocouple and biological efficacy studies to assure the sterility performance of the sterilizer. It is the responsibility of the operator to adhere to the conditions set below under each cycle setting. Any deviation in the pre-set times, sterilization temperature, maximum instrument weights per tray or per instrument, or load configuration may jeopardize the efficiency of treatment.
Sterilization Cycles – Capacity Restrictions and Limitations
Unwrapped Instrument Sterilization
▪ To sterilize unwrapped instruments, place them into the instrument tray under the loading and capacity limitations and restrictions noted below for the “Unwrapped Instruments” Cycle. Instruments sterilized in the “Unwrapped Instruments” Cycle may reach 375°F (191°C) by the completion of the cycle.
▪ Place the tray into sterilizer by sliding the tray all the way to the rear of the heating chamber. Close the door ensuring the handle is in the fully closed (vertical) position.
▪ Touch “Start” on keypad, select “Unwrapped Instruments.” Door will lock and sterilization cycle will initiate once the chamber has reached 375°F (191°C). ▪ At the end of the cycle, a beep will sound and “CYCLE COMPLETE” will appear on the keypad. The door will unlock for instrument removal.
▪ Immediately after opening the door, use heat-resistant gloves to slide the tray out of the chamber. The tray containing the sterilized instruments will remain hot-to-the-touch for approximately 10-15 minutes.
▪ After the sterilization cycle, immediately cover theunwrapped instrument(s) with a sterile cover to prevent environmental pathogens from causing instrument contamination. After cooling, retain sterile covering while transporting for immediate use to patient. Do Not Store Instruments for Future Use.
▪ Shut sterilizer door and turn handle to the vertical closed position to retain temperature in the sterilizer chamber.
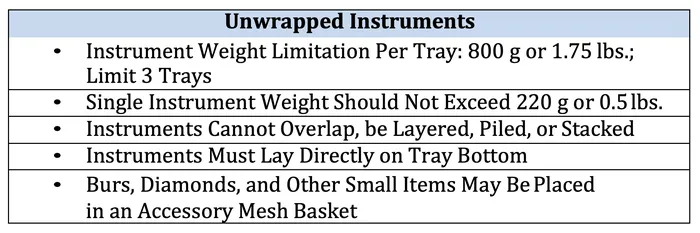
Unwrapped Handpiece Sterilization
To sterilize unwrapped handpieces, place them into the instrument tray under the loading and capacity limitations and restrictions noted below for the “Unwrapped Handpieces” Cycle. Instruments in the “Unwrapped Handpieces” Cycle may reach 375°F (191°C) by the completion of the cycle.
▪ Place the tray into sterilizer by sliding the tray all the way to the rear of the heating chamber. Close the door ensuring the handle is in the fully closed (vertical) position.
▪ Touch “Start” on keypad, select “Unwrapped Handpieces”. Door will lock and sterilization cycle will initiate once the chamber has reached 375°F (191°C).
▪ At the end of the cycle, a beep will sound and “CYCLE COMPLETE” will appear on the keypad. The door will unlockfor instrument removal.
▪ Immediately after opening the door, use heat-resistant gloves to slide the tray out of the chamber. The tray containing the sterilized handpieces will remain hot-to-the-touch for approximately 10-15 minutes.
▪ After the sterilization cycle, immediately cover theunwrapped instrument(s) with a sterile cover to prevent environmental pathogens from causing instrument contamination. After cooling, retain sterile covering while transporting for immediate use to patient. Do Not Store Instruments for Future Use.
▪ Shut sterilizer door and turn handle to the vertical closed position to retain temperature in the sterilizer chamber.
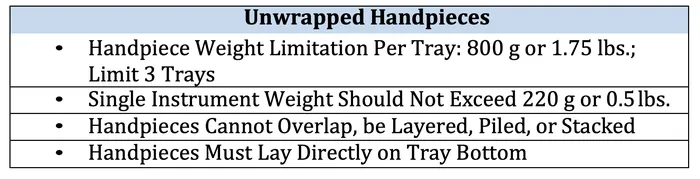
Wrapped Instrument Sterilization
▪ To sterilize pouched handpieces or pouched instruments, place them into the instrument tray under the loading andcapacity limitations and restrictions noted below for the “Wrapped Instruments” Cycle.
▪ Instruments in the “Wrapped Instruments” Cycle will not exceed 375°F (191°C) by the completion of the cycle. In most instances the temperature threshold of the instruments will not exceed 350°F (177°C).
▪ Place the tray into sterilizer by sliding the tray all the way to the rear of the heating chamber. Close the door ensuring the handle is in the fully closed (vertical) position. ▪ Touch “Start” on keypad, select “Wrapped Instruments”. Door will lock and sterilization cycle will initiate once the chamber has reached 375°F (191°C).
▪ At the end of the cycle, a beep will sound and “CYCLE COMPLETE” will appear on the keypad. The door will unlock for instrument removal.
▪ Immediately after opening the door, use heat-resistant gloves to slide the tray out of the chamber. The tray containing the sterilized instruments will remain hot-to-the-touch for approximately 10-15 minutes.
▪ Shut sterilizer door and turn handle to the vertical closed position to retain temperature in the sterilizer chamber.
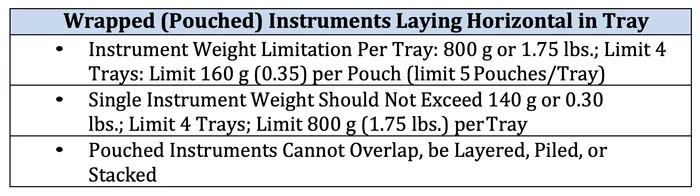
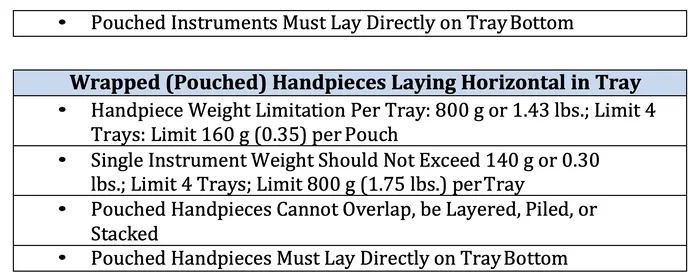 Wrapped Cassette Sterilization Instructions
This cycle is required for instruments housed in metal cassettes or organizers and pertains to both pouched and sterile wrapped cassettes (packs). Plastic cassettes are incompatible with the HVHA sterilization process. Cassette sizes compatible with RH-Pro trays are those designated quarter- (~2½-3.0”x 8”x 1¼”), half- (~5½”x 8”x 1¼”), and full- (~8”x 11”x 1¼”) size and include both single- and double-tiered configurations.
It is important to note that both pouches and sterile wrap must be compatible with the HVHA sterilization process.
ONLY USE CPAC NYLON POUCHES, PAPER WRAP, AND DRY HEAT STERILIZATION TAPE THAT HAVE BEEN RECOMMENDED BY CPAC EQUIPMENT, INC. TO AVOID POTENTIAL MELTING OR OFF-GASSING OF NON- COMPATIBLE MATERIALS.
▪ To sterilize wrapped cassettes (packs), place them into the instrument tray under the loading and capacity limitations and restrictions noted below for the “Wrapped Cassettes” Cycle. It should be noted that due to the extra mass of the cassettes and air entrapment within their pouches that additional time is necessary to bring the instruments to their “spore inactivation temperature.” This time may vary but is minimally set at 28 minutes. Once this temperature or time has been achieved, the sterilization cycle of12 minutes is initiated.
▪ Instruments in the “Wrapped Cassettes” Cycle will not exceed 375°F (191°C) by the completion of the cycle. In most instances the temperature threshold will not exceed 350°F (177°C).
▪ Place the tray into sterilizer by sliding the tray all the way to the rear of the heating chamber. Close the door ensuring the handle is in the fully closed (vertical) position.
▪ Touch “Start” on keypad, select “Wrapped Cassettes”. Door will lock and sterilization cycle will initiate once the chamber has reached 375°F (191°C).
▪ At the end of the cycle, a beep will sound and “CYCLE COMPLETE” will appear on the keypad. The door will unlock for instrument removal.
▪ Immediately after opening the door, use heat-resistant gloves to slide the tray out of the chamber. The tray containing the sterilized instruments will remain hot-to-the-touch for approximately 10-15 minutes. Shut sterilizer door and turn handle to the vertical closed position to retain temperature in the sterilizer chamber.
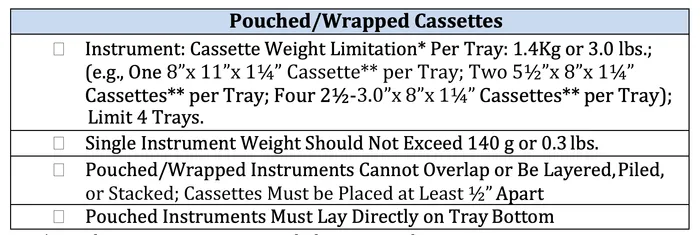
High-Temperature Cycle (375°F) – Detailed Cycle Operation
IMPORTANT NOTE PREHEAT STERILIZER CHAMBER BEFORE RUNNING FIRST STERILIZATION CYCLE OF THE DAY. ALSO CHECK TO VERIFY THE “TIME AND DAY” SETTINGS ARE ACCURATE TO ENSURE STORED CYCLE DOCUMENTATION IS PROPERLY TIME-STAMPED.
Once the sterilizer has been preheated to its operation temperature, the RH-Pro9/RH-Pro11 is now ready for instrument sterilization at 375°F and instrument trays may now be loaded into the chamber. Ensure all pouches used are heat-resistant nylon pouches. Close and lock door. Ensure “Time and Date” setting is correct. If not, press “Menu” button and select “Time and Date”.
Note: Cycle button will revert temperature setting back to main cycle selection screen if desiring a Low-Temperature cycle or the N95 mask decontamination setting. If no immediate use of the sterilizer is planned, it is best to keep the door closed and in locked position to minimize temperature loss to the sterilization chamber. The blower and heater will shut down upon completion of each cycle.
Sequence for Starting Sterilization Cycle After Reboot:


Sequence for Starting Sterilization Cycle from either the “CYCLE COMPLETE”, “PREHEATING” OR “READY” screens:
(1) No Use of Logger – Select “No”:
 OR
(2) Use of Logger – Insert Logger: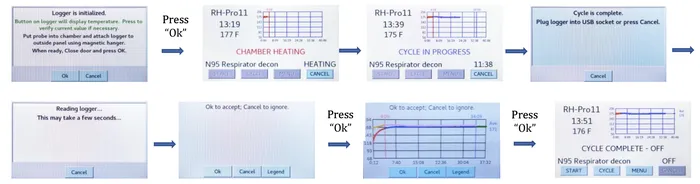
The countdown timer is initiated at the start of the sterilization cycle with “Unwrapped instruments”, “Wrapped instruments”, “Handpiece instruments”, “Wrapped cassettes” (cycles of 6, 12, 8, and 12 minutes, respectively once chamber temperature has reached 375°F). At the end of the sterilization cycle, the screen displays “CYCLE COMPLETE -OFF” with audible notification and the door is unlocked to be opened manually for instrument tray removal. The heater and blower are also turned off, allowing the chamber to slowly cool if the door remains closed.
It should be noted that the temperature reading on the display screen is that of the sterilization chamber at the air exhaust port. This temperature reading is the most indicative of the instrument heating process. As air is heated to 375°F (191°C) by the heaters located in the upper and lower plenums, the air will lose temperature to the instruments as they heat up.
The cooling of the chamber is reflective of the “Pre-Heating” process status and is monitored by the thermocouple at the air exhaust port. As the instruments gain heat, they demand less heat from high- velocity air and the temperature of the chamber air gradually increases. At a set-maintained temperature the data from the thermocouple initiates the selected pre-set sterilization cycle. This temperature is slightly below 375°F (191°C).
Readings slightly lower that 375°F (191°C) are not indicative of the sterilization process and should not be a concern to the operator. This air exhaust port thermocouple also supplies temperature readings to the USB memory and to the printer.
Premature Canceling of a Cycle
When a sterilization cycle is in process, the door is in a “Locked” position and cannot be opened unless “CANCEL” is pressed. Pressing “CANCEL” results in the following screen sequence:
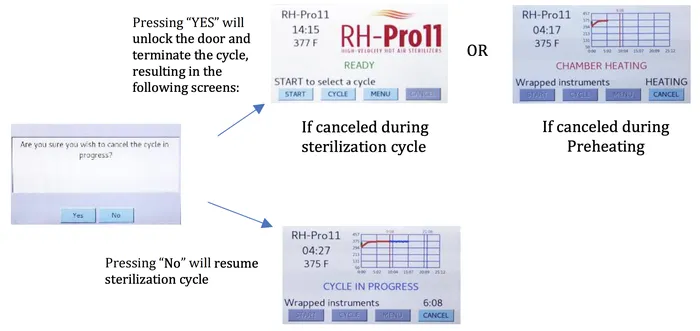
The interruption of the sterilization cycle is noted in memory. A new sterilization cycle can be initiated by pressing “START” on the “READY” display.
Turning Off the RH-Pro11/RH-Pro9 Sterilizer
At the completion of sterilization activities, the sterilizer may be shut down by pressing the On/Standby button and holding it for approximately 7-8 seconds until the screen goes dark and the blue LED in the On/Standby button is illuminated.
Low-Temperature Cycle Operation
It is the operator’s responsibility to validate all Low-Temperature Cycles to Verify that the Time-Temperature Parameters Result in a Full 12 – Log10 Spore Kill.
High-Velocity Hot Air Sterilization Principles
- The RH-Pro9/RH-Pro11 sterilizer utilizes dry, rapidly flowing air to sterilize instruments. This process is both a heat conduction and heat convection process and requires that all instruments be directly subjected to the hot, high velocity moving air. In the RH-Pro9/RH-Pro11sterilizer, airflow moves constantly through the instrument tray from the left to right of the sterilizer chamber.
- Airflow can be restricted by the misplacement of instruments and packaging, which may interfere with the performance of the sterilizer.
- The three sterilization cycles offered are each unique in their cycle lengths owing to the time necessary for instrument preheating and the different times necessary to inactivate 12 Log10 spores at each offered temperature.
- Operator validation of the Low-Temperature settings is required to assure that for the operator’s specific conditions the requirement to inactivate 12 Log10 spores is met (protocols are provided by CPAC Equipment to assist the operator in validation compliance).
- Adherence to these limitations and restrictions is requiredfor assuring performance specifications.
- As with any sterilization technology, it is imperative that all instruments be clean, dry, and free of any organic or chemicalresidues.
- Only those instruments and pouches that have been demonstrated tobe compatible with temperatures of 280°F through 320°F can be sterilized in the RH-Pro9/RH-Pro11 sterilizer.
Pre-set Sterilization Cycles
The RH-Pro9/RH-Pro11sterilizer is equipped with three pre-programmed sterilization cycles, each representing the time required to achieve a 6-Log reduction of bacterial spores plus a Sterility Assurance Level (SAL) of 6 Logs for:
- 280°F
- 300°F
- 320°F
Note: The conditions presented below for the three LowTemperature settings have been derived from thermocouple and biological efficacy studies to assure the sterility performance of the sterilizer. It is the responsibility of the operator to adhere to the conditions set below under each cycle setting and to validate that these conditions meet the 12 Log10 spore inactivation requirement. Any deviation in the pre-set times, sterilization temperature, maximum instrument weights per tray or per instrument, or load configuration may jeopardize the efficiency of treatment.
Wrapped Instrument Sterilization
▪ To sterilize pouched handpieces or pouched instruments, place them into the instrument tray under the loading andcapacity limitations and restrictions noted below for “Wrapped Instruments” and Wrapped Handpieces.”
▪ Instruments in the Low-Temperature cycle willnot exceed the designated Low-Temperature settings by more than 2-3 degrees during the cycle.
▪ Place the tray into sterilizer by sliding the tray all the way to the rear of the heating chamber. Close the door ensuring the handle is in the fully closed (vertical) position.
▪ At the end of the cycle, a beep will sound and “CYCLE COMPLETE” will appear on the keypad. The door will unlockfor instrument removal.
▪ Immediately after opening the door, use heat-resistant gloves to slide the tray out of the chamber. The tray containing the sterilized instruments will remain hot-to-the-touch for approximately 10-15 minutes.
▪ Shut sterilizer door and turn handle to the vertical closed position to retain temperature in the sterilizer chamber
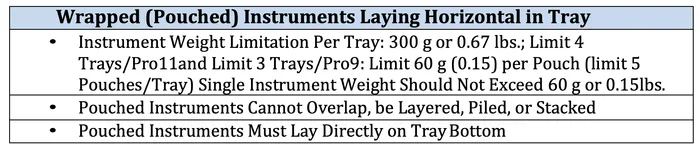
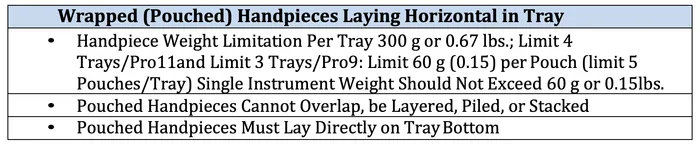
Low-Temperature Cycle – Detailed Cycle Operation
IMPORTANT NOTE PREHEAT STERILIZER CHAMBER BEFORE RUNNING FIRST STERILIZATION CYCLE OF THE DAY. ALSO CHECK TO VERIFY THAT THE “TIME AND DAY” SETTINGS ARE ACCURATE TO ENSURE THAT STORED CYCLE DOCUMENTATION IS PROPERLY TIME-STAMPED.
Once the sterilizer has been preheated to its operation temperature, the RH-Pro9/RH-Pro11 is now ready for instrument sterilization and instrument trays may now be loaded into the chamber. Autoclavable pouches may be used for all Low-Temperature settings, but pre-test them to ensure temperature compatibility. Any chemical indicators printed on these pouches are not appropriate for these three settings and should be disregarded. Use the CIR Thermo-sensor as a substitute for chemical indicators/integrators. Close and lock door. Ensure that “Time and Date” setting is correct. If not, press “Menu” button and select “Time and Date”.
Note: Cycle button will revert temperature setting back to main cycle selection screen if desiring another Low-Temperature cycle, the 375°F cycle, or the N95 mask decontamination setting. If no immediate use of the sterilizer is planned, it is best to keep the door closed and in locked position to minimize temperature loss to the sterilization chamber. The blower and heater will shut down upon completion of each cycle.
Sequence for Starting Sterilization Cycle After Reboot:
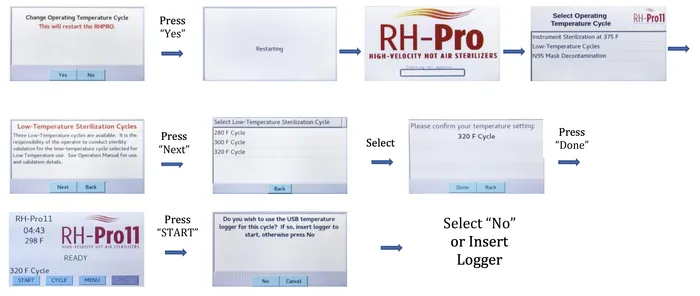
Sequence for Starting Sterilization Cycle from either the “CYCLE COMPLETE”, “PREHEATING” OR “READY” screens:

No Use of Logger – Select “No”:

OR
Use of Logger – Insert Logger:
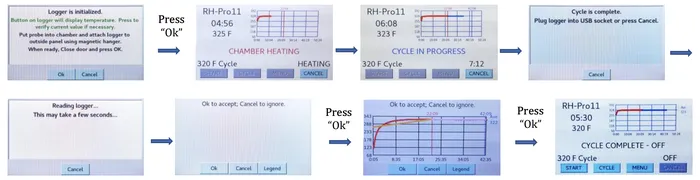
The countdown timer is initiated at the start of the sterilization cycle once chamber temperature has reached temperature. At the end of the sterilization cycle, the screen displays “CYCLE COMPLETE -OFF” with audible notification and the door is unlocked to be opened manually for instrument tray removal. The heater and blower are also turned off, allowing the chamber to slowly cool if the door remains closed.
Premature Canceling of a Cycle
When a sterilization cycle is in process, the door is in a “Locked” position and cannot be opened unless “CANCEL” is pressed. Pressing “CANCEL” results in the following screen sequence:
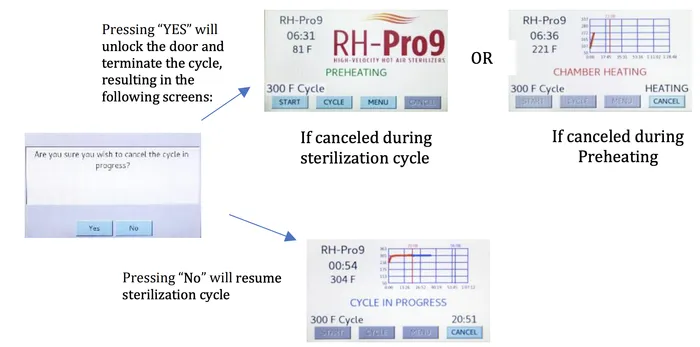
The interruption of the sterilization cycle is noted in memory. A new sterilization cycle can be initiated by pressing “START” on the “READY” display.
Turning Off the RH-Pro11/RH-Pro9 Sterilizer
At the completion of sterilization activities, the sterilizer may be shut down by pressing the On/Standby button and holding it for about 7-8 seconds until the screen goes dark and the blue LED in the On/Standby button is illuminated.
N95 Respirator Decontamination Operation
The RH-N95 is for the decontamination of N95 masks ONLY that are not heat sensitive and that can withstand decontamination at temperatures of 167°F (75°C). Never use the RH-N95 for processing liquids, chemicals or radioactive materials.
IMPORTANT NOTICE–PLEASE READ CAREFULLY AND COMPLETELY
IMPORTANT – The RH-Pro11/RH-Pro9 is intended for the bioburden reduction of compatible N95 respirators as provided under applicable FDA guidelines. As of June 30, 2021, Emergency Use Authorization (EUA) previously granted by FDA has been rescinded. The N95 Cycle available on RH-Pro11/RH-Pro9 Sterilizers therefore cannot be used for N95 Respirator decontamination or for bioburden reduction until that time FDA issues another EUA deemed necessary to meet N95 Respirator need requirements. Please note that CPAC Equipment, Inc. bears no responsibility for the operator’s or the owner ‘s actions regarding N95 cycle use during periods of FDA non-authorization. Any use of the RH-Pro9 or RH-Pro11 sterilizer’s N95 cycle for decontamination of N95 masks sterilizer becomes the responsibility of the operator and the owner of that equipment.
The RH-Pro11/RH-Pro9 employs High-Velocity Hot Air (HVHA) to decontaminate N95 masks, using fluidized hot, dry air to transfer dry heat energy to N95 masks by a combination of convection and conductive processes. Conventional practices necessary for steam sterilization do not apply to HVHA technology and in many instances are contrary to HVHA protocols provided in this user manual. The N95 edition of RH-Pro series of this technology has been designed to address the critical shortage of N95 masks in healthcare during the Covid-19 pandemic.
This unit has one dedicated “N95 Mask” cycle that incorporates the time and temperature parameters that provide the conditions necessary (1) to destroy coronavirus and Mycobacterium and (2) to maintain the performance of the mask for breathability and microbial filtration. There are many manufacturers and variations of N95 masks. Initial testing on material compatibility has been performed on only a limited number of N95 masks to date. All masks use polyester and polypropylene nonwoven fabrics as filtration material which are compatible with our dry heat process.
Other materials may not be compatible and should be checked before and after mask reprocessing. Such incompatibilities may be found in the elastic bands, foam nose fittings, and adhesives. Although internal testing by CPAC Equipment has indicated a mask can be re-processed at least 10 times, the number or recycles can also be limited to use and wear conditions.
Before using a reprocessed mask, check elasticity, adhesive connections, form fit to nose and face to ensure proper and secure fit. Please read this manual carefully, paying particular attention to the requirements for loading capacities, load configurations, and other restrictions of the RH-Pro11/RHPro9. Failure to follow the operating instructions in this manual may result in damage to the unit, user injury, or reduction in microbial killing efficacy. Following these instructions will result in a worry-free decontamination process.
Cautions
▪ During operation, the exterior surface of the RH-N95 remains comfortable to the touch; however, the tray will be hot. Use only the provided heat-resistant gloves for removing the tray. The RHPro11/RH-Pro9 is designed for use only with N95 respirators. There are many different brands and mask types that are designated N95. CPAC is doing its best to test compatibilities of these masks, but unfortunately not all have received performance testing. Many plastics (e.g., nylon, polyester), and silicone rubber products can be used in this moderate temperature environment, but extreme care should be used in decontaminating N95 masks until compatibility has been confirmed by the manufacturer.
Temperature Safety Features
The temperature in the RH-Pro11/RH-Pro9 sterilizer is controlled by computer logic, which is programmed to maintain uniform temperature throughout the processing chamber. The temperature control maintains a uniform exhaust temperature of 180°F (82°C) as indicated on the keypad display with a variability of +/- 1°F. The actual temperature as indicated on the CIR Thermo-sensor (logger) probe placed on the tray at site of mask placement will read 176°F (80°C). The logger serves to replace the use of a chemical indicator by directly recording time and temperature at site of decontamination.
The door cannot be opened during a processing cycle without the operator pressing “Cancel” on the keypad. Any interruption in processing cycle will result in a cycle interruption error and notification which will be documented in memory.
General Guidelines for N95 Mask Loading
The RH-Pro9/RH-Pro11 sterilizer utilizes dry, rapidly flowing air to decontaminate respirators. This process is both a heat conduction and heat convection process and requires that all respirators be directly subjected to the hot, high velocity moving air. In the RH-Pro9/RHPro11 sterilizer, airflow moves constantly across the tray from the left to right of the sterilizer chamber.
▪ Airflow can be restricted by the misplacement of N95 respirators, which may interfere with the performance of the unit.
▪ For high-velocity hot air (HVHA™) RH-Pro11/RH-Pro9 operating at 176°F, most of the N95 mask/respirator filtration materials are thermally tolerant at this operating temperature along with elastic, adhesive and nose foam materials.
▪ Use trays provided with the RH-Pro11/RH-Pro9 that have been designed to provide required hot airflow from all directions to N95 masks/ respirators.
▪ Masks should be placed individually into sandwich bags.
▪ Bagged masks/respirators are to be placed flat on the tray.
▪ Masks must fit within the tray.
▪ Trays must be fully inserted into the treatment chamber to assure full airflow to the masks.
Pre-set N95 Cycle
The RH-Pro11/RH-Pro9 is equipped with a pre-programmed decontamination cycle, representing the time and temperature required to achieve a 6-Log reduction of coronavirus and Mycobacteria according to peer-reviewed studies. This cycle is set with a 4-minute warm-up period followed by a 30-minute decontamination cycle at 176°F (75°C) (temperature at site of masks as measured by the CIR thermal sensor logger). Chamber temperature will display a temperature of 180 +/- 1°F on the touch pad which is being measured by a thermocouple located at the chamber’s exhaust port.
N95 Cycle – Capacity Restrictions, Limitations, Loading
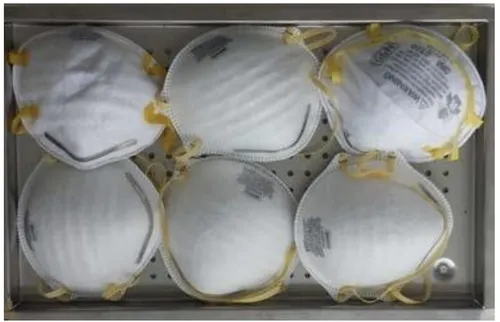
The N95 cycle has been designed to operate at 180°F (82°C) with a decontamination cycle time of 30 minutes plus 4-minute warm-up (total of 34 minutes per processing). Up to four trays can be processed per cycle under the following configuration (2 x 3) as shown in a 6 mask per tray configuration:
Operation of the N95 Respirator Decontamination Cycle The On/Standby button will show an illuminated blue LED when electric power is present and the RH-N95 is in its “standby” mode. With the door open or closed, press the On/Standby button to activate the unit. The blue LED in the On/Standby button will go dark after being pressed.
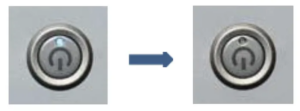
Allowing about 12-15 seconds after pressing the On/Standby button will result in the following screen sequence which initiates “Start-of-Day” Preheating:

IMPORTANT NOTE
PREHEAT STERILIZER CHAMBER BEFORE RUNNING FIRST STERILIZATION CYCLE OF THE DAY. ALSO CHECK TO ENSURE THAT THE “TIME AND DAY” SETTINGS ARE ACCURATE TO ENSURE THAT STORED CYCLE DOCUMENTATION IS PROPERLY TIME-STAMPED.
Start-of-Day” Preheating
At the start of the day the RH-Pro11/RH-Pro9 will require time to pre-heat the internal metal and insular components that serve as a heat sink to the heated air of the system. The “Start-of-Day” pre-heating process includes the heating of the chamber to 180°F when “N95 Mask Decontamination” is selected. Note that if any other higher temperature cycles have previously been run, the chamber will be, in all likelihood, above the high-temperature threshold for mask decontamination and the following screen will appear:
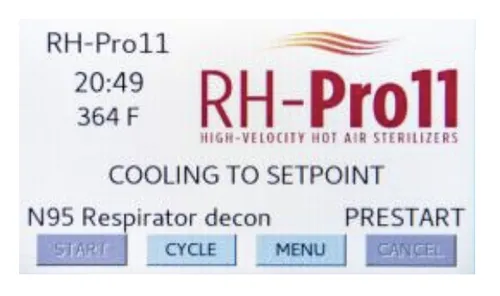
To remedy this condition, open the chamber door to expedite chamber cooling to a temperature below 180°F.
Follow the protocols outlined for “Start-of-the-Day” preheating procedures. This process includes the preheating of the trays that will subsequently hold the N95 masks requiring decontamination. Place empty trays into chamber; Close and turn handle counterclockwise to full vertical position; and press “START” Once the sterilizer has been preheated to its operation temperature, the RHPro9/RH-Pro11 is now ready for N95 mask sterilization and masks may now be placed onto the preheated trays for processing. Close and lock door. Ensure that “Time and Date” setting is correct. If not, press “Menu” button and select “Time and Date”.
If no immediate use of the sterilizer is planned, it is best to keep the door closed and in locked position to minimize temperature loss to the sterilization chamber. The blower and heater will shut down upon completion of each cycle.
N95 Respirator Decontamination Sequences
Sequence for Starting Sterilization Cycle After Reboot:
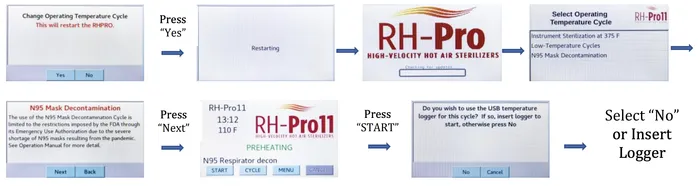
Sequence for Starting Sterilization Cycle from either the “CYCLE COMPLETE”, “PREHEATING” OR “READY” screens:
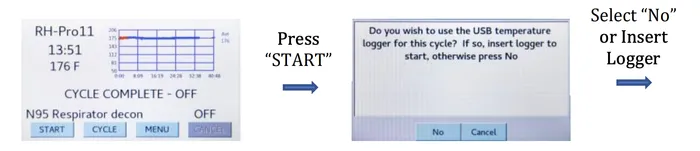
No Use of Logger – Select “No”:

OR
Use of Logger – Insert Logger:
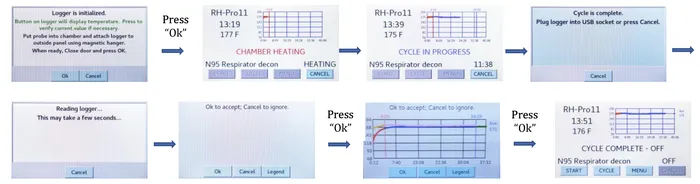
Upon completion of the cycle or for later retrieval of the time-temperature cycle log for both the internal thermocouple and the CIR Thermo-sensor, refer to Section 6.6.4 for detailed instructions.
Premature Canceling of a Cycle
When a sterilization cycle is in process, the door is in a “Locked” position and cannot be opened unless “CANCEL” is pressed. Pressing “CANCEL” results in the following screen sequence:
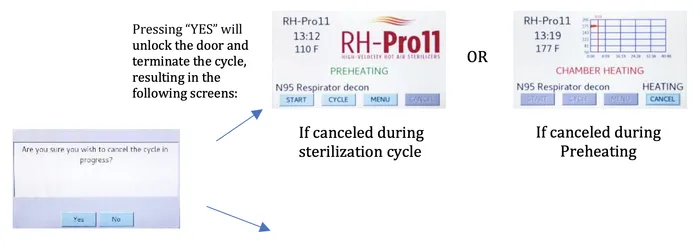
The interruption of the sterilization cycle is noted in memory. A new sterilization cycle can be initiated by pressing “START” on the “READY” display.
Turning Off the RH-Pro11/RH-Pro9 Sterilizer
At the completion of sterilization activities, the sterilizer may be shut down by pressing the On/Standby button and holding it for about 7-8 seconds until the screen goes dark and the blue LED in the On/Standby button is illuminated.
Menu Set-Up
To set “Date and Time”, “Update Software”, “Reset to Factory Settings” Export Cycle Files, or reconfigure several internal settings, press “MENU” from active “READY” or “PREHEATING screens to display “SELECT ITEM, then press desired category. For viewing all “CONFIGURATION” files, a scrolling menu is displayed. The scroll bar on far right of screen will allow advancement through the entirety of the screen as depicted:
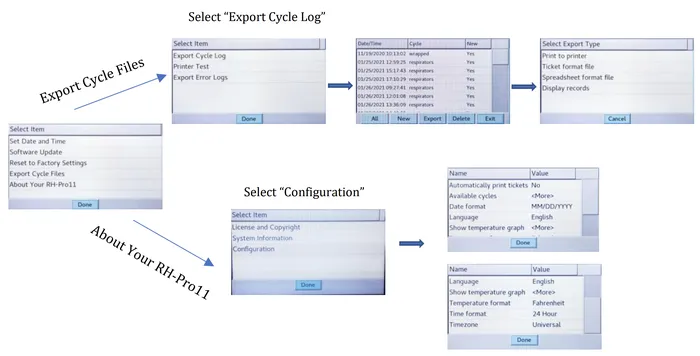
Five “MENU” screens and eight Configuration screen formats/ operational parameters are presented of which the operator may make changes. Note that none of these operator configurations will affect treatment times and temperatures required of the decontamination process. Press the desired category and follow instructions on the screen for attribute selection. If no more changes are to be made, press “DONE” to return to “READY” or main screen.
Setting Time and Date
The RH-Pro11/RH-Pro9 has as an option in the selection of a time zone. However, it is important to set the time zone before you set the time as setting the time zone may alter the time previously selected (i.e., if the device were displaying Pacific time of 05:00 pm, setting the time zone to Eastern time would change the displayed time to 08:00 pm). If you set the time prior to setting the time zone, you may likely need to re–set the time. From the Main Screen touch “Menu” then select and touch “Set Time and Date” to display a screen that allows a date and time to be set. Depending on the “Time Format” selected (within “Menu” under “Configuration above), time can be expressed as 24—hour clock or as AM/PM. Once a date and time has been selected, touch “OK“ to set.
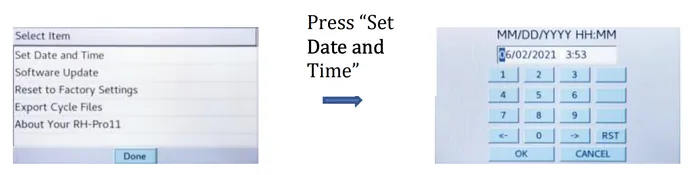
Or a 24-hour clock:
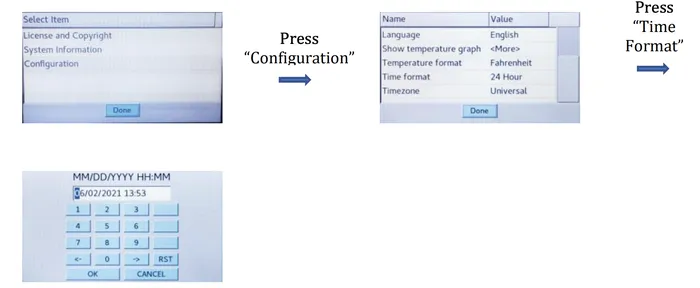
A time zone may be selected, but as an optional feature. From the Main Screen touch “Menu” then select and press “Configuration” and touch “Time Zone”, selecting and touching the appropriate area of the world to locate the nearest city within your designated time zone. The feature does not allow an automatic time-change during Standard time to Daylight time and reverse. Once selected touch “Back” or “Done” on each successive screen to return to the Main Menu.

Placing Time-Temperature Graph on Display Screen During Cycle
The RH-Pro11/RH-Pro9 features an optional display graphic depicting the time—temperature of the treatment chamber during the decontamination cycle to aid as an assurance that the unit is operating at specification and to provide a visual aid as to the progress of the process. This graph depicts the progress in red during 8-minute “Chamber Heating” and in blue during a 6-minute “Cycle in Progress” (Unwrapped Cycle) as depicted below:

This option if not already pre—set may be accessed by pressing “MENU” from “READY” or “PREHEAT” screens to display “SELECT ITEM, then press “About Your RH-Pro11” to access the “CONFIGURATION” screen as shown:
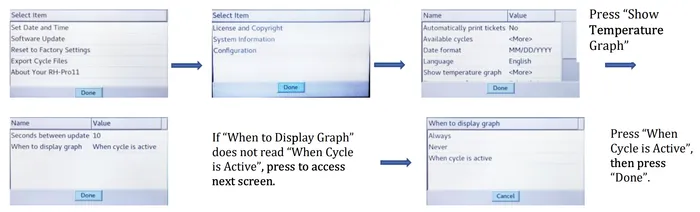
Screens then will be displayed in reverse order by pressing “DONE” until return to “READY” or “PREHEAT” screens. Upon reaching “Chamber Heating” in next decontamination process, the time-temperature graph will appear through the duration of the treatment process.
Software Transfer Via USB Port
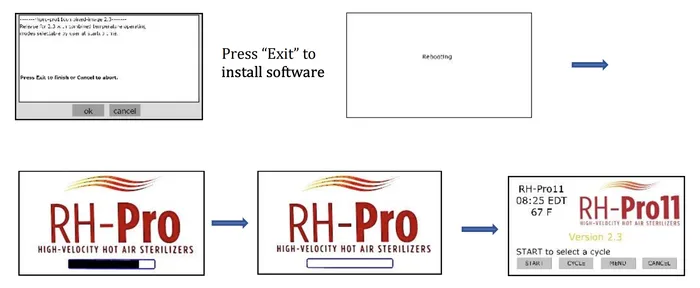
Software is occasionally updated by CPAC Equipment, Inc. (CEI) via email containing a downloadable file labeled “Update.zip” to a USB flash drive via your computer. This file is a compressed “zip” file which can be downloaded to via either MAC or Windows systems. Do not “unzip”. If the flash drive has been used previously for updates, remove any previous file before uploading new file.
The RH-Pro11/RH-Pro9 will not recognize differences between the old and new update files. Follow instructions contained in the email. Once the “Update.zip” file is loaded onto the flash drive from your computer. The flash drive may be inserted into the RH—Pro11/RH-Pro9 USB port at any time other than during the running of a sterilization cycle. Once inserted the screen will display “Flash Drive Ready”.
Press “MENU” from “READY” or “PREHEAT” screens to display “SELECT ITEM” screen as sequenced below:

Press “SOFTWARE UPDATE” and the following typical automatic sequence is initiated:
 Downloading Cycle Data to Flash Drive
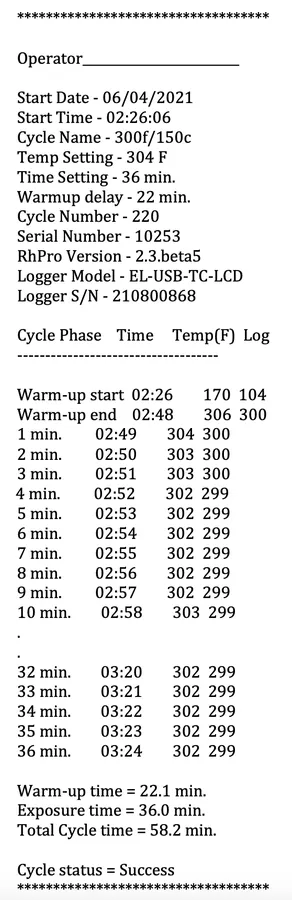
The RH-Pro11 internally stores time-temperature data from the internal thermal sensor. This data can be retrieved by loading onto a flash drive for off-site electronic storage or for hard copy documentation. Two standard formats are available for downloading these records: “Ticket Format File” and “Spreadsheet Format File.” Of these two, the Ticket Format File” provides the most easily read format. See below for an example. The “Spreadsheet Format File” will print as an Excel spreadsheet. “Display Records” allows the graphical representation of individual cycle data on the RH-Pro11/RH-Pro9 screen. (See below).
Stored data is loaded to a flash drive via the following screen sequence:

Press “Export Cycle Logs” to select which cycles to be saved to the flash drive as sequenced:

Pressing “Display records” will graphically display selected sterilization cycle for both the internal sterilizer thermocouple and CIR Thermo-sensor. This display cannot be transferred to the flash drive at this time.
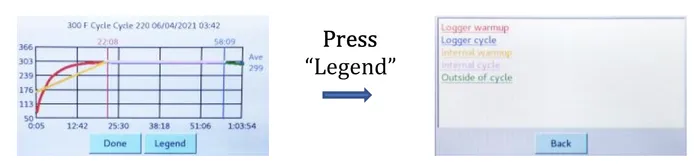
Pressing the selected format (e.g., Ticket format file”) will automatically transfer cycle data to the inserted flash drive as partially shown below.
As always if you have any questions about this process or anything else please feel free to contact us and take advantage of our “FREE TECH SUPPORT.”
We also offer FREE VIRTUAL TECH SUPPORT to “See and Talk” with a “Real Time Live Technician” for any problems you may be in need of help with.
You can also use our “FREE MAINTENANCE PROGRAM”. Take the guesswork and worrying about what unit is due for maintenance and which maintenance cycle it is time for. We will keep track of all your autoclaves and let you know when it’s time for anything.
If you want to read more info on the CPAC RH-Pro9, you can find it on our site here.